
Learn by example: Oracle AI Data Platform Workbench

Oracle AI Data Platform is an Oracle Cloud Infrastructure (OCI) offering. It is an integrated enterprise platform that brings together data engineering, analytics, machine learning, and generative AI in a governed environment. It helps build AI agents and workflows, and operationalize them using data from across your business.
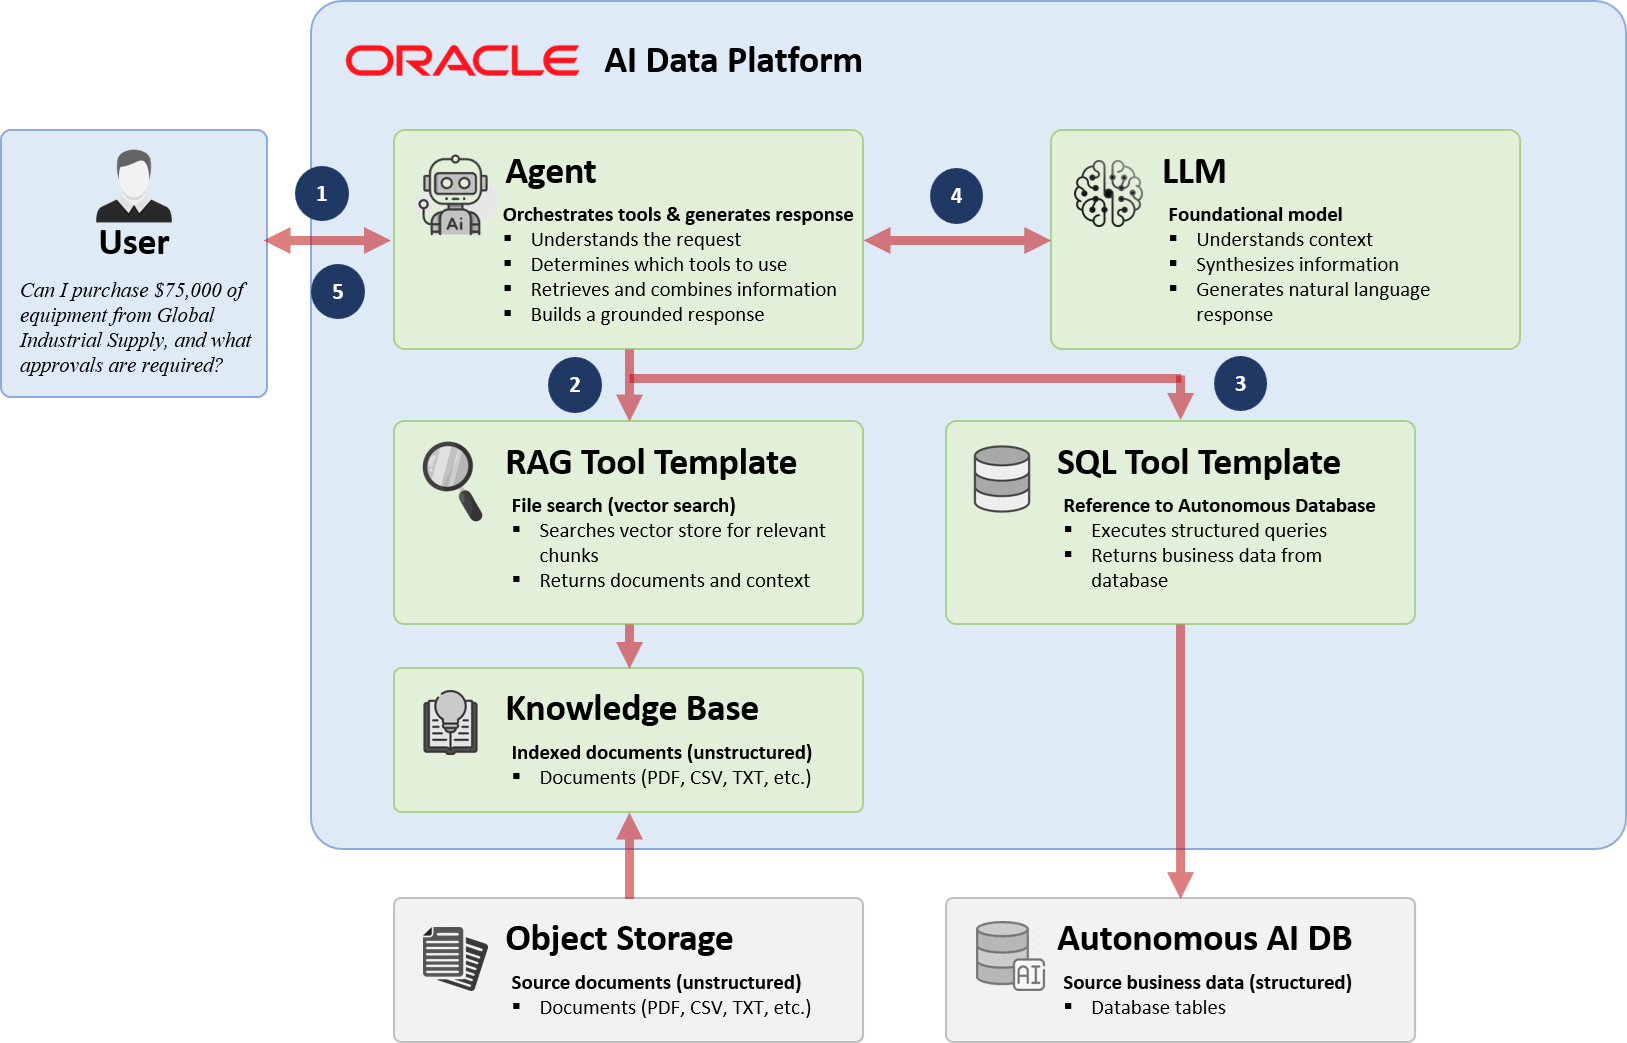
In this rather lengthy post, I walk through setting up the architecture below: (1) a user asks a question; (2) the agent decides whether to pull from an unstructured RAG knowledge base, (3) a SQL data source, or both; (4) the LLM synthesizes the results into (5) a final answer.
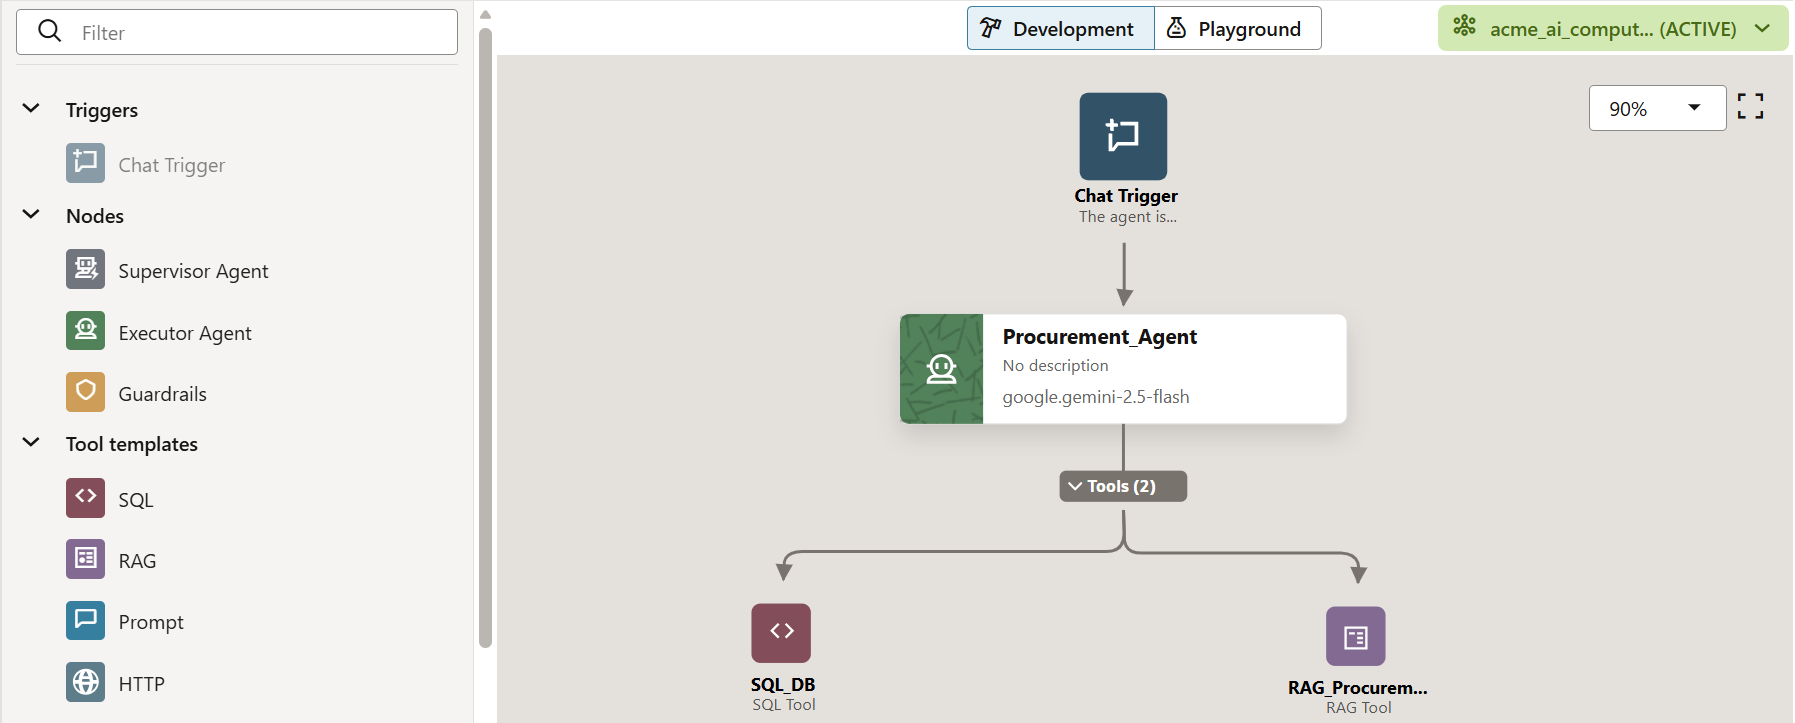
The Oracle AI Data Platform is exactly that, a unified platform that provides the ability to set up, develop, and execute AI agents and workflows. This is how the final version of the agent looks like within in the platform.
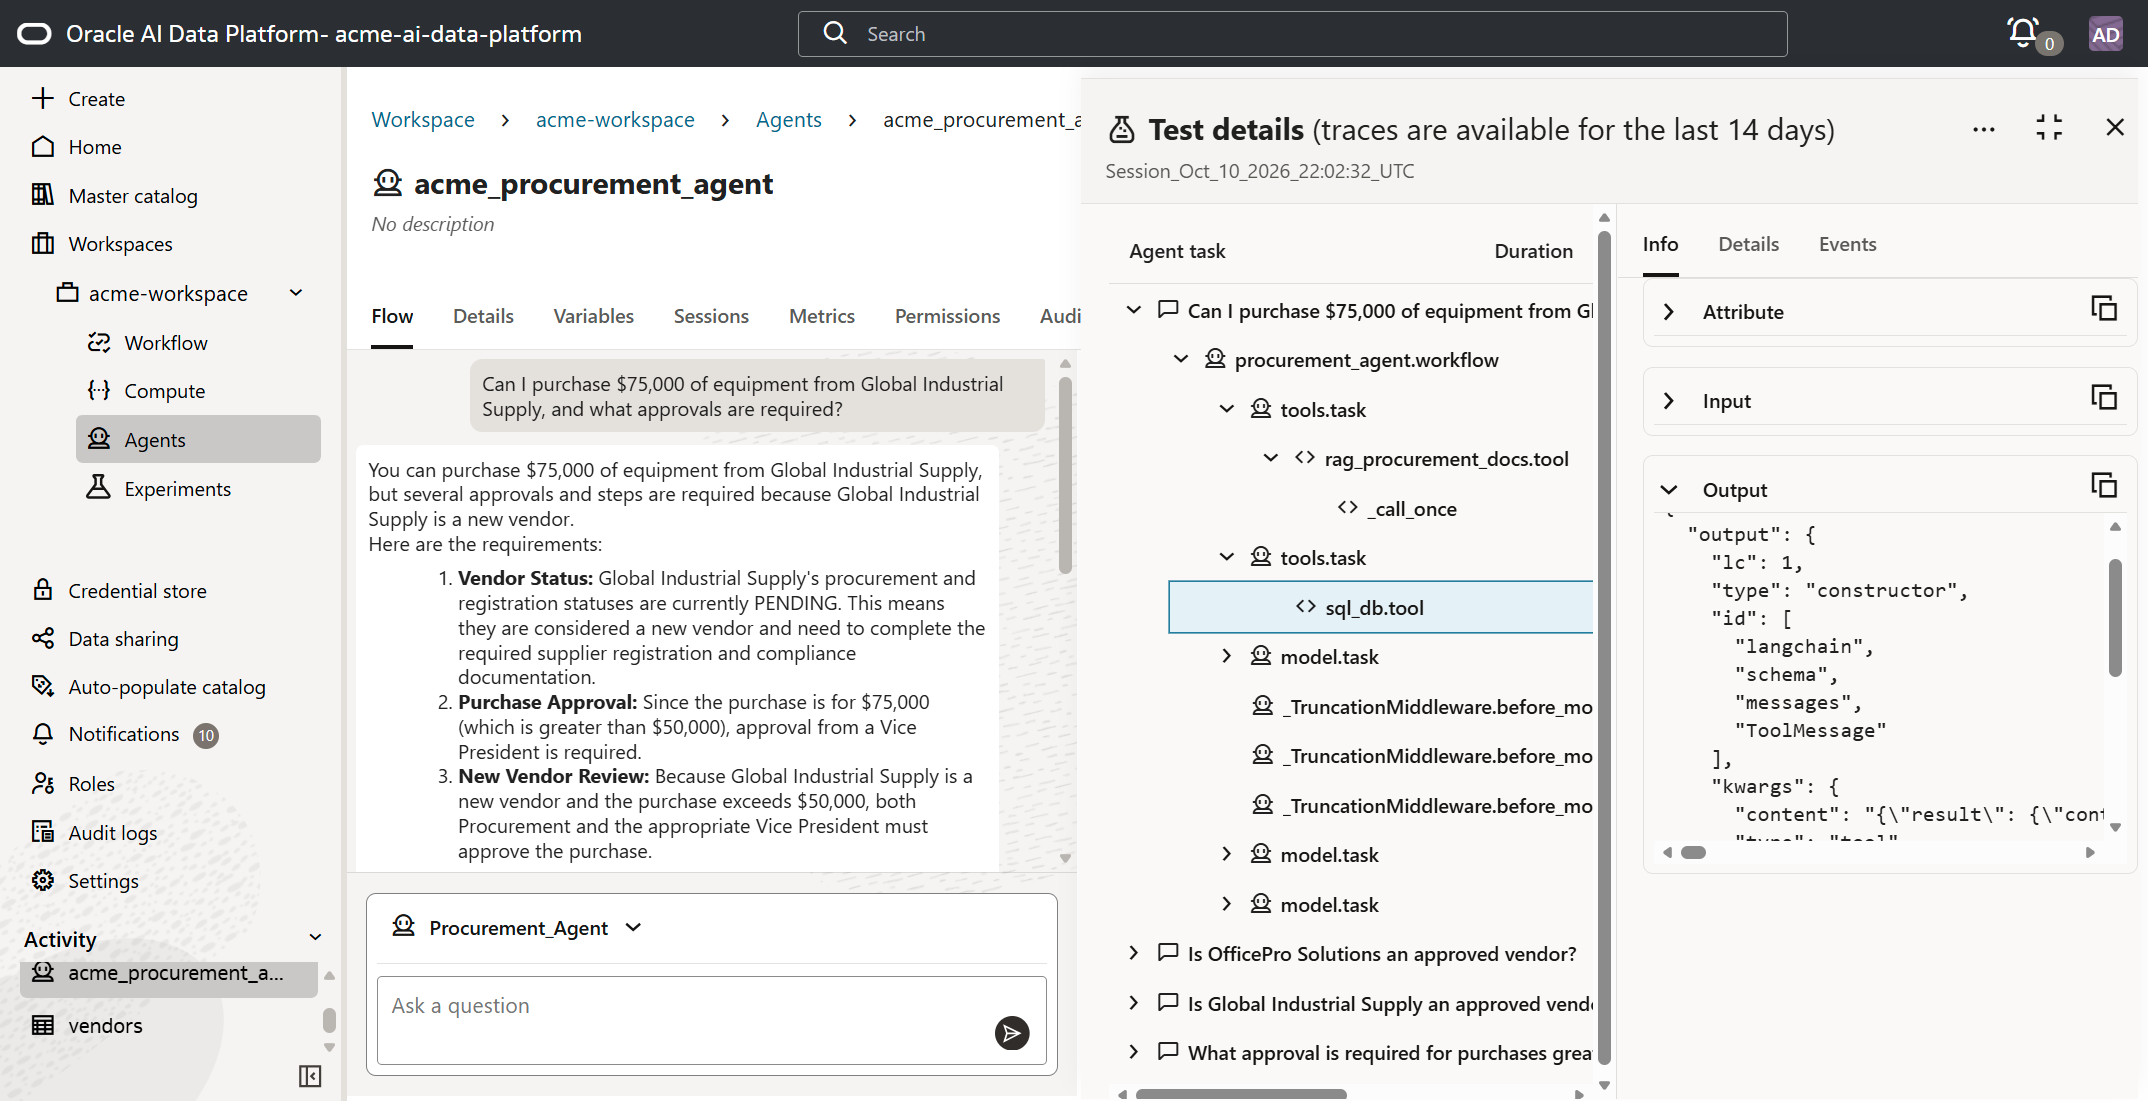
When testing the agent, a chatbot-like experience is typical, with full traceability and inherited access control to the data. The agent can be published as an endpoint allowing integration into your applications.
The remainder of this post describes the full implementation of this use case.
1. Add necessary policy statements
Assume that you have a compartment called Path-Sandbox where this exercise will be performed in. And assume that your user is in a group called Dev_Admins. Based on this, here are the policy statements needed. Your OCI administrator should be able to do this.
These rules are not restrictive in nature and are not recommended in a production environment, though they are isolated to a specific compartment.
allow group 'OracleIdentityCloudService'/'Dev_Admins' to manage ai-data-platforms in compartment Path-Sandbox

allow group 'OracleIdentityCloudService'/'Dev_Admins' to use ai-data-platforms in compartment Path-Sandbox

allow any-user TO {AUTHENTICATION_INSPECT, DOMAIN_INSPECT, DOMAIN_READ, DYNAMIC_GROUP_INSPECT, GROUP_INSPECT, GROUP_MEMBERSHIP_INSPECT, USER_INSPECT, USER_READ} IN TENANCY where all {request.principal.type='aidataplatform'}

allow any-user to manage buckets in tenancy where all { request.principal.id=target.resource.tag.orcl-aidp.governingAidpId, any {request.permission = 'BUCKET_DELETE', request.permission = 'PAR_MANAGE', request.permission = 'RETENTION_RULE_LOCK', request.permission = 'RETENTION_RULE_MANAGE'} }

allow any-user to use generative-ai-family in tenancy where all { request.principal.type='aidataplatform'}

allow any-user to use metrics in tenancy where ALL {request.principal.type='aidataplatform', target.metrics.namespace='oracle_aidataplatform'}

allow any-user to {TAG_NAMESPACE_USE} in tenancy where all {request.principal.type = 'aidataplatform'}

allow any-user to read objectstorage-namespaces in tenancy where all { request.principal.type='aidataplatform', any {request.permission = 'OBJECTSTORAGE_NAMESPACE_READ'}}

allow any-user to manage buckets in tenancy where all { request.principal.type='aidataplatform', any {request.permission = 'BUCKET_CREATE', request.permission = 'BUCKET_INSPECT', request.permission = 'BUCKET_READ', request.permission = 'BUCKET_UPDATE'}}

allow any-user to manage objects in tenancy where all { request.principal.id=target.bucket.system-tag.orcl-aidp.governingAidpId  }

allow any-user to manage log-groups in compartment Path-Sandbox

allow any-user to read log-content in compartment Path-Sandbox

allow group 'OracleIdentityCloudService'/'Dev_Admins' to manage datalake in compartment Path-Sandbox
2. Create a bucket and upload policy documents
I have 5 policy documents in TXT format on my local workstation. Supported formats of these unstructured documents include PDF, DOCX, or TXT. The files used in this exercise here are linked below on the bottom of this post.
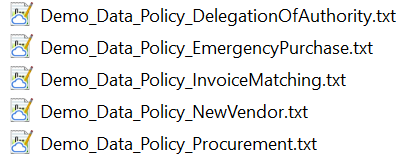
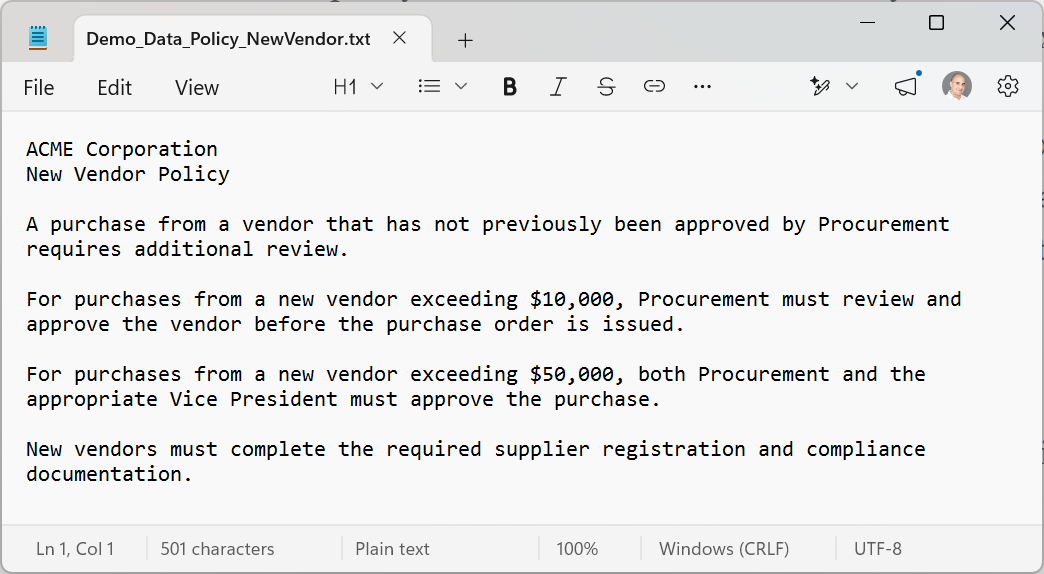
These are simply procurement policy documents, maintained in our hypothetical ACME company. Here is a snippet of one.
What we want to do is to create an object storage (specifically a bucket) to host these documents. This will be the source of our unstructured documents.
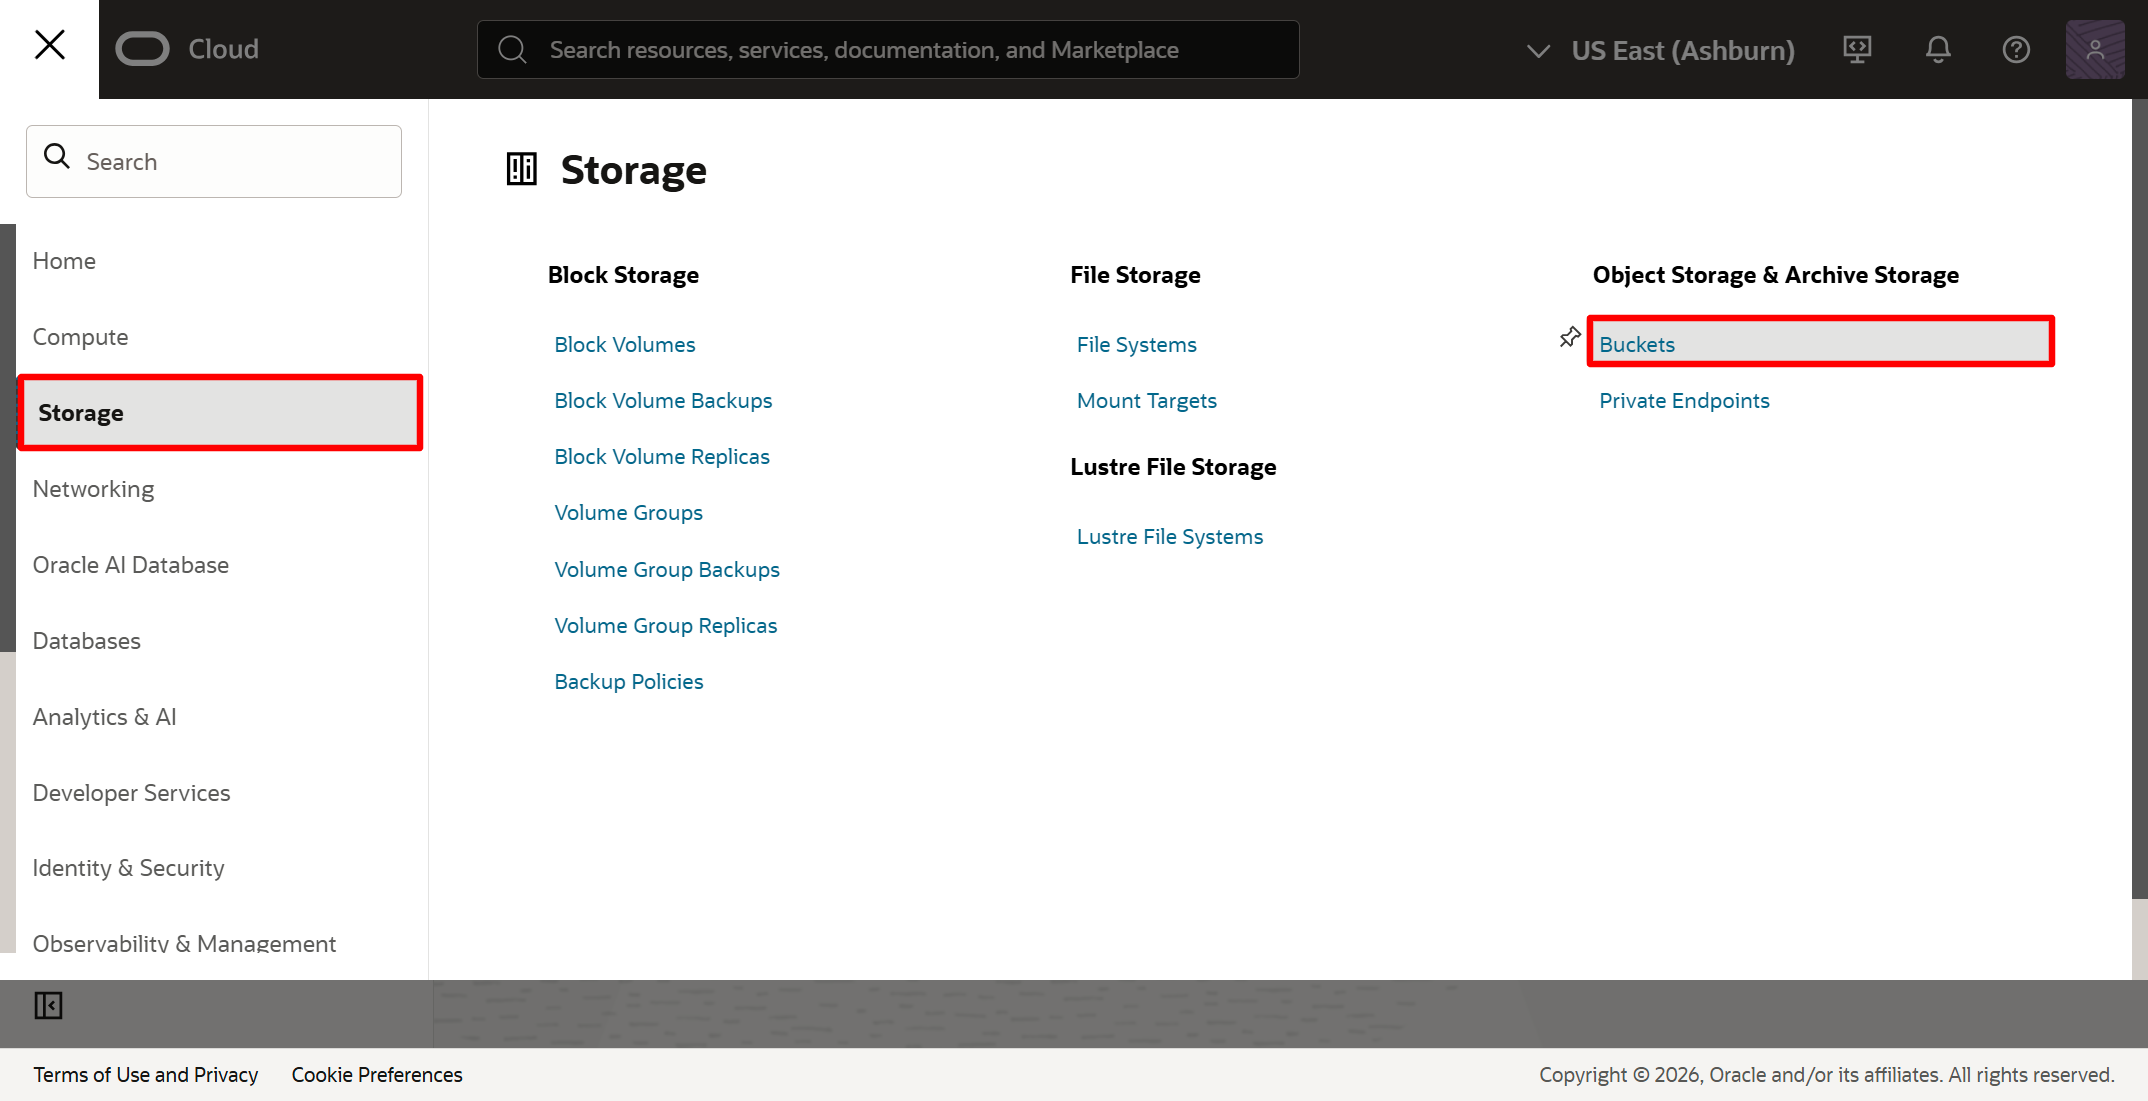
Navigate to Storage then click Buckets.
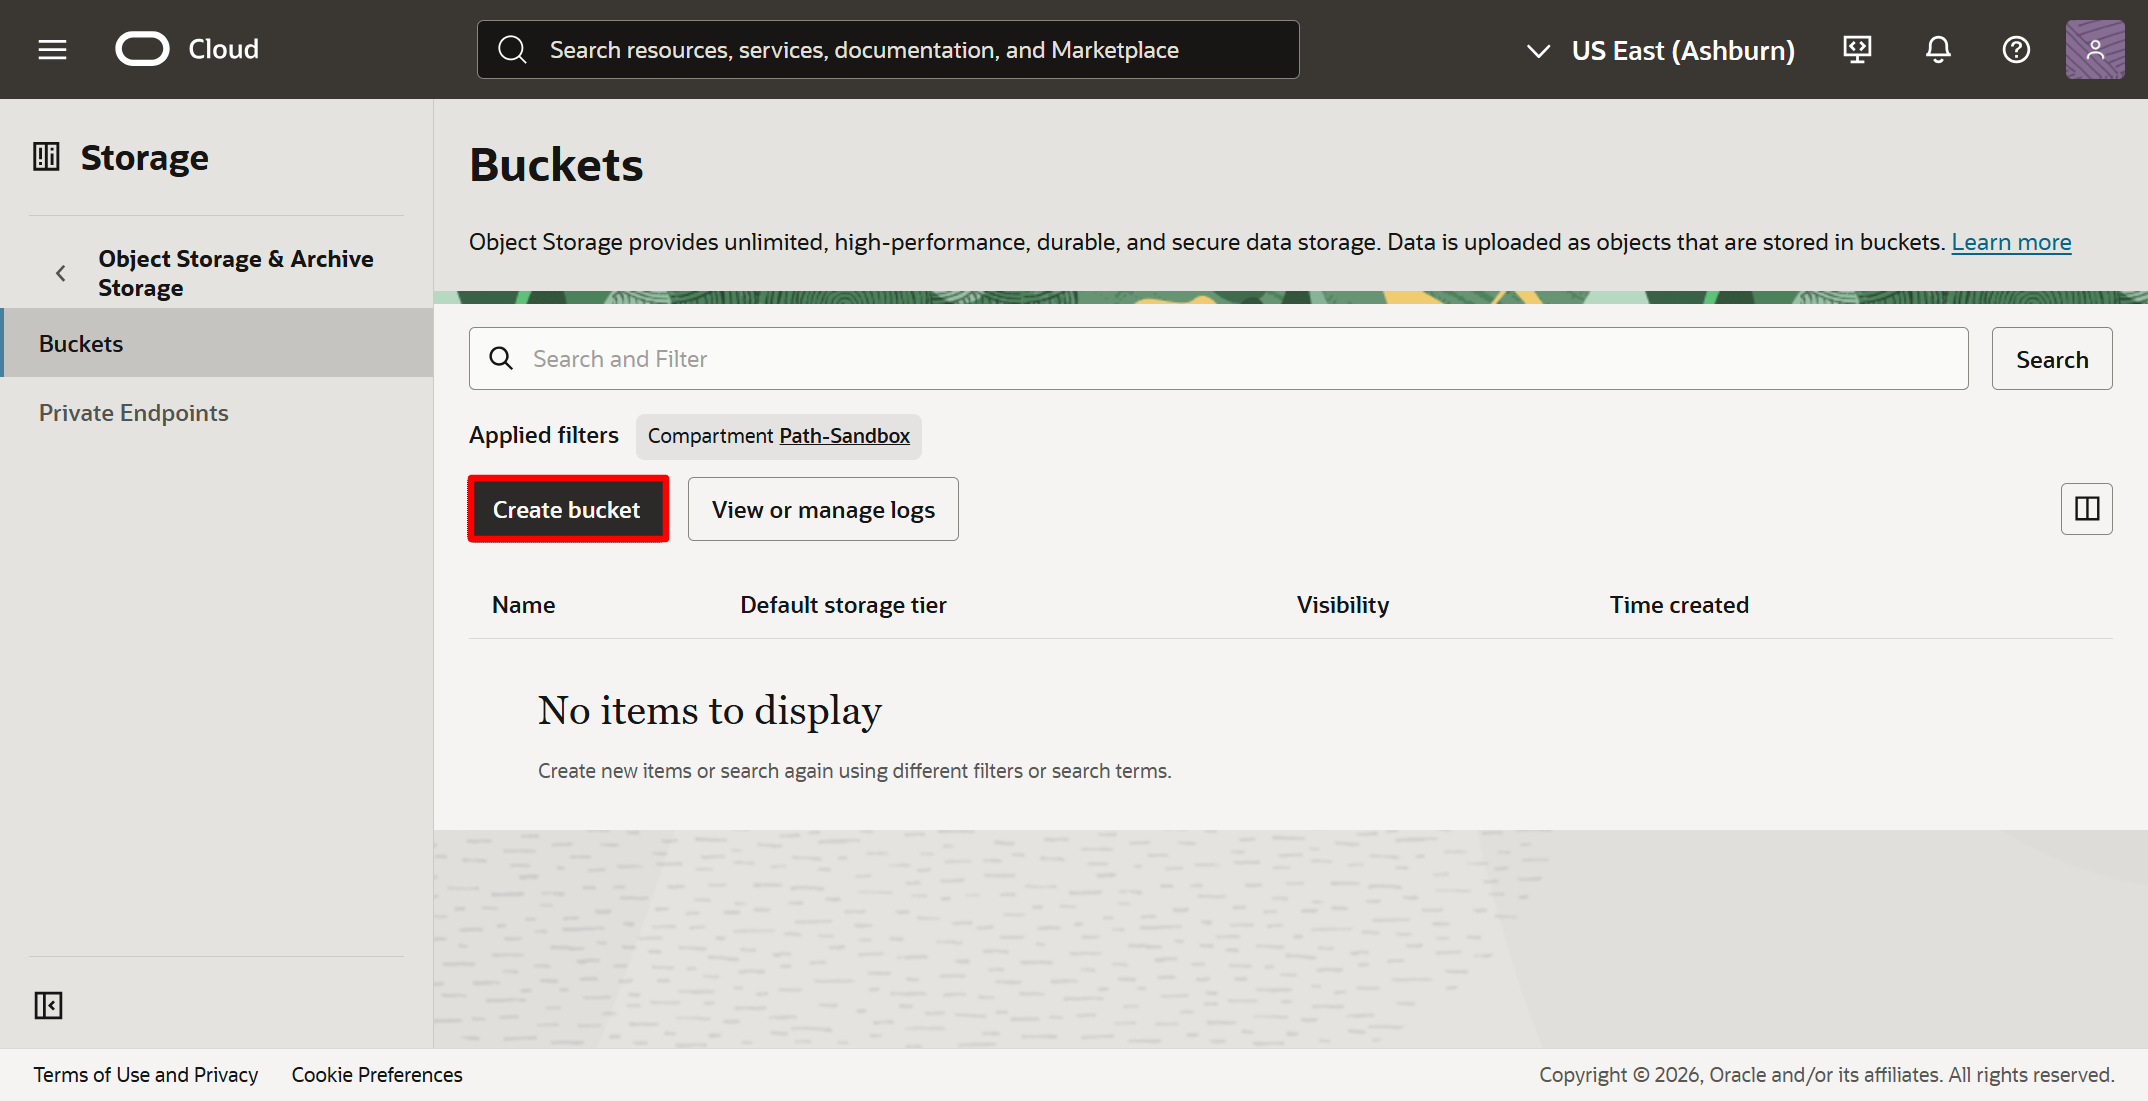
Click on Create bucket.
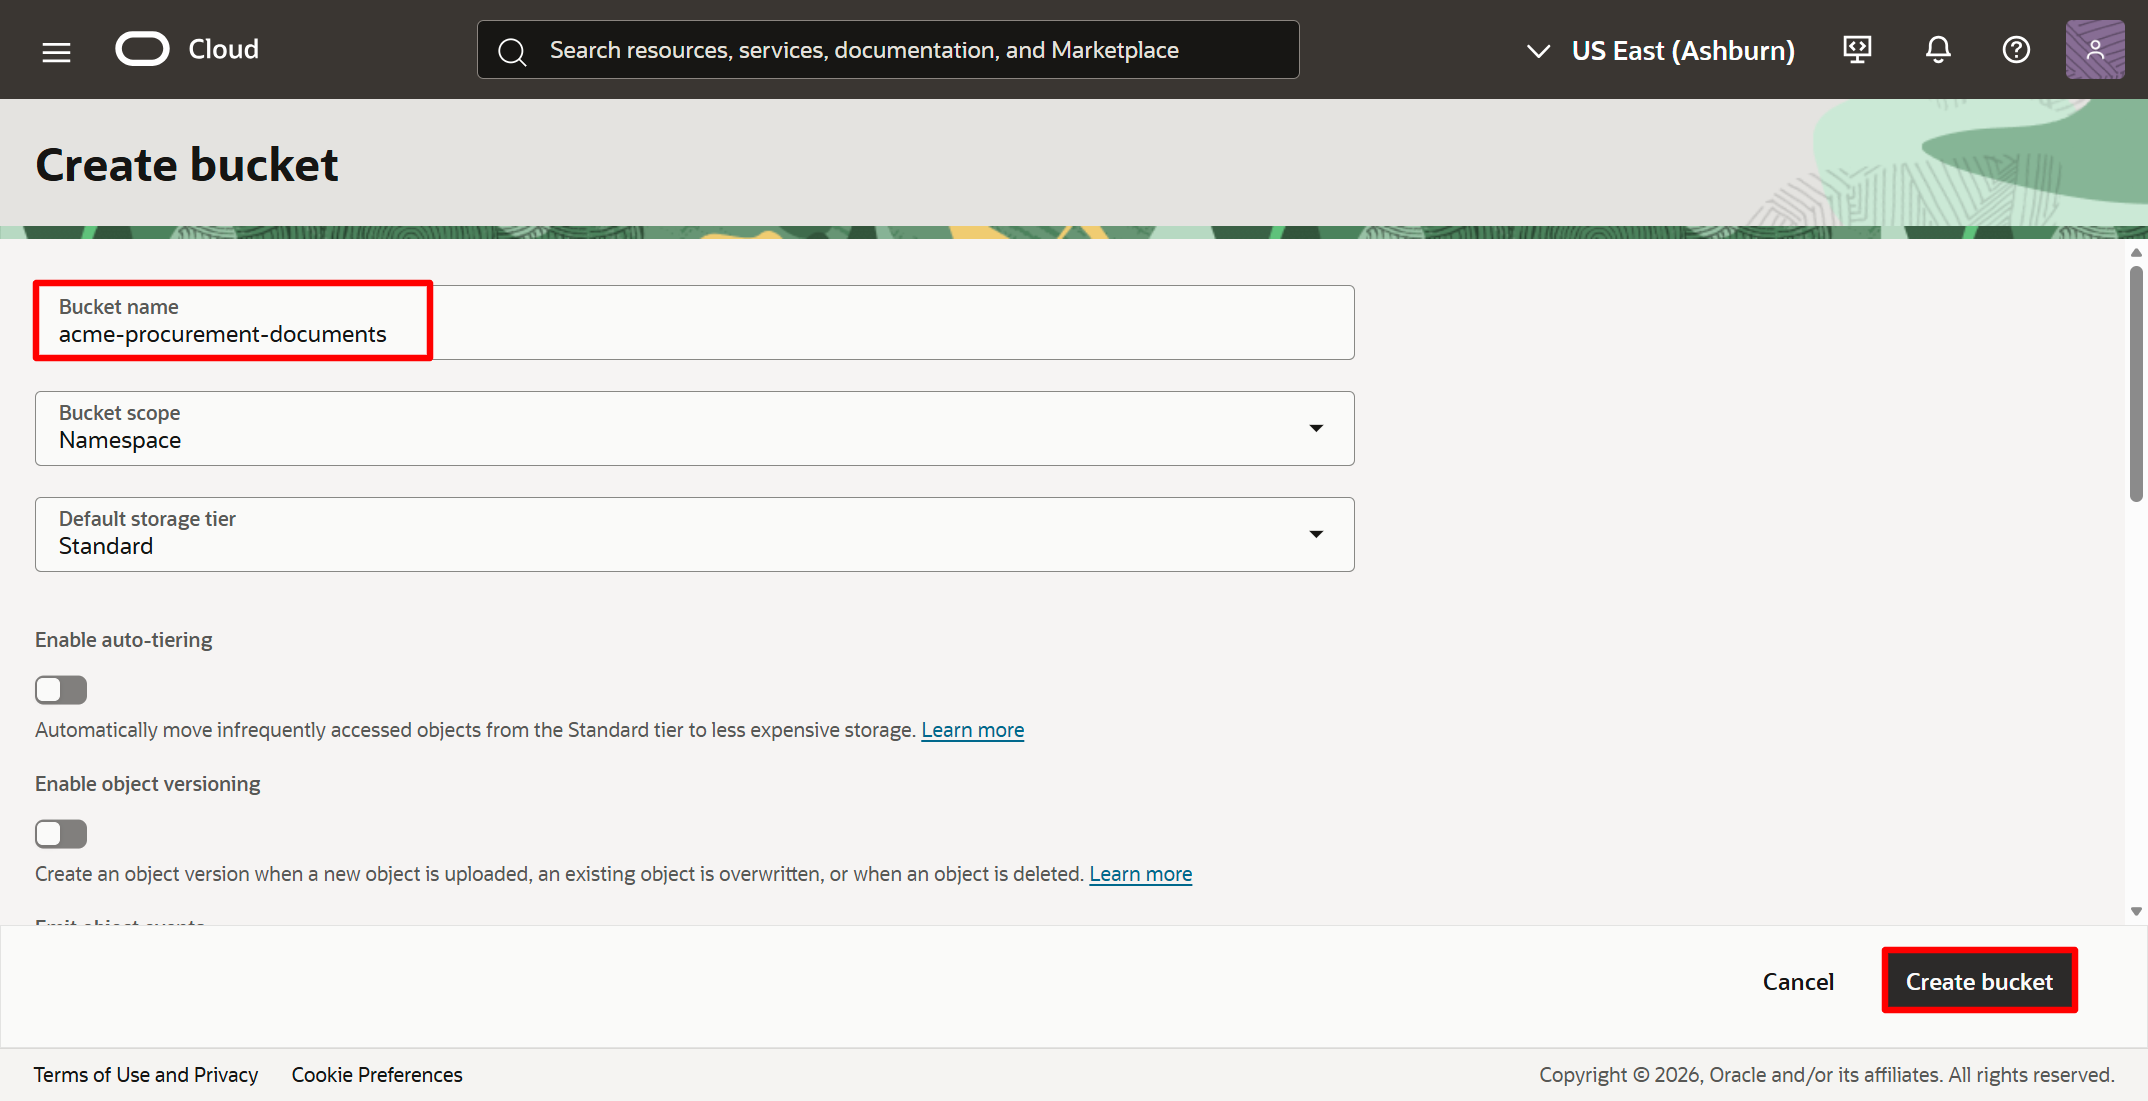
Enter a name for the bucket, for example acme-procurement-documents, then click Create bucket.
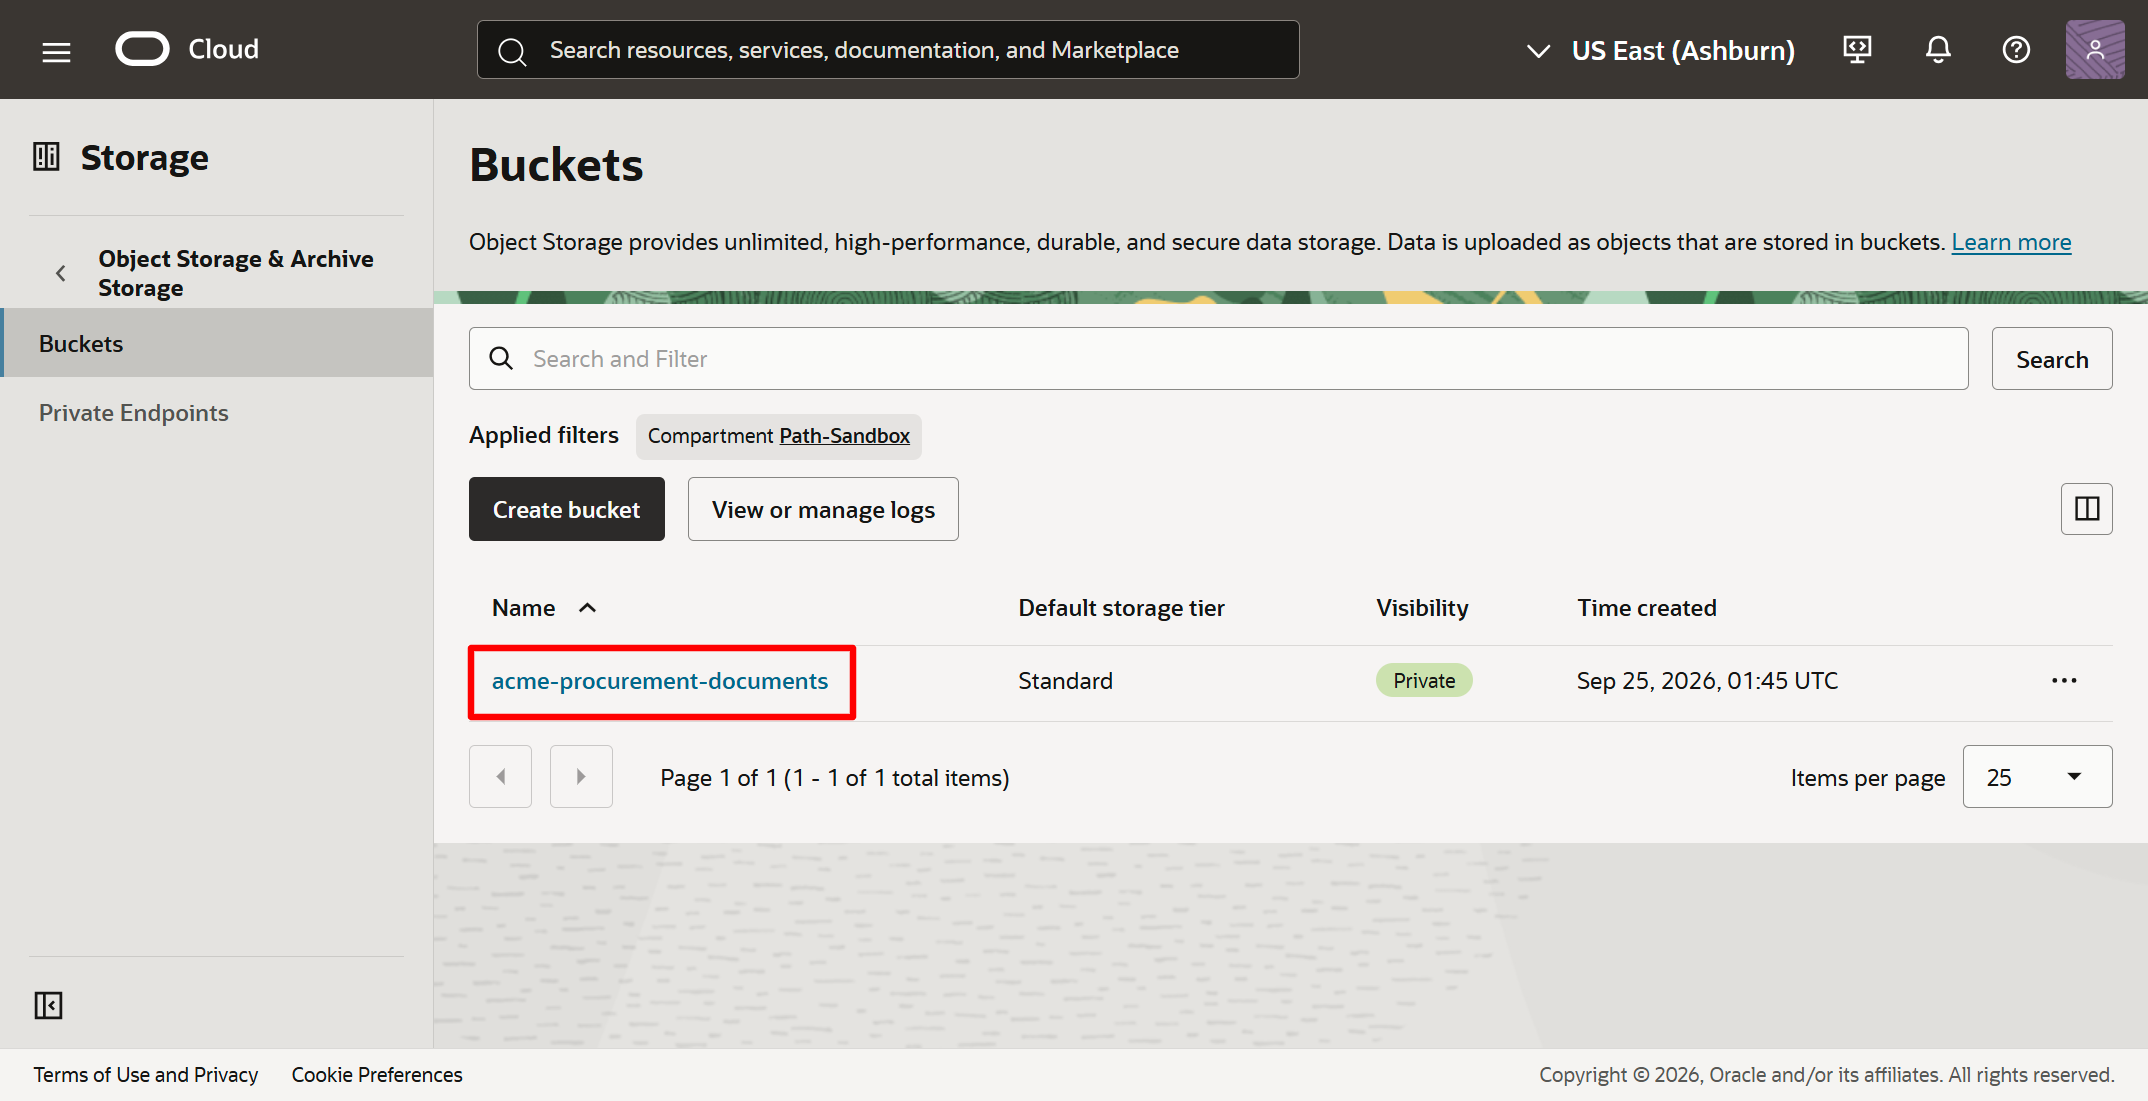
Click on the bucket name so that we can upload the documents to this newly created bucket.
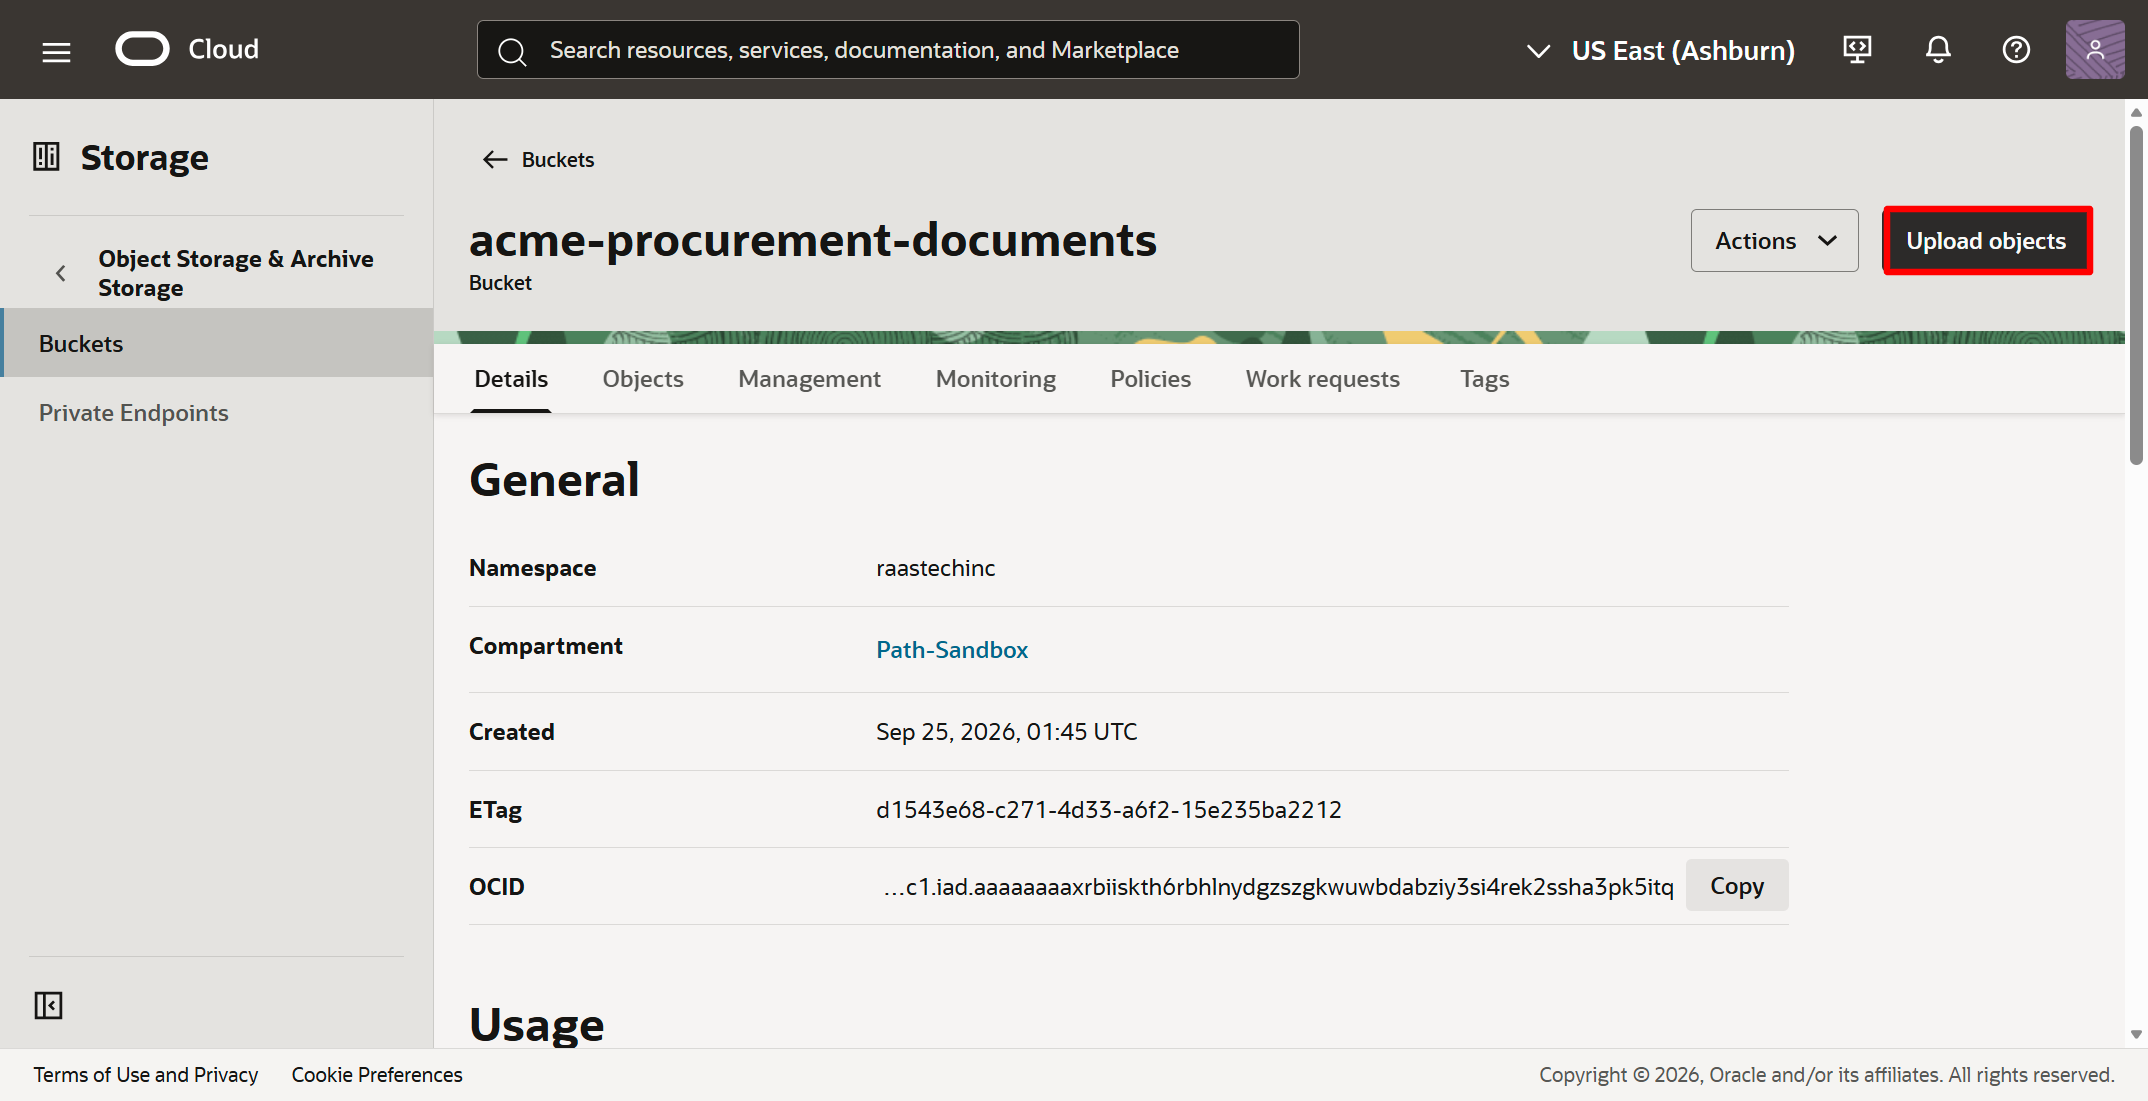
Click on Upload objects.
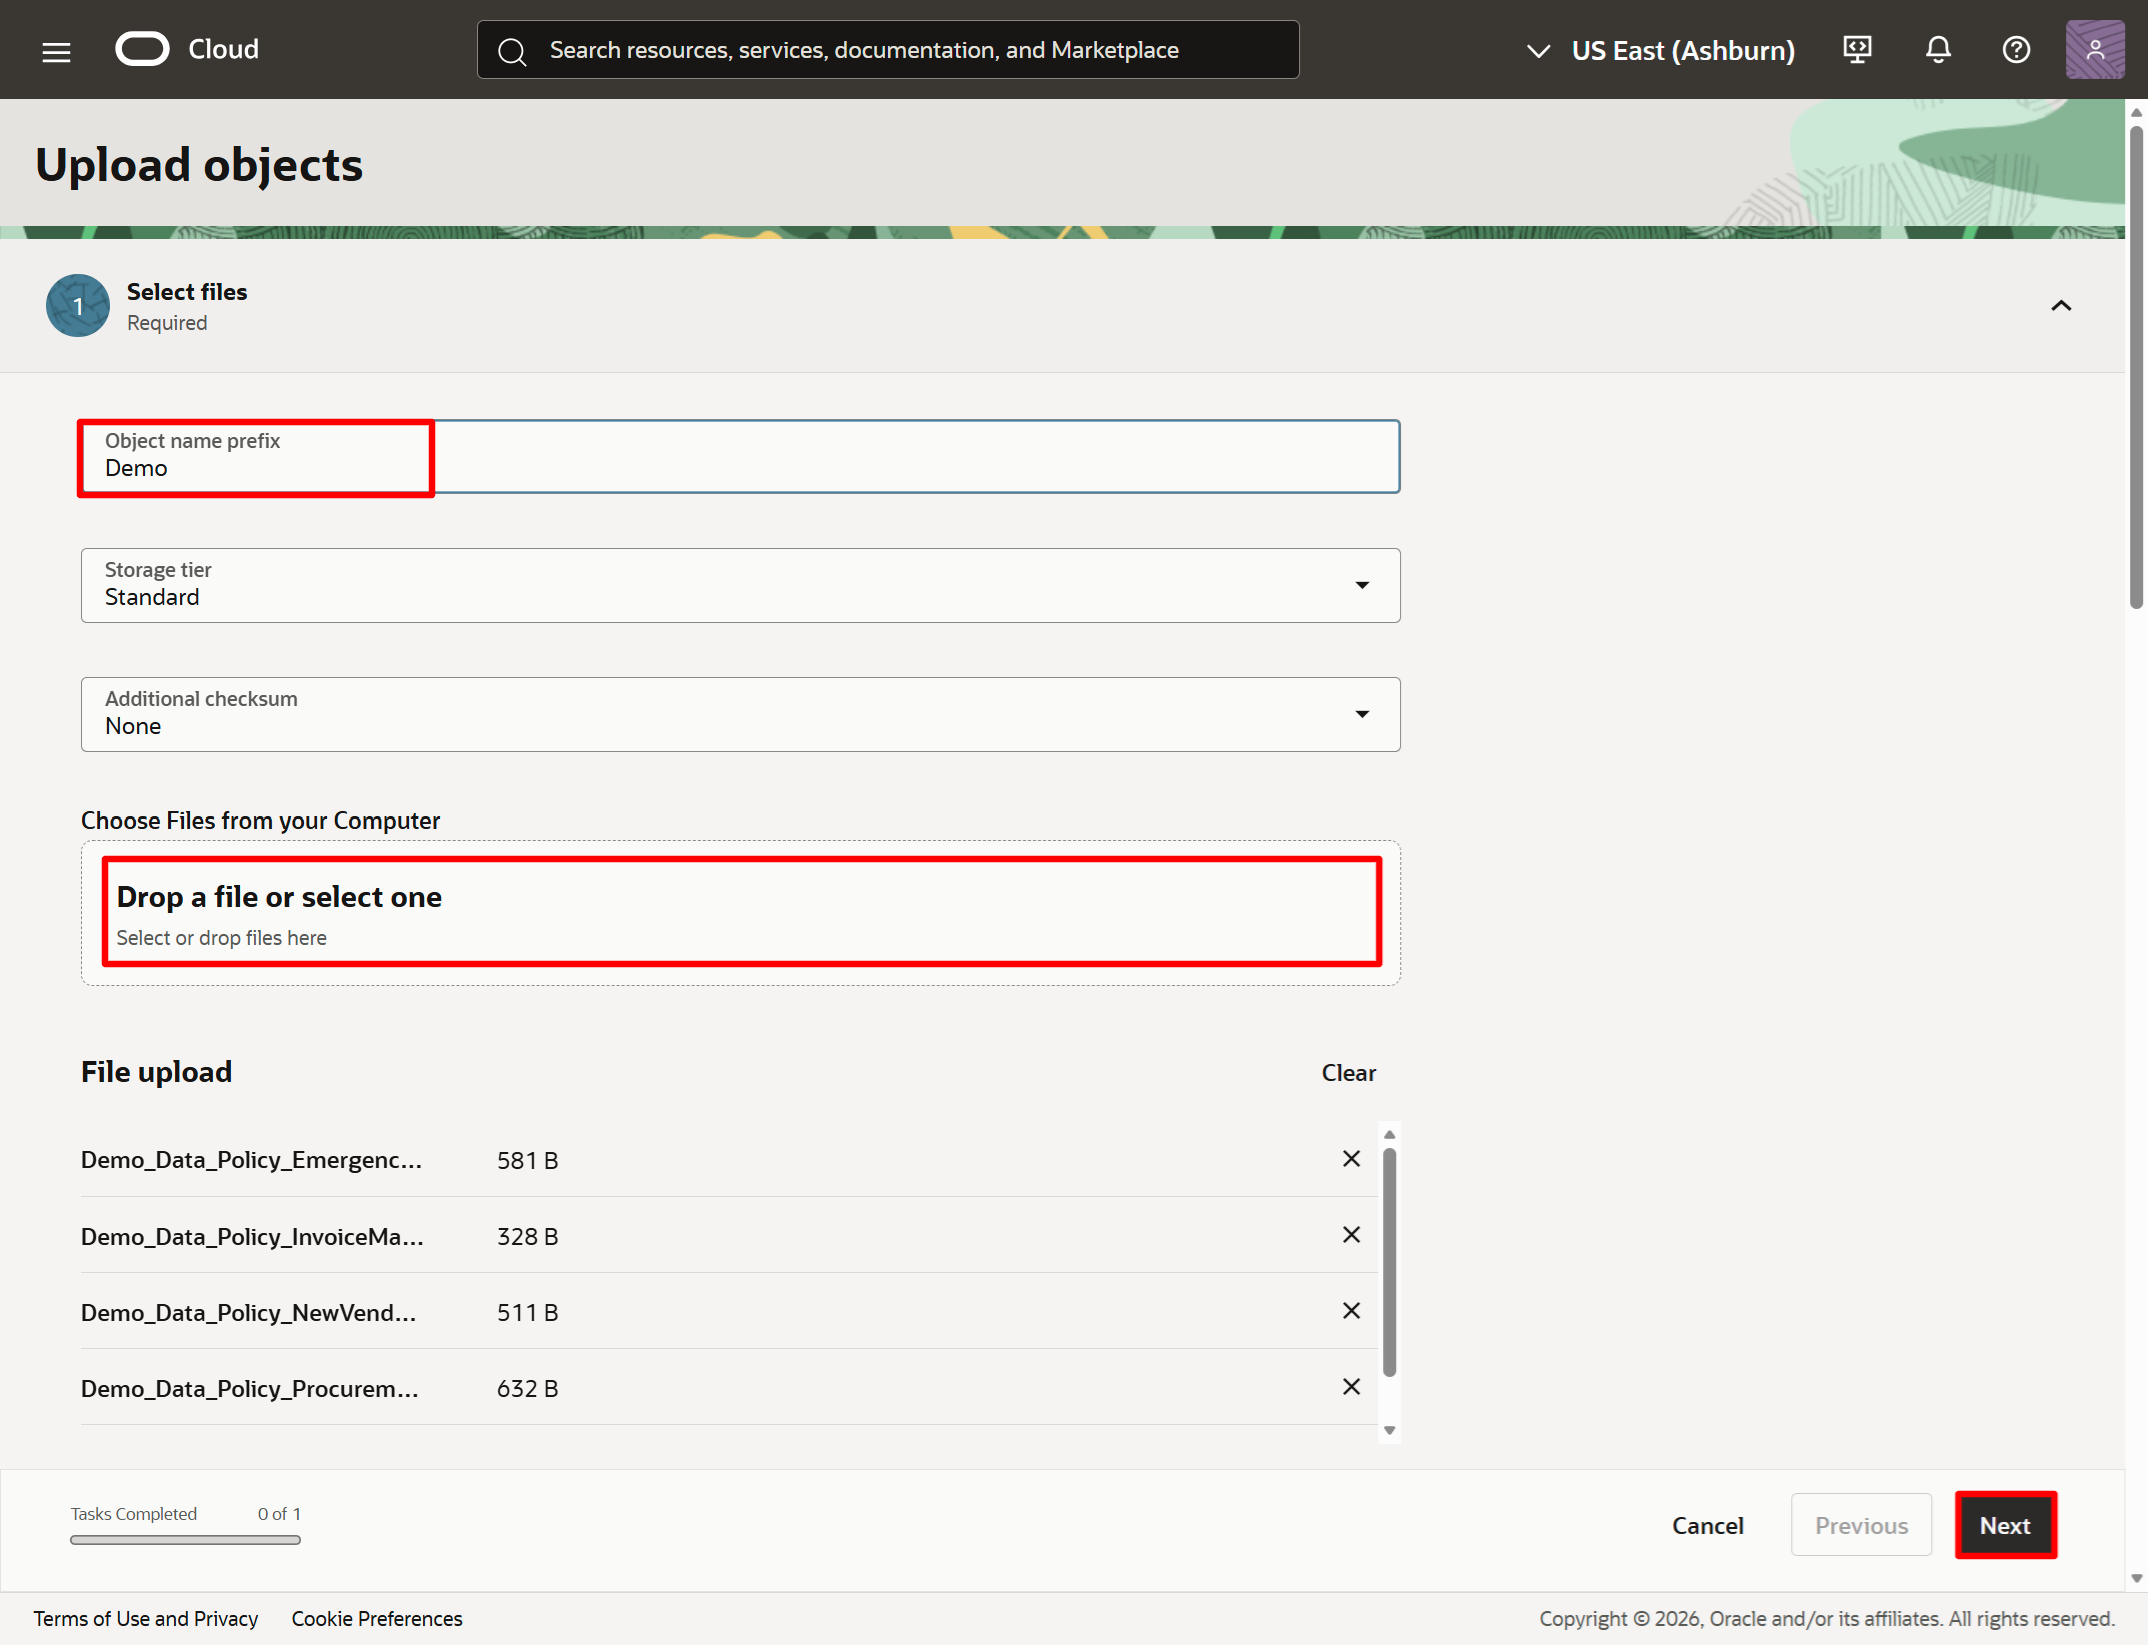
Enter an object name prefix of "Demo" since all documents start with that, upload all the documents into the area highlighted, click Next, then click on Upload objects on the next screen.
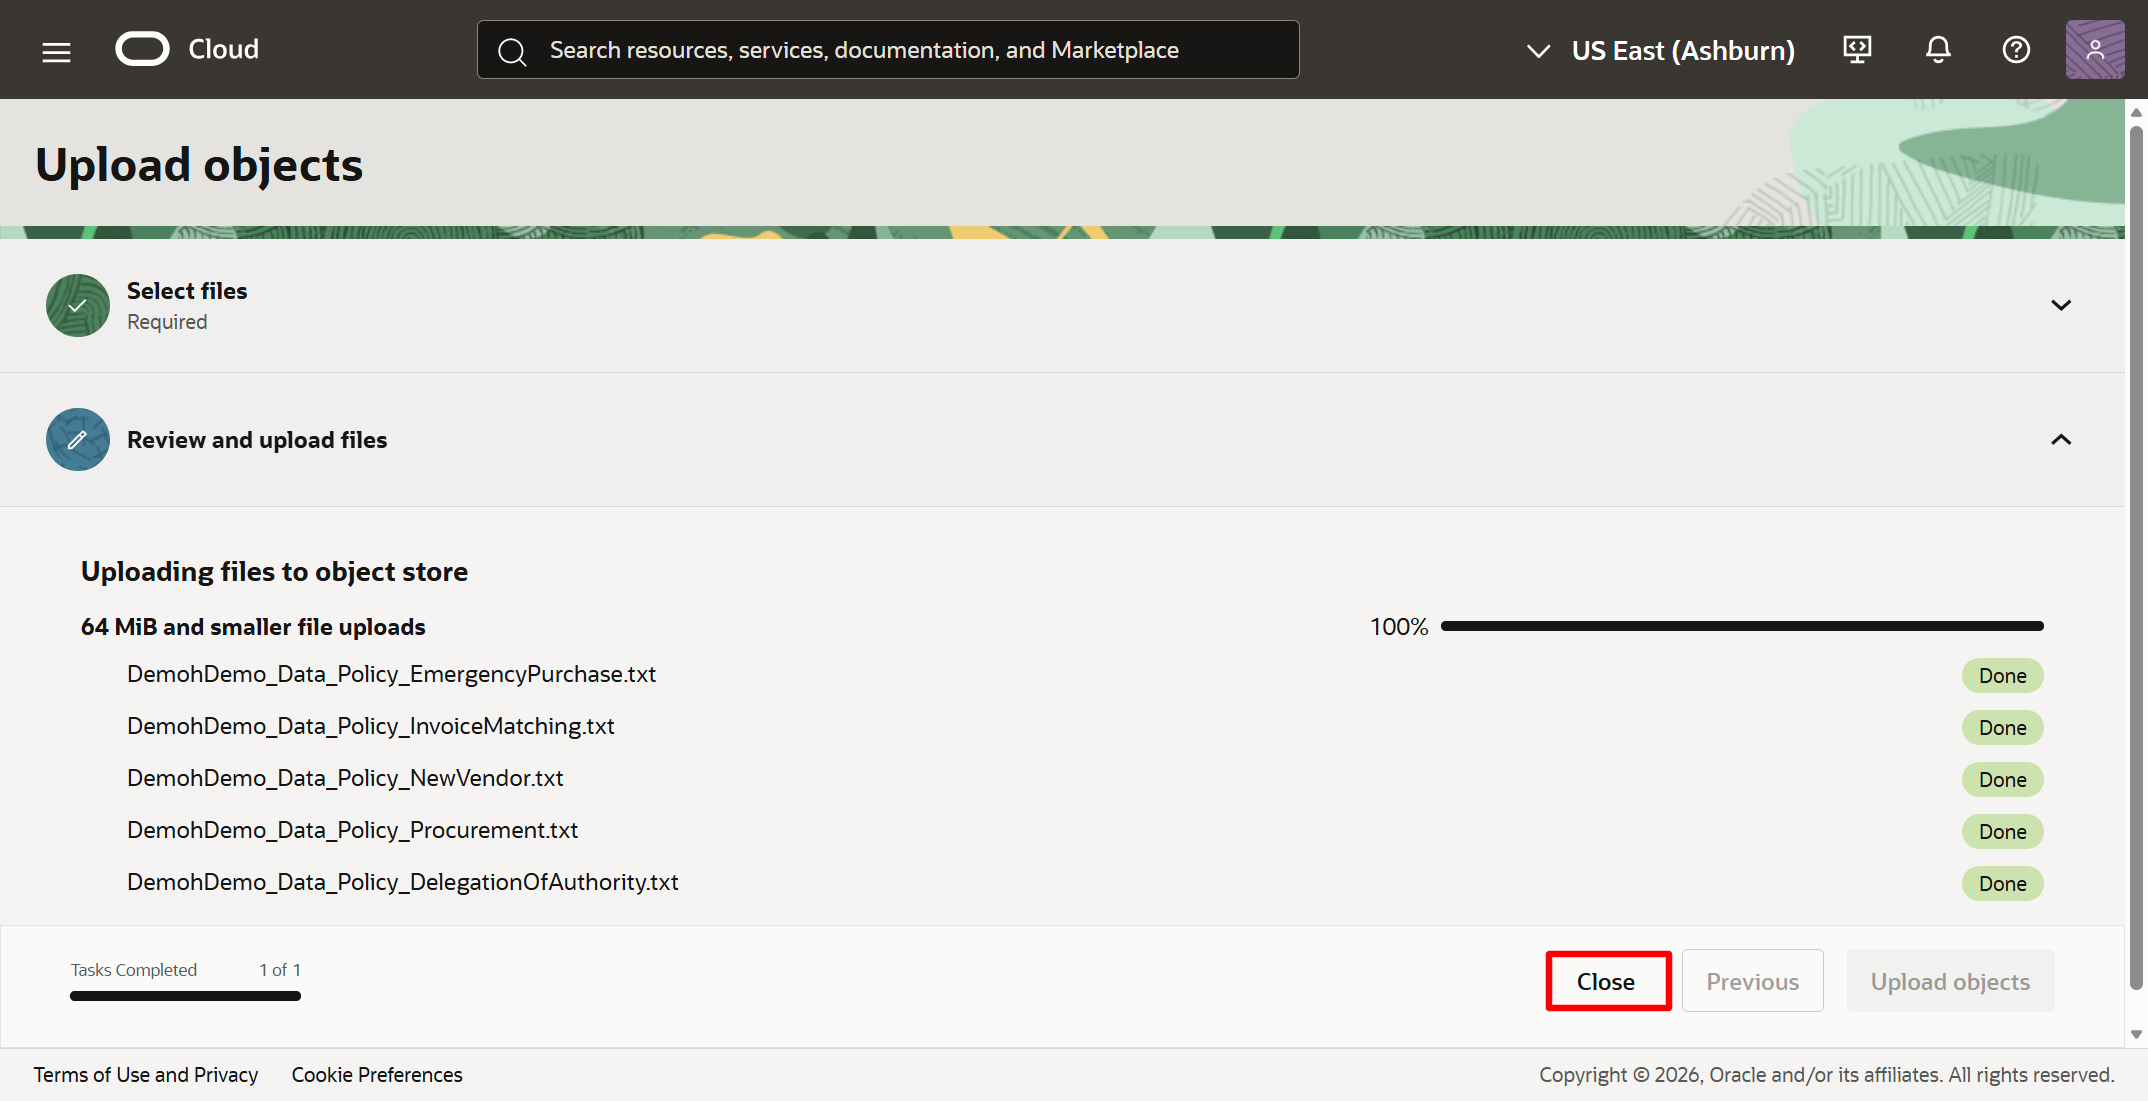
This is the confirmation page confirming that all files have been uploaded, so simply click Close.
3. Create an Autonomous AI Lakehouse
The Autonomous AI Lakehouse will be used for two purposes: (1) host our structured sample data within a few custom database tables, and (2) serve as the metadata store for the Oracle AI Data Platform Workbench service that we'll create in the next step.
There will be sample data inserted into our custom tables which will serve as the source of our structured data.
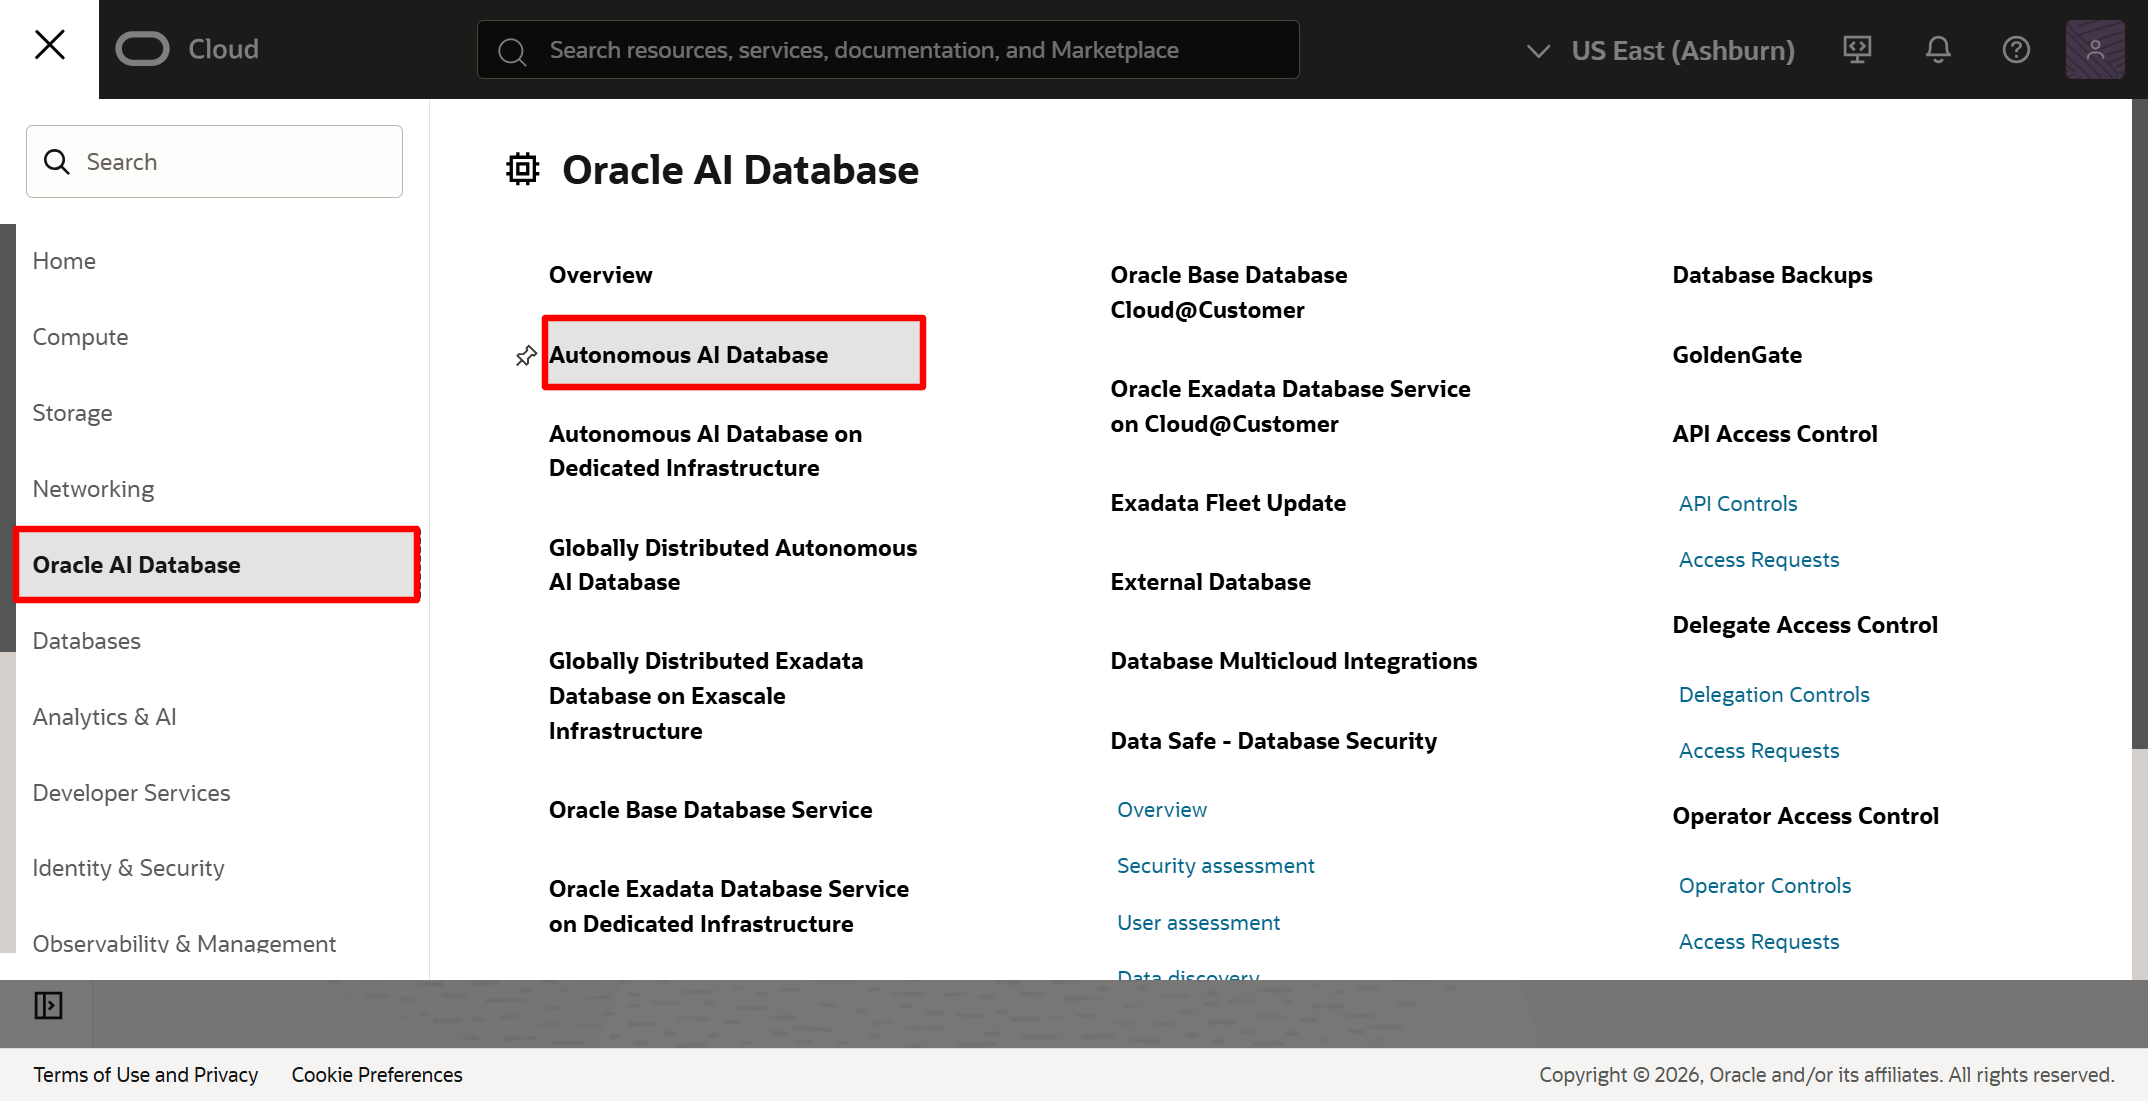
Navigate to Oracle AI Database, then click on Autonomous AI Database.
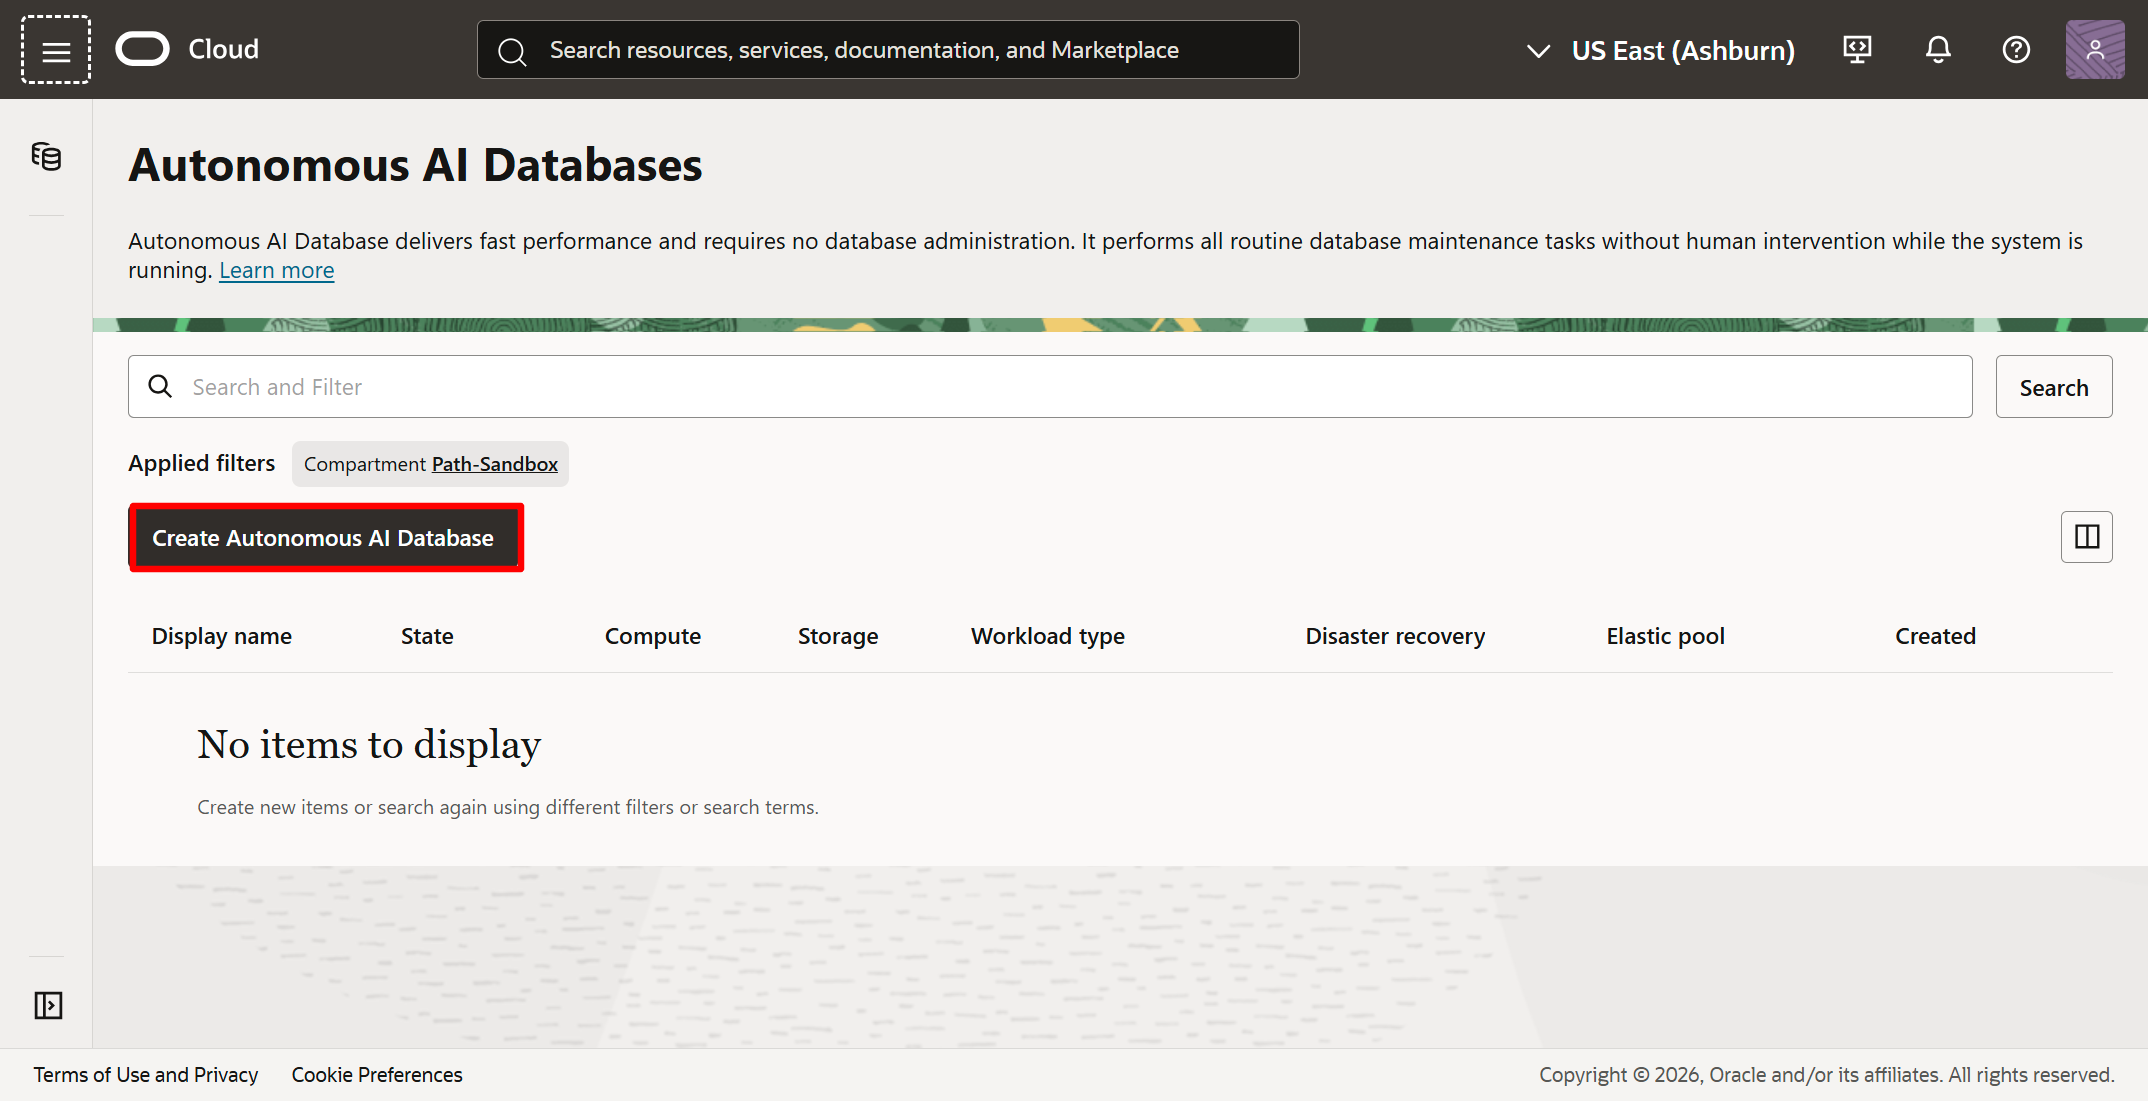
Click on Create Autonomous AI Database.
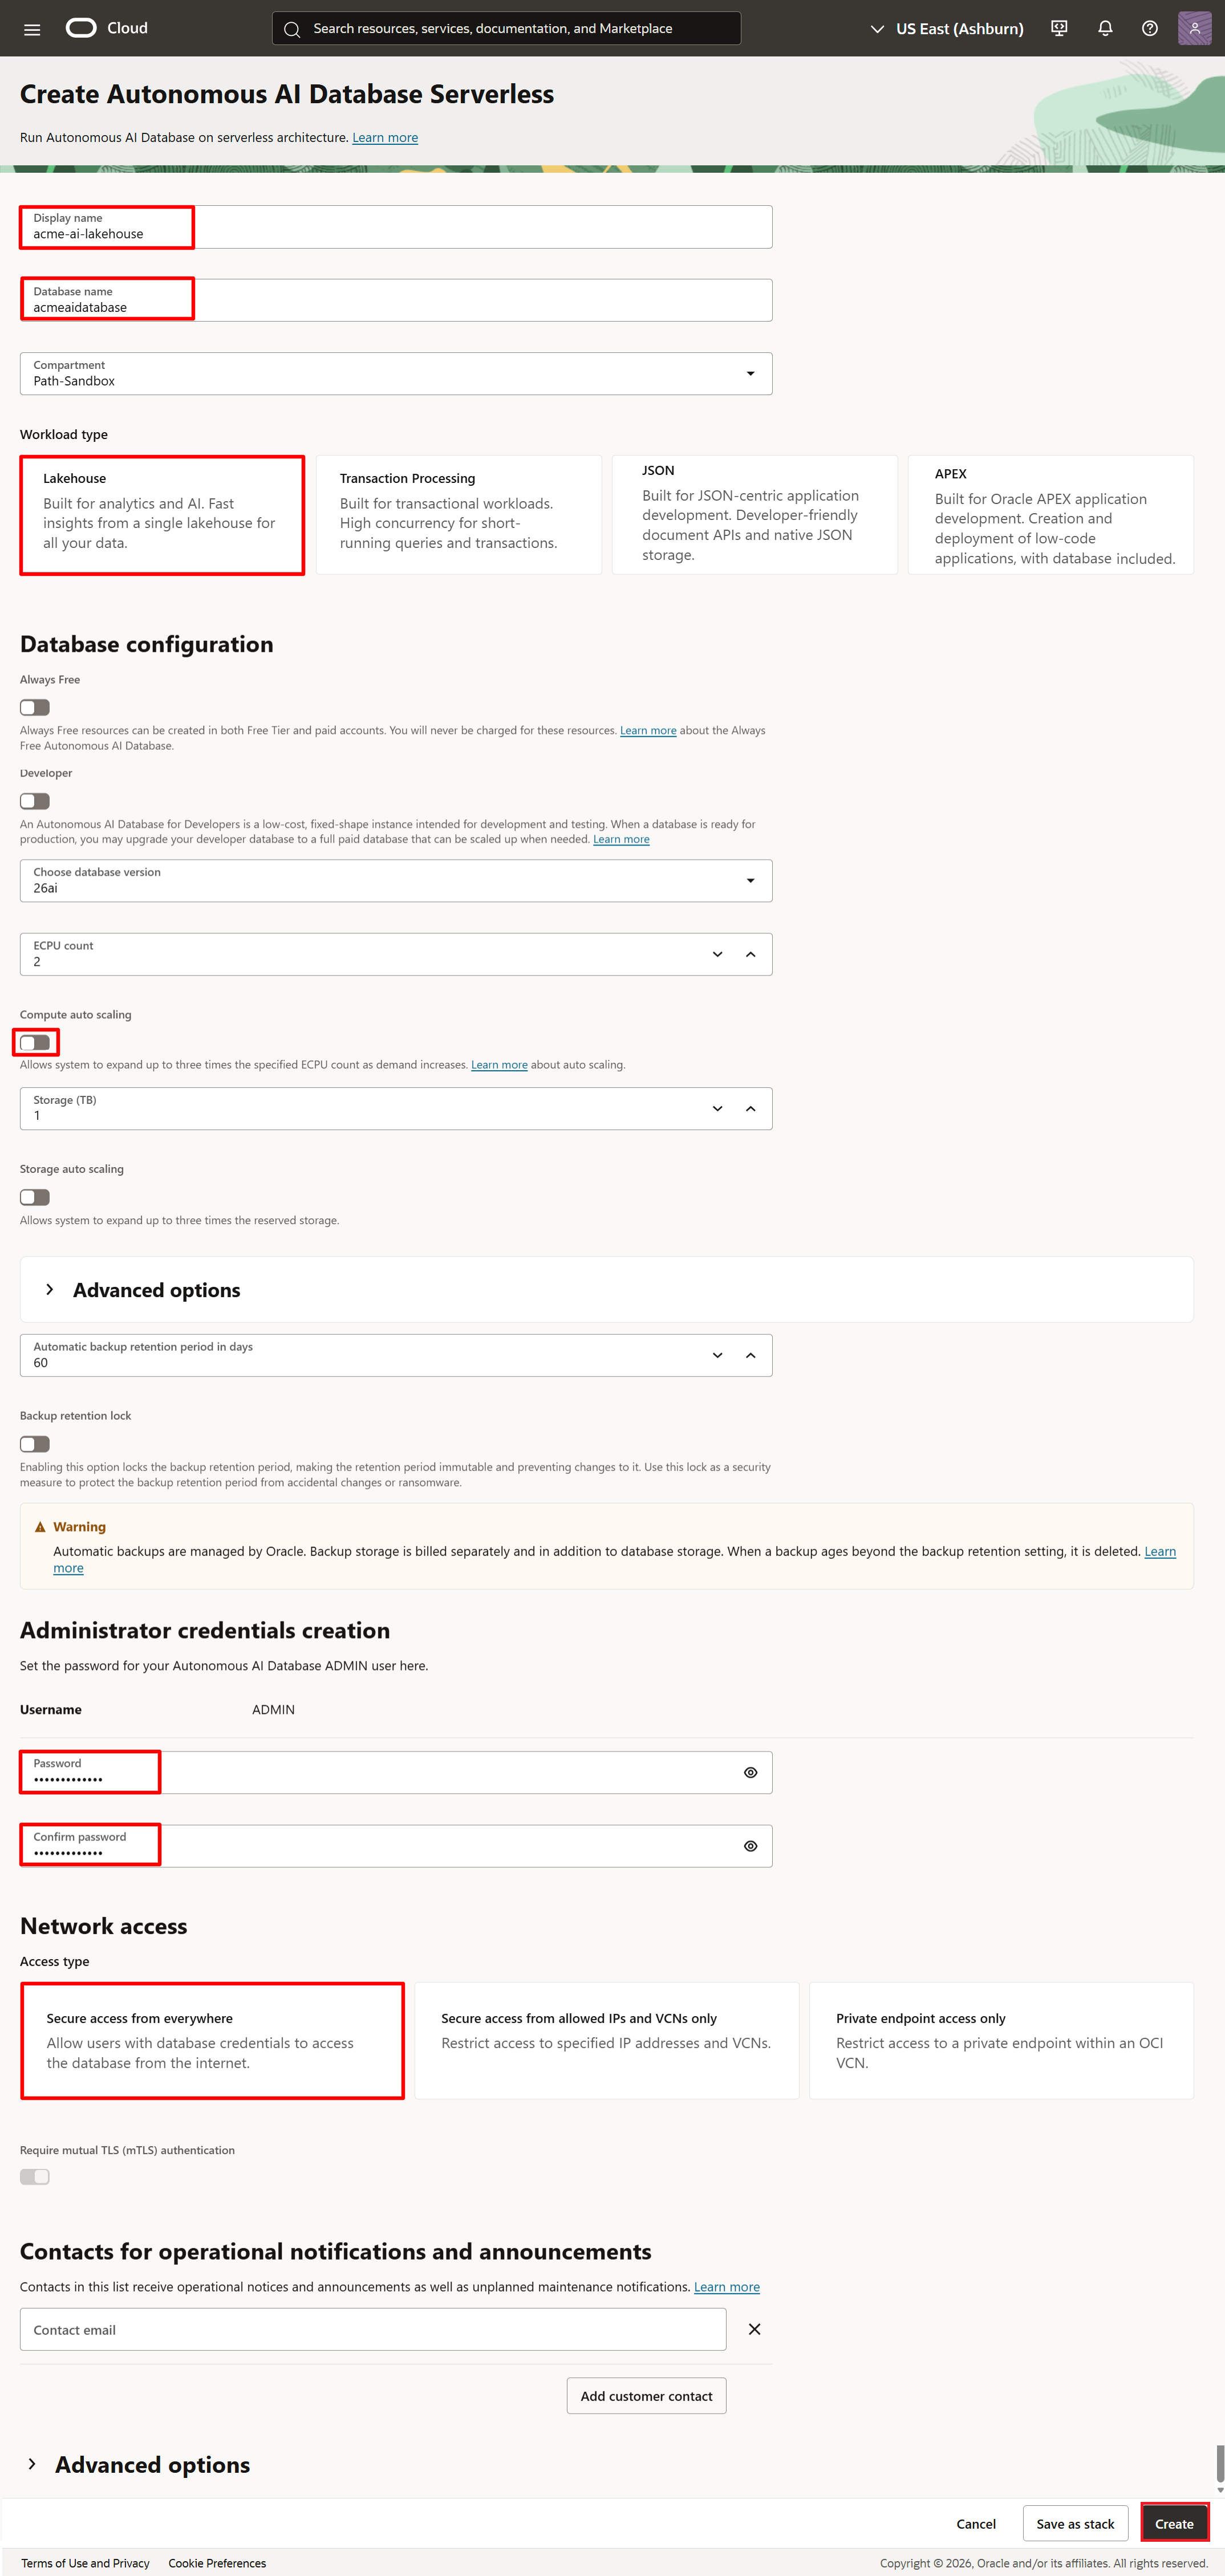
Enter a display name (e.g., acme-ai-lakehouse) and database name (e.g., acmeaidatabase). Select Lakehouse. Uncheck Compute auto scaling to avoid unexpected costs during this exercise. Enter an admin password. Select Secure access from everywhere (though this is not recommended in most cases, since the database is exposed to the public internet). Then click on Create.
4. Create a database user
A database user called acme will be created to host our sample data.
When the lakehouse is created (in the previous step), the following page automatically appears. Wait until the database shows as available (see green icon), then click on Database actions then Database Users.
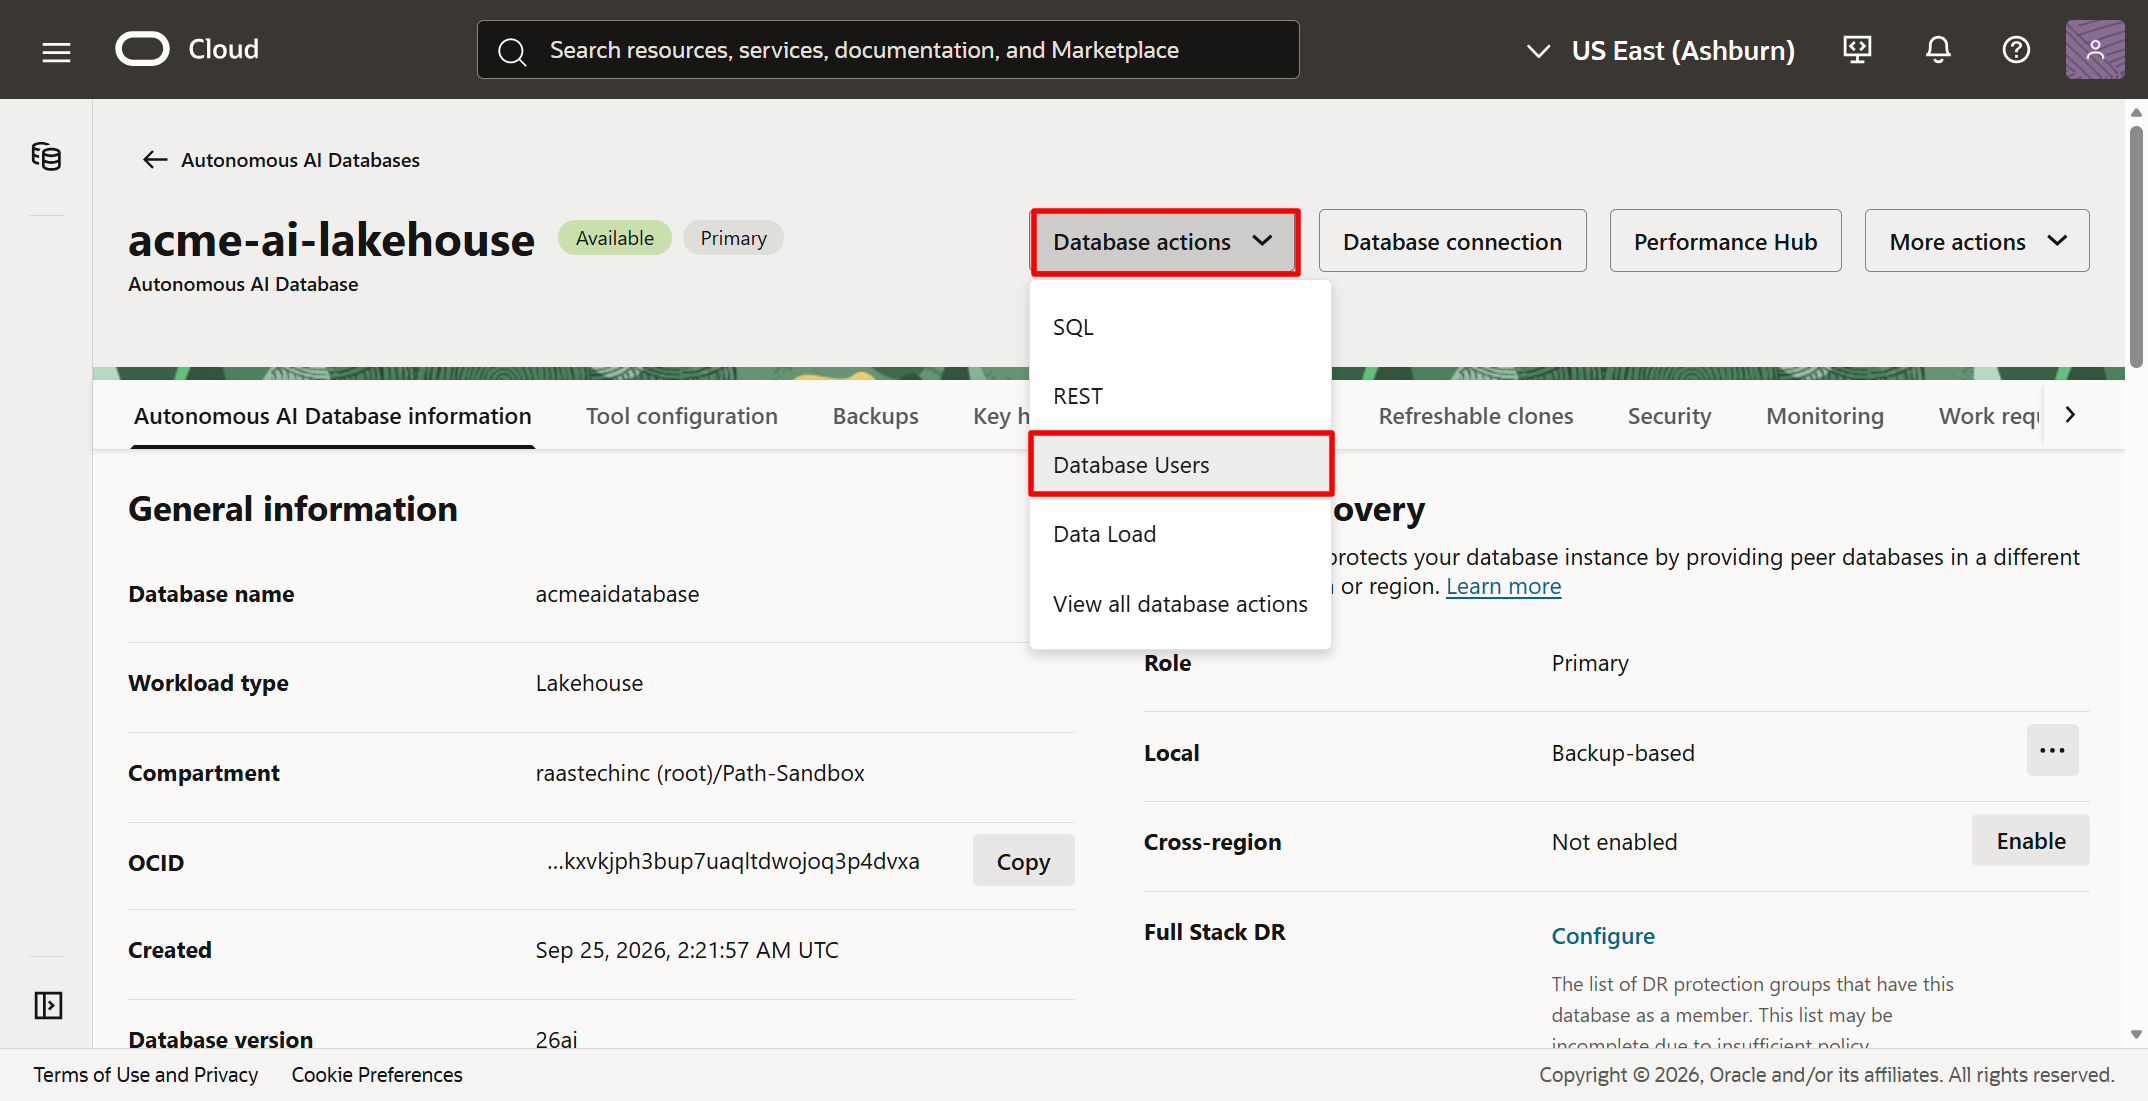
A new tab will open that allows the management of database users. Click on Create User.
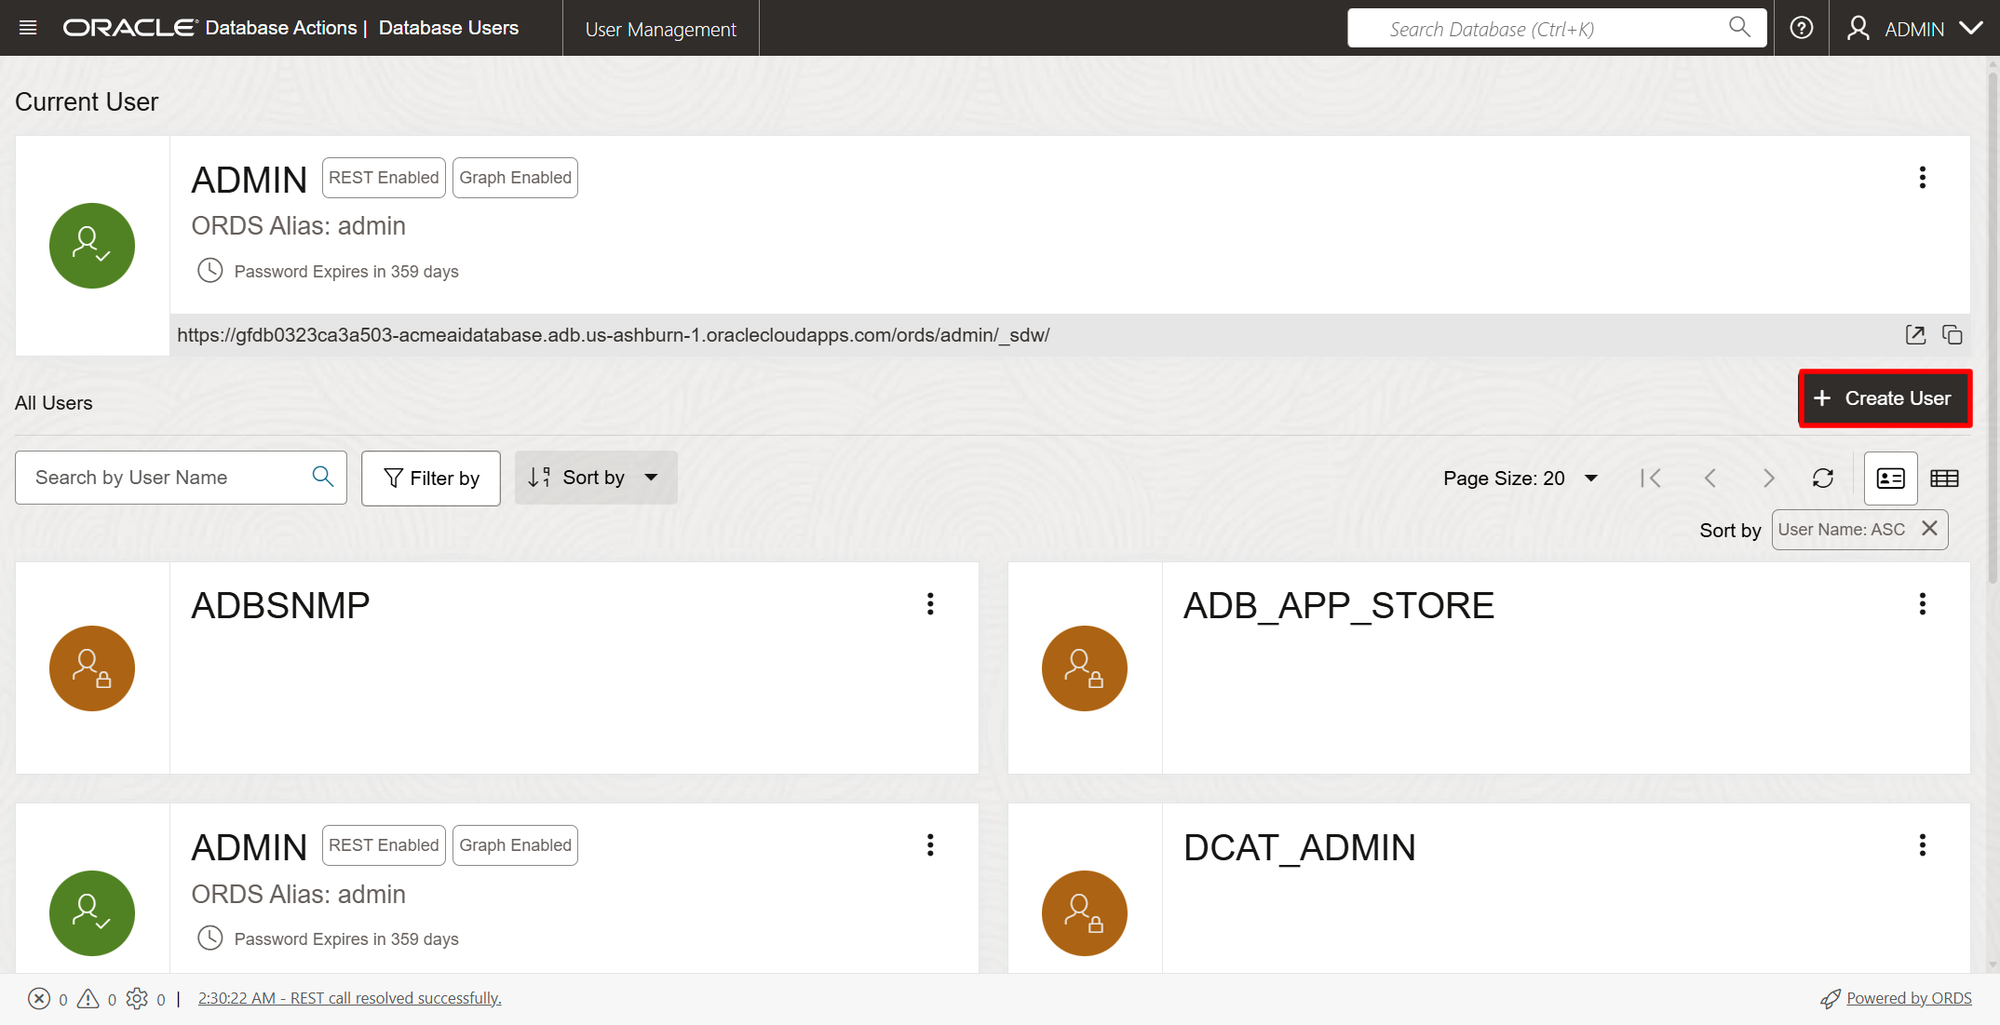
Enter the username acme and a strong password. Select a quota on tablespace DATA of 25M, then click on Create User. By default, the user will have the roles 'resource' and 'connect'.
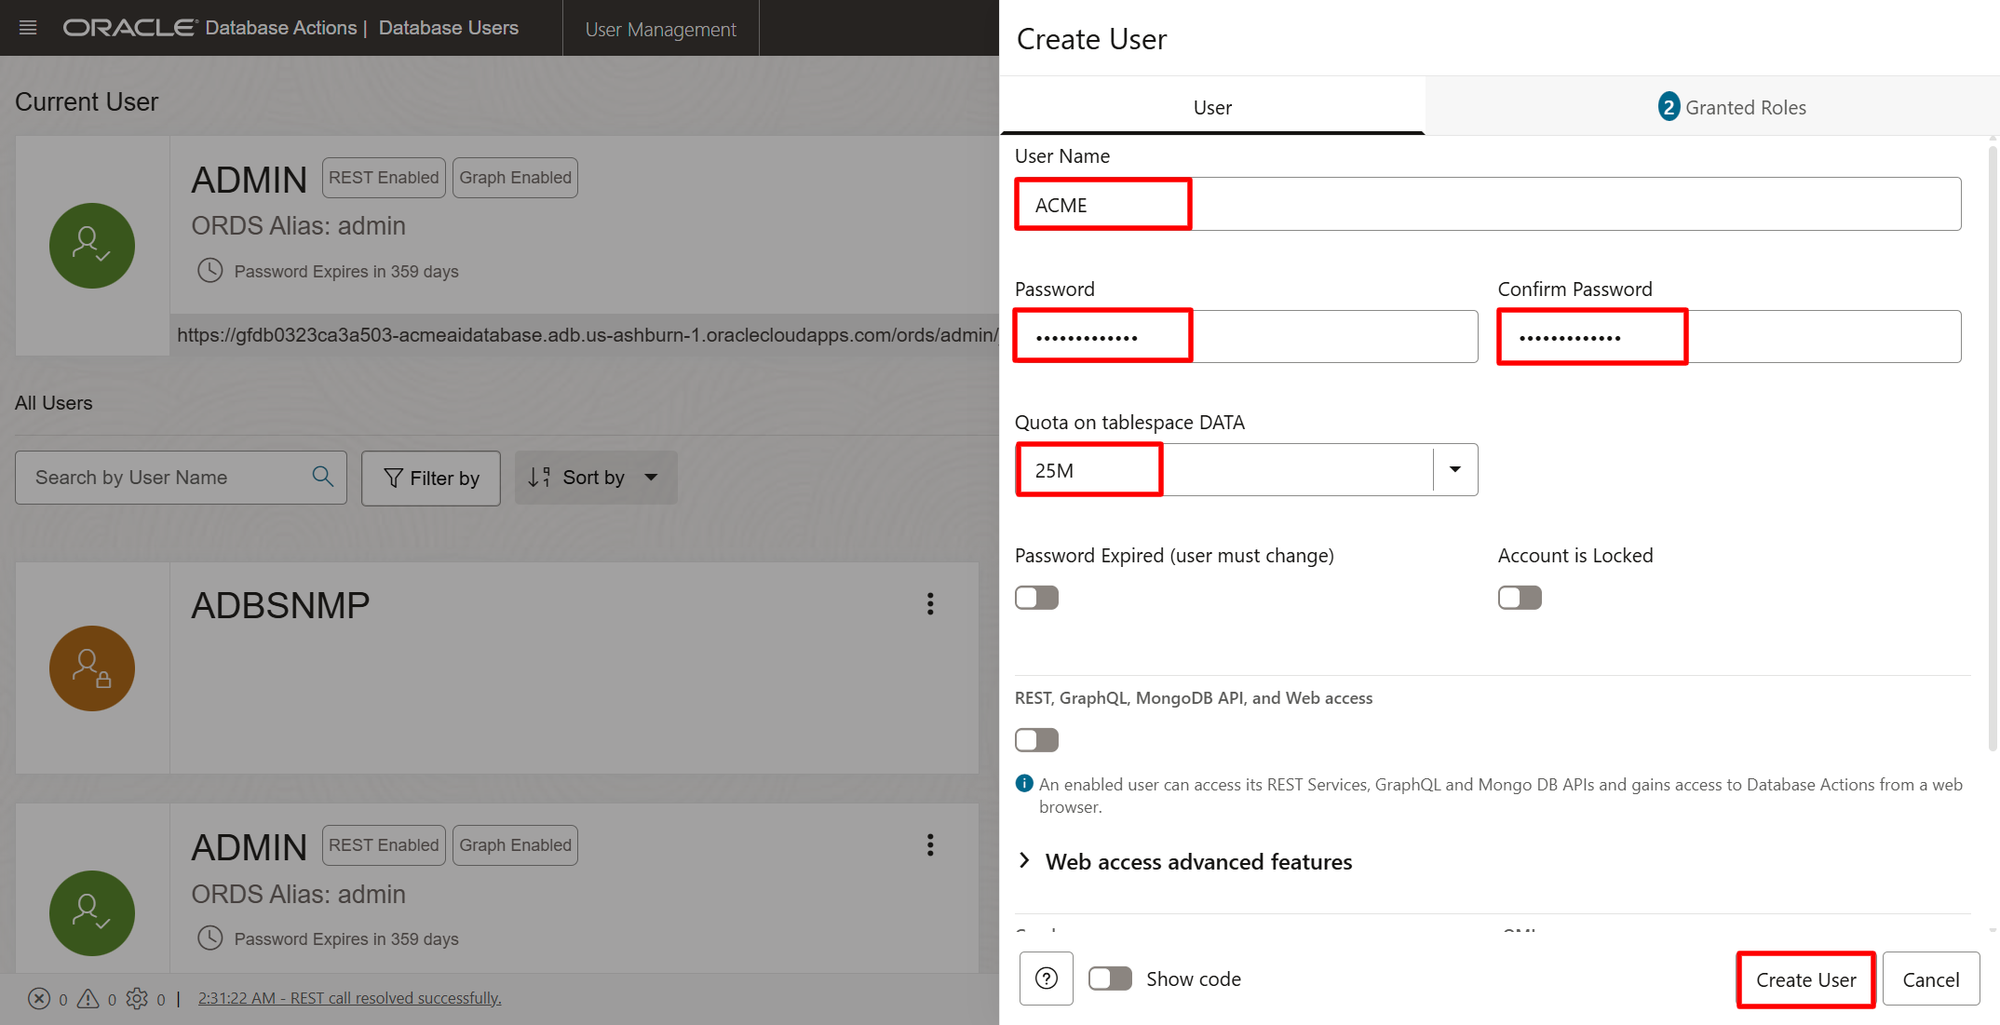
This is the confirmation page. This browser tab can be safely closed since there is no need to further manage database users.
5. Create custom tables and insert sample data
The SQL script to create the custom tables and insert the sample data is at the end of this post.
Back on the lakehouse that was just created, click on Database actions then SQL. A new tab will open.
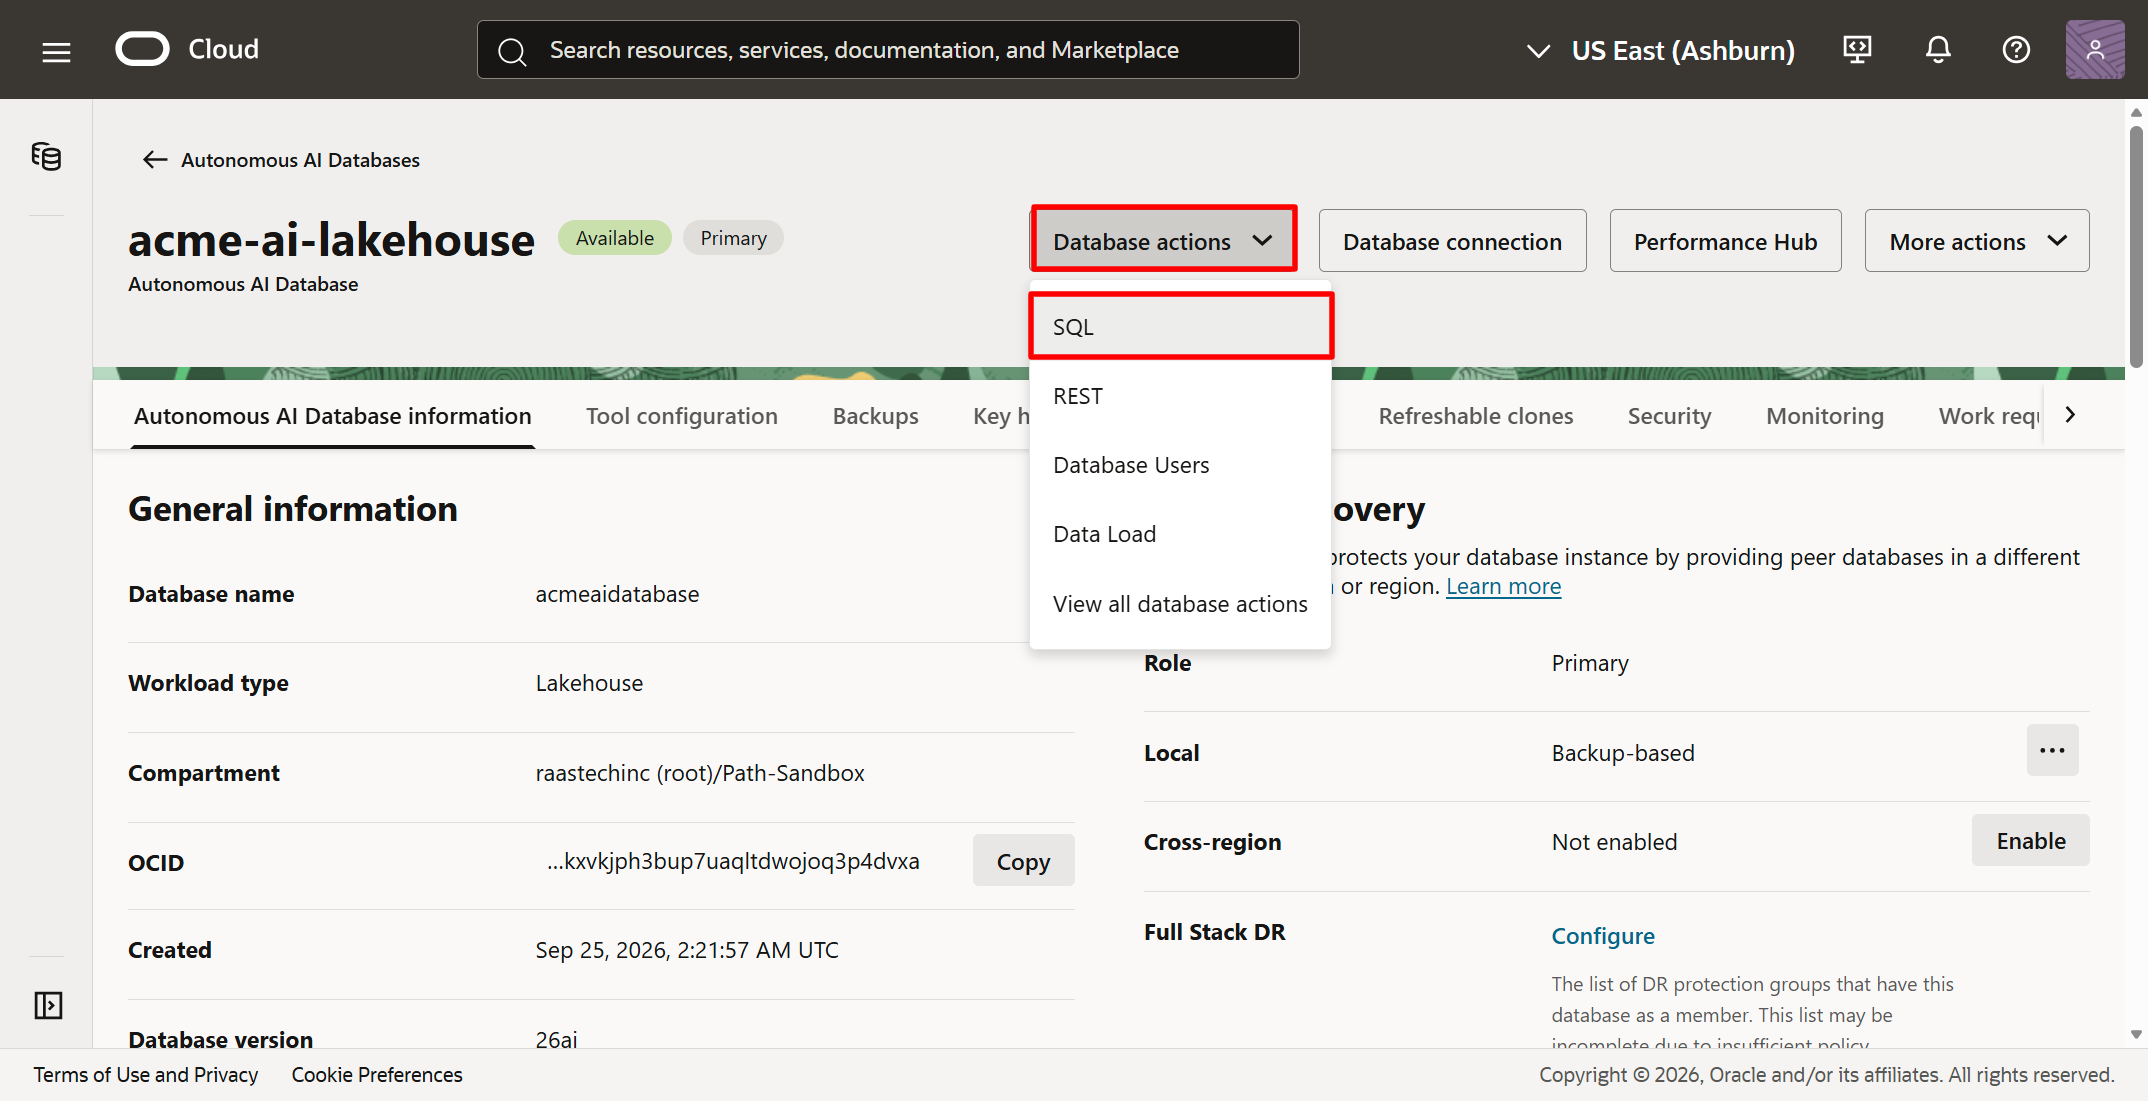
Paste the contents of the SQL script in the open area, then click on the Run Statement icon in green.
Though we are logged in as ADMIN at the moment, the script will appropriately create the objects under the acme schema.
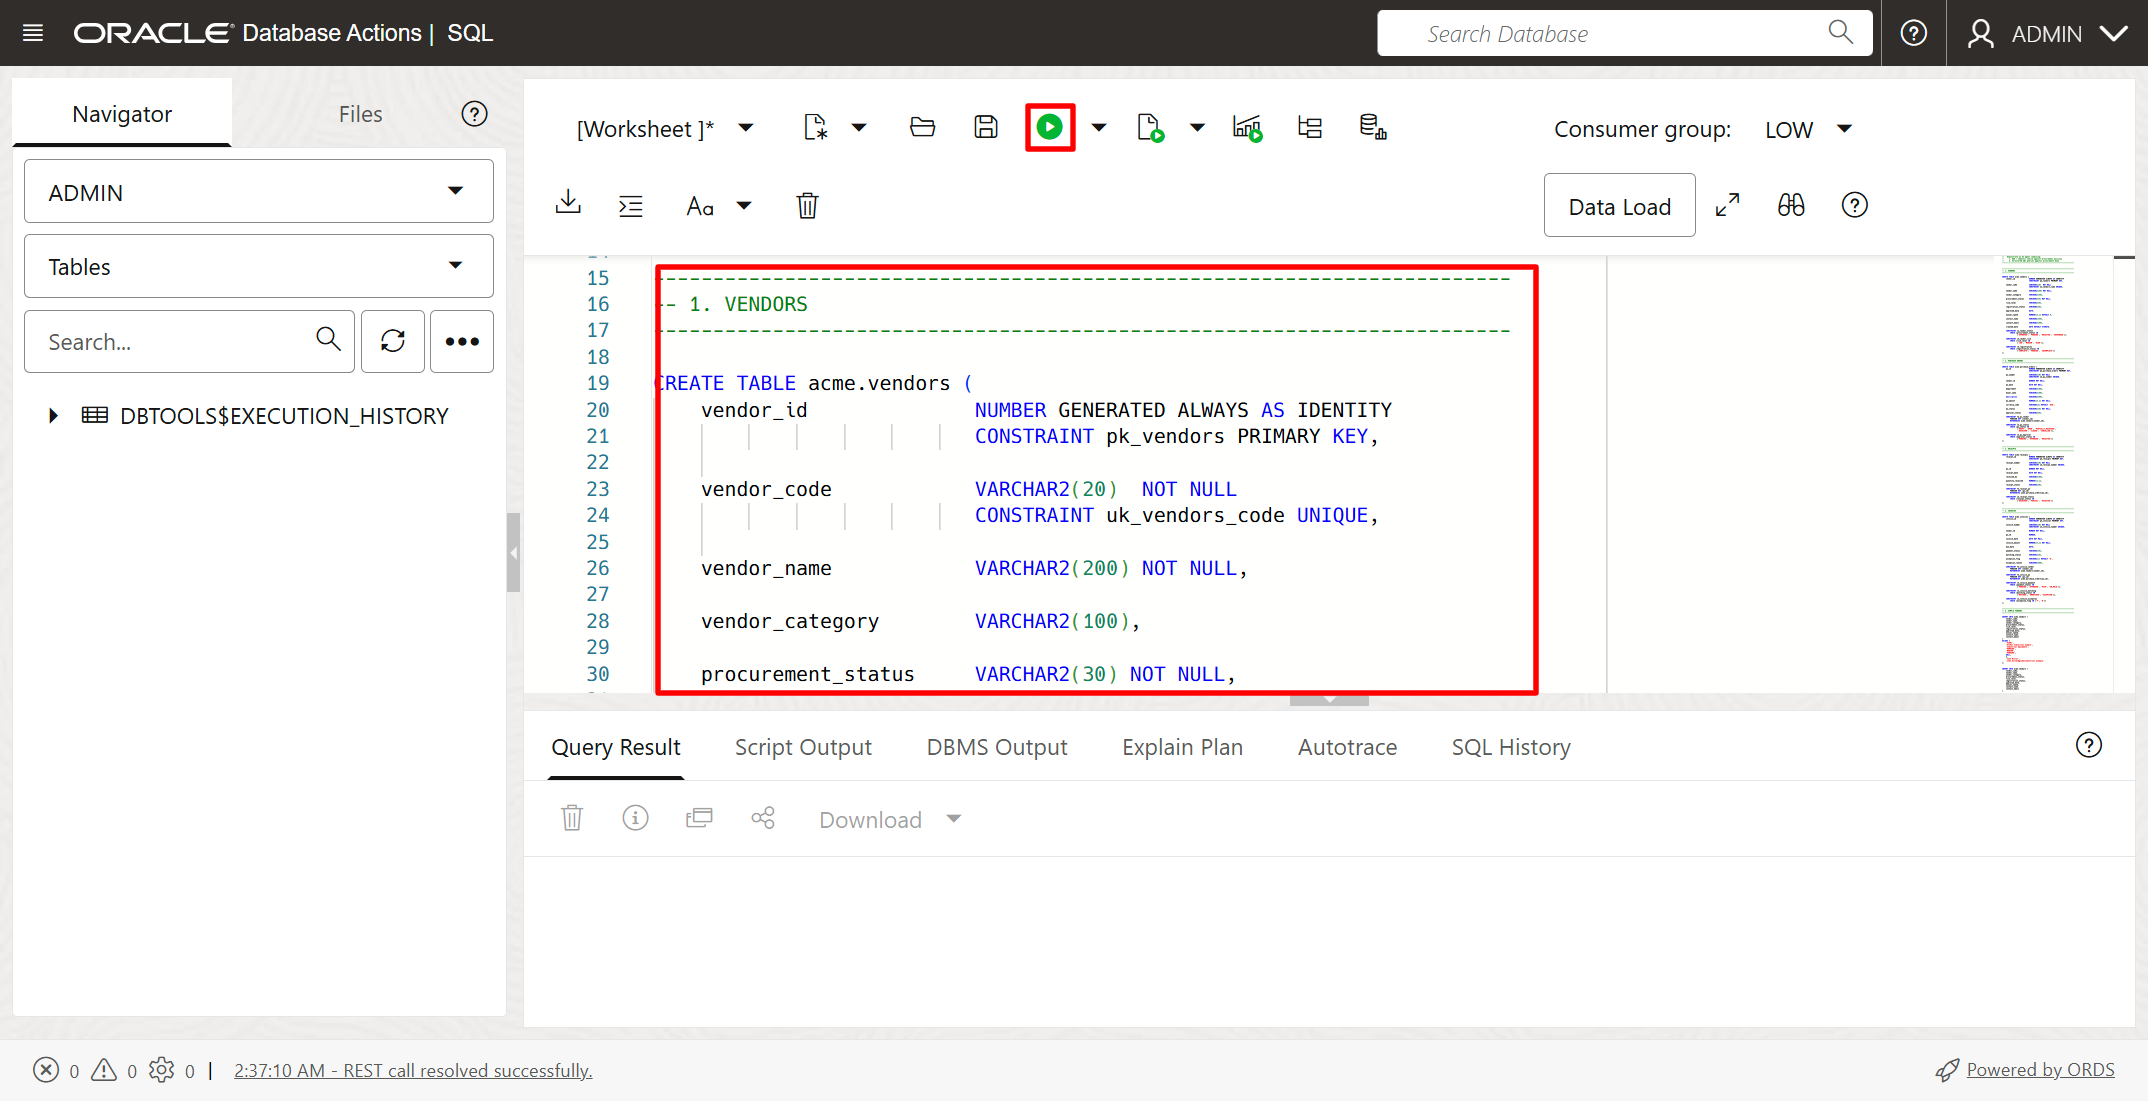
Click on Script Output to view the output of the script and verify that it ran correctly. Then switch the user to "ACME" of the left-hand side to see the 4 tables created.
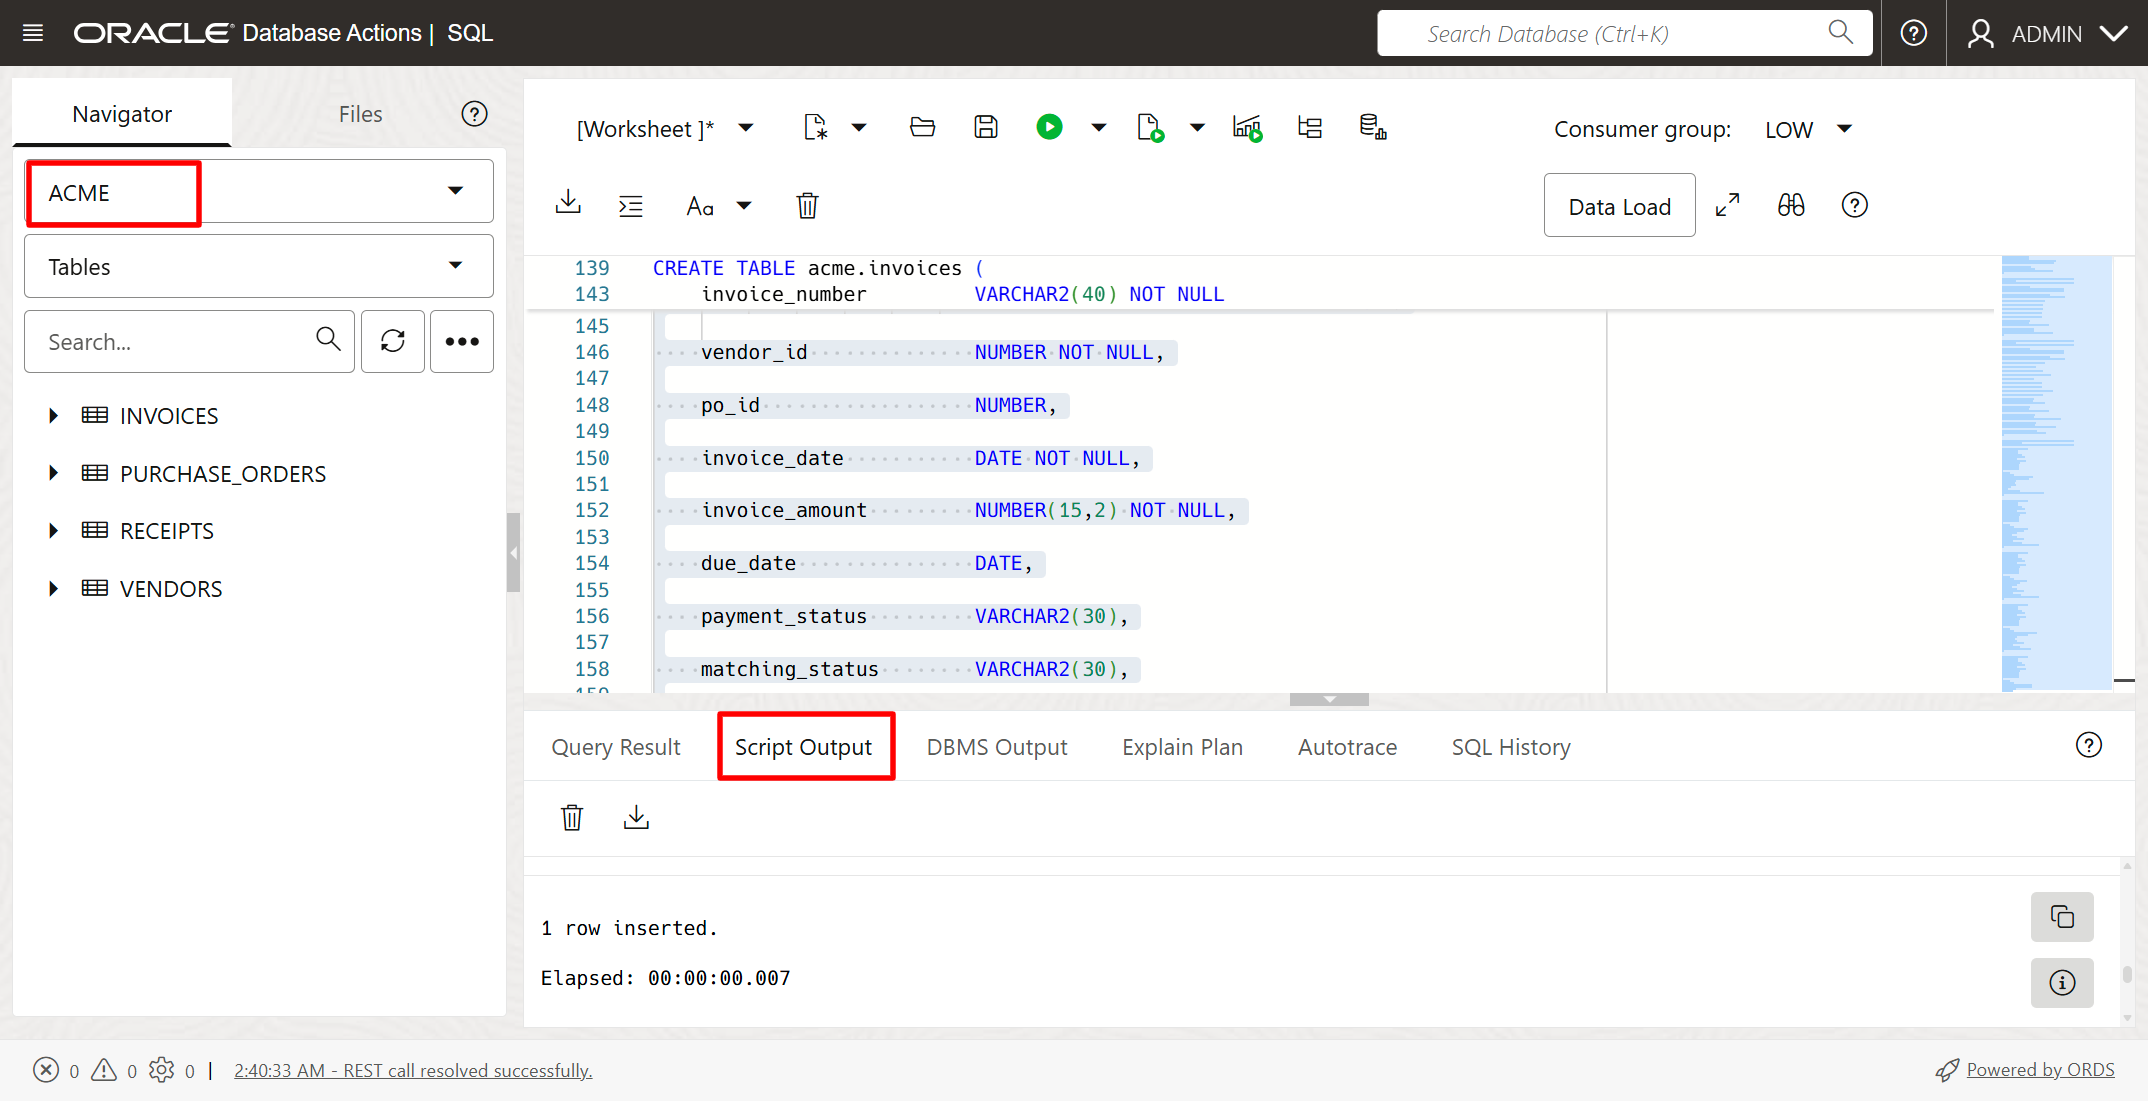
Querying the VENDORS table should return some sample data. Note that there is a vendor named "Global Industrial Supply" with a registration status "PENDING".
This will be a relevant point in our agent testing later.
Close this browser tab as it is no longer needed.
6. Create an AI Data Platform Workbench instance
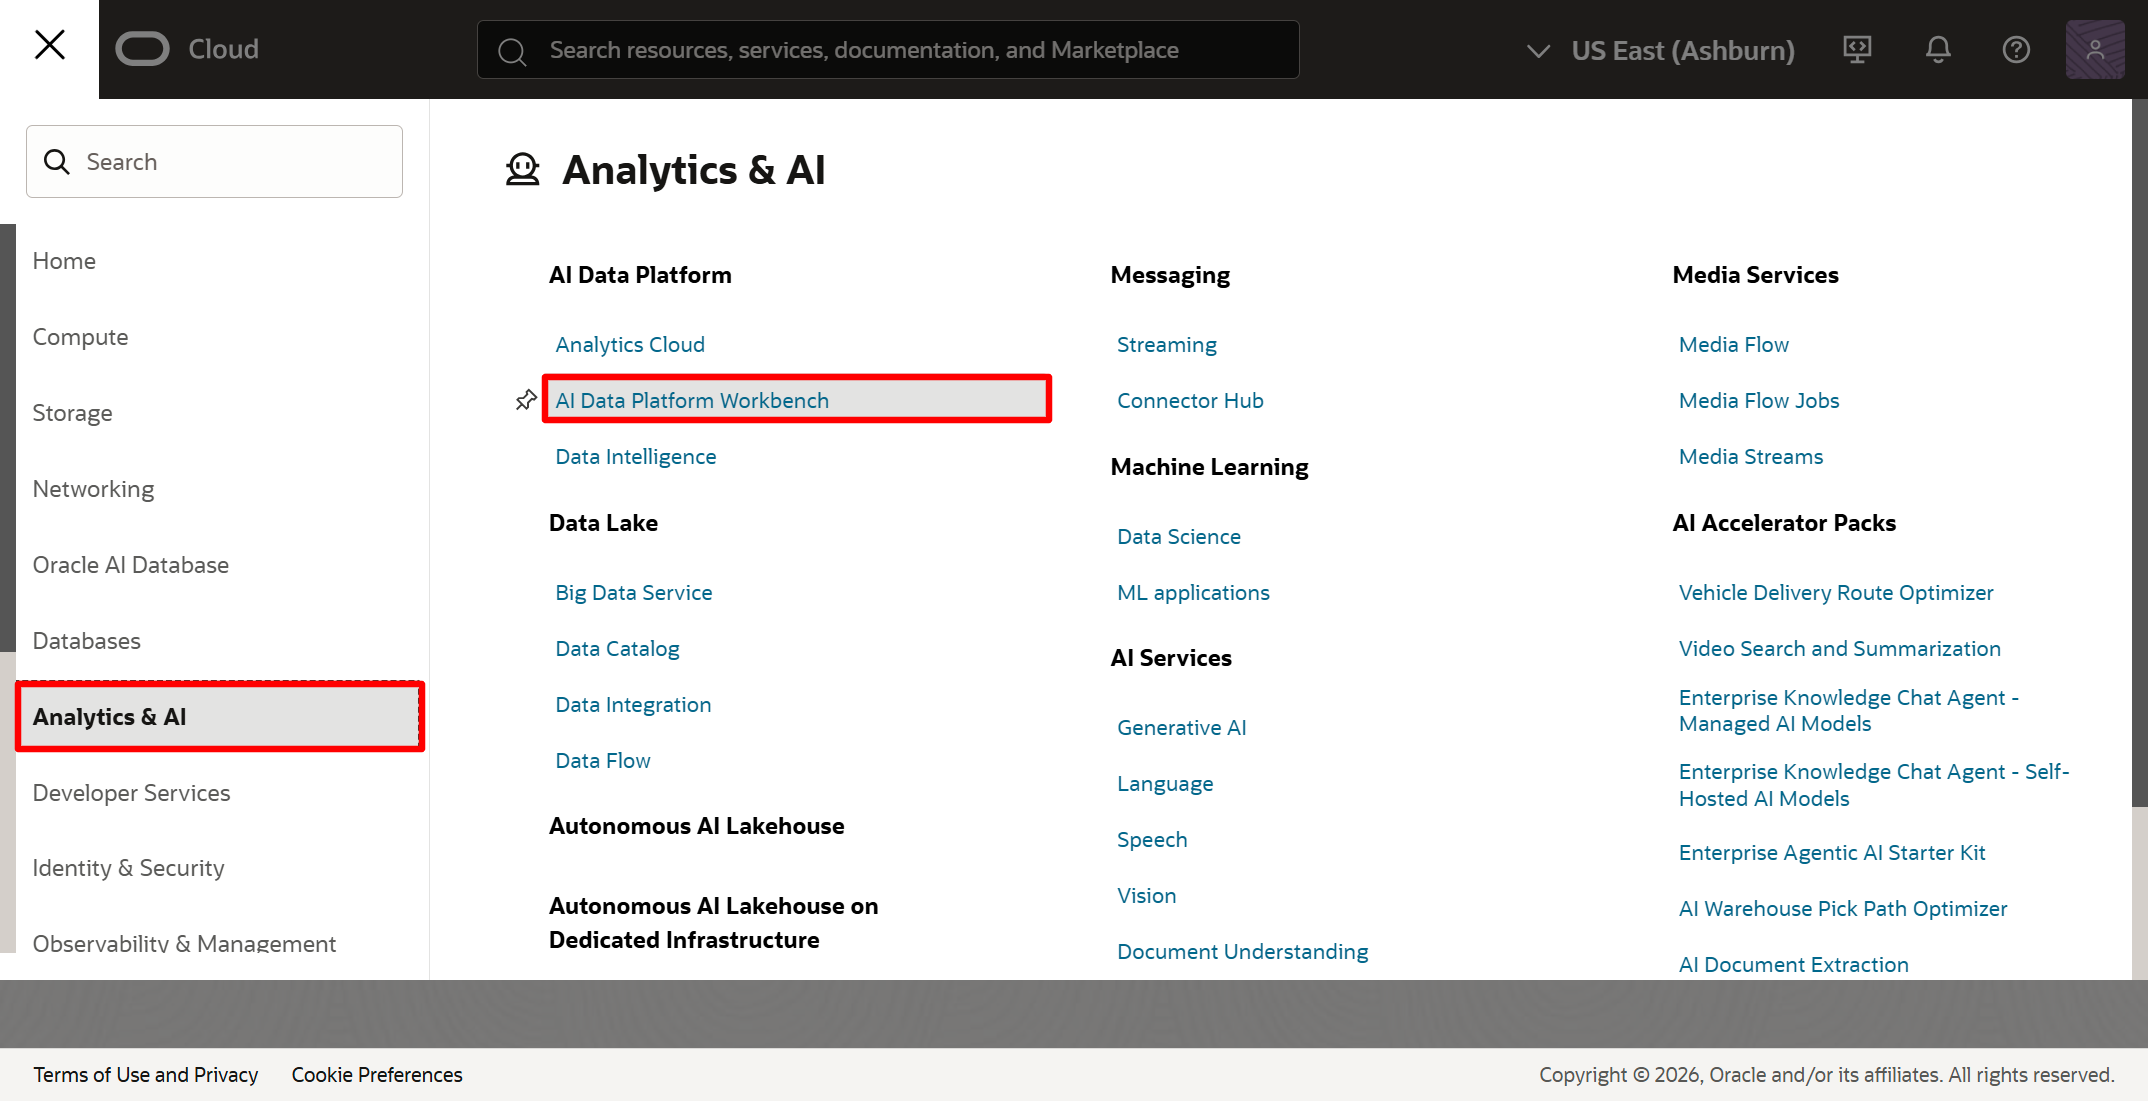
Navigate to Analytics & AI, then click on AI Data Platform Workbench.
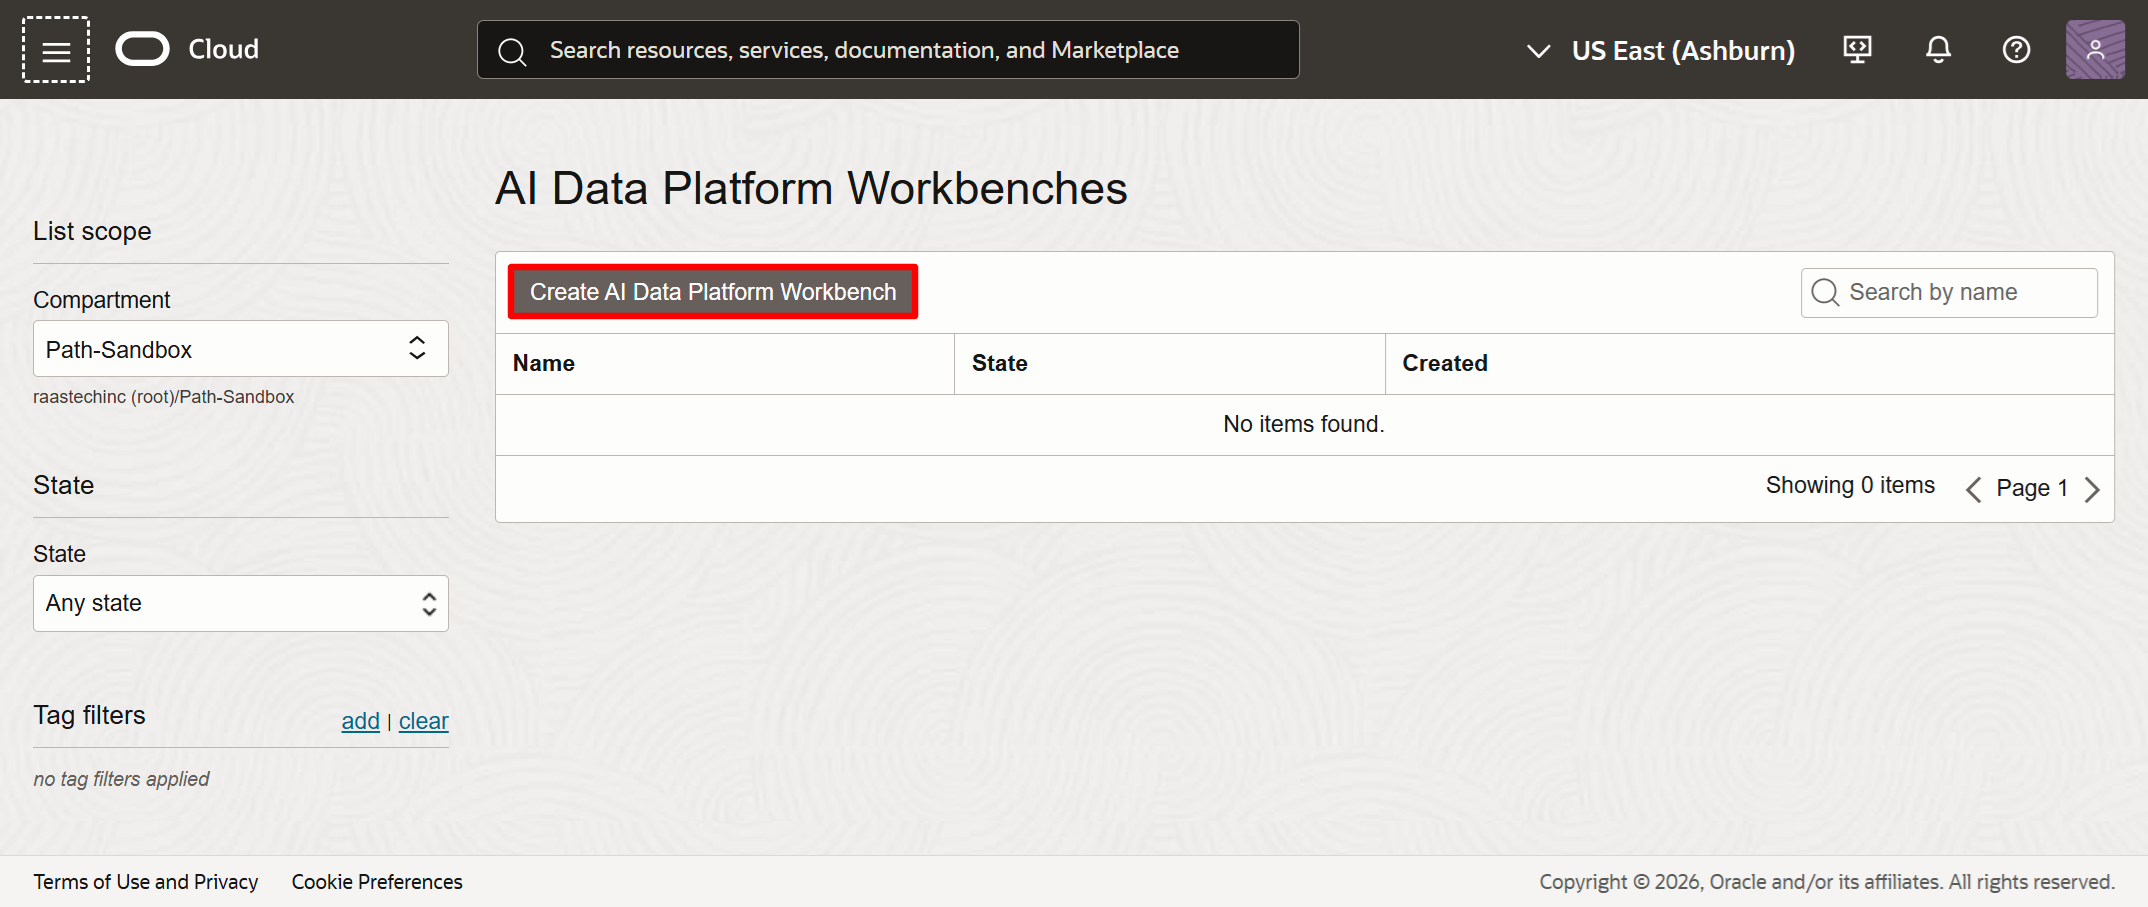
Click on Create AI Data Platform Workbench.
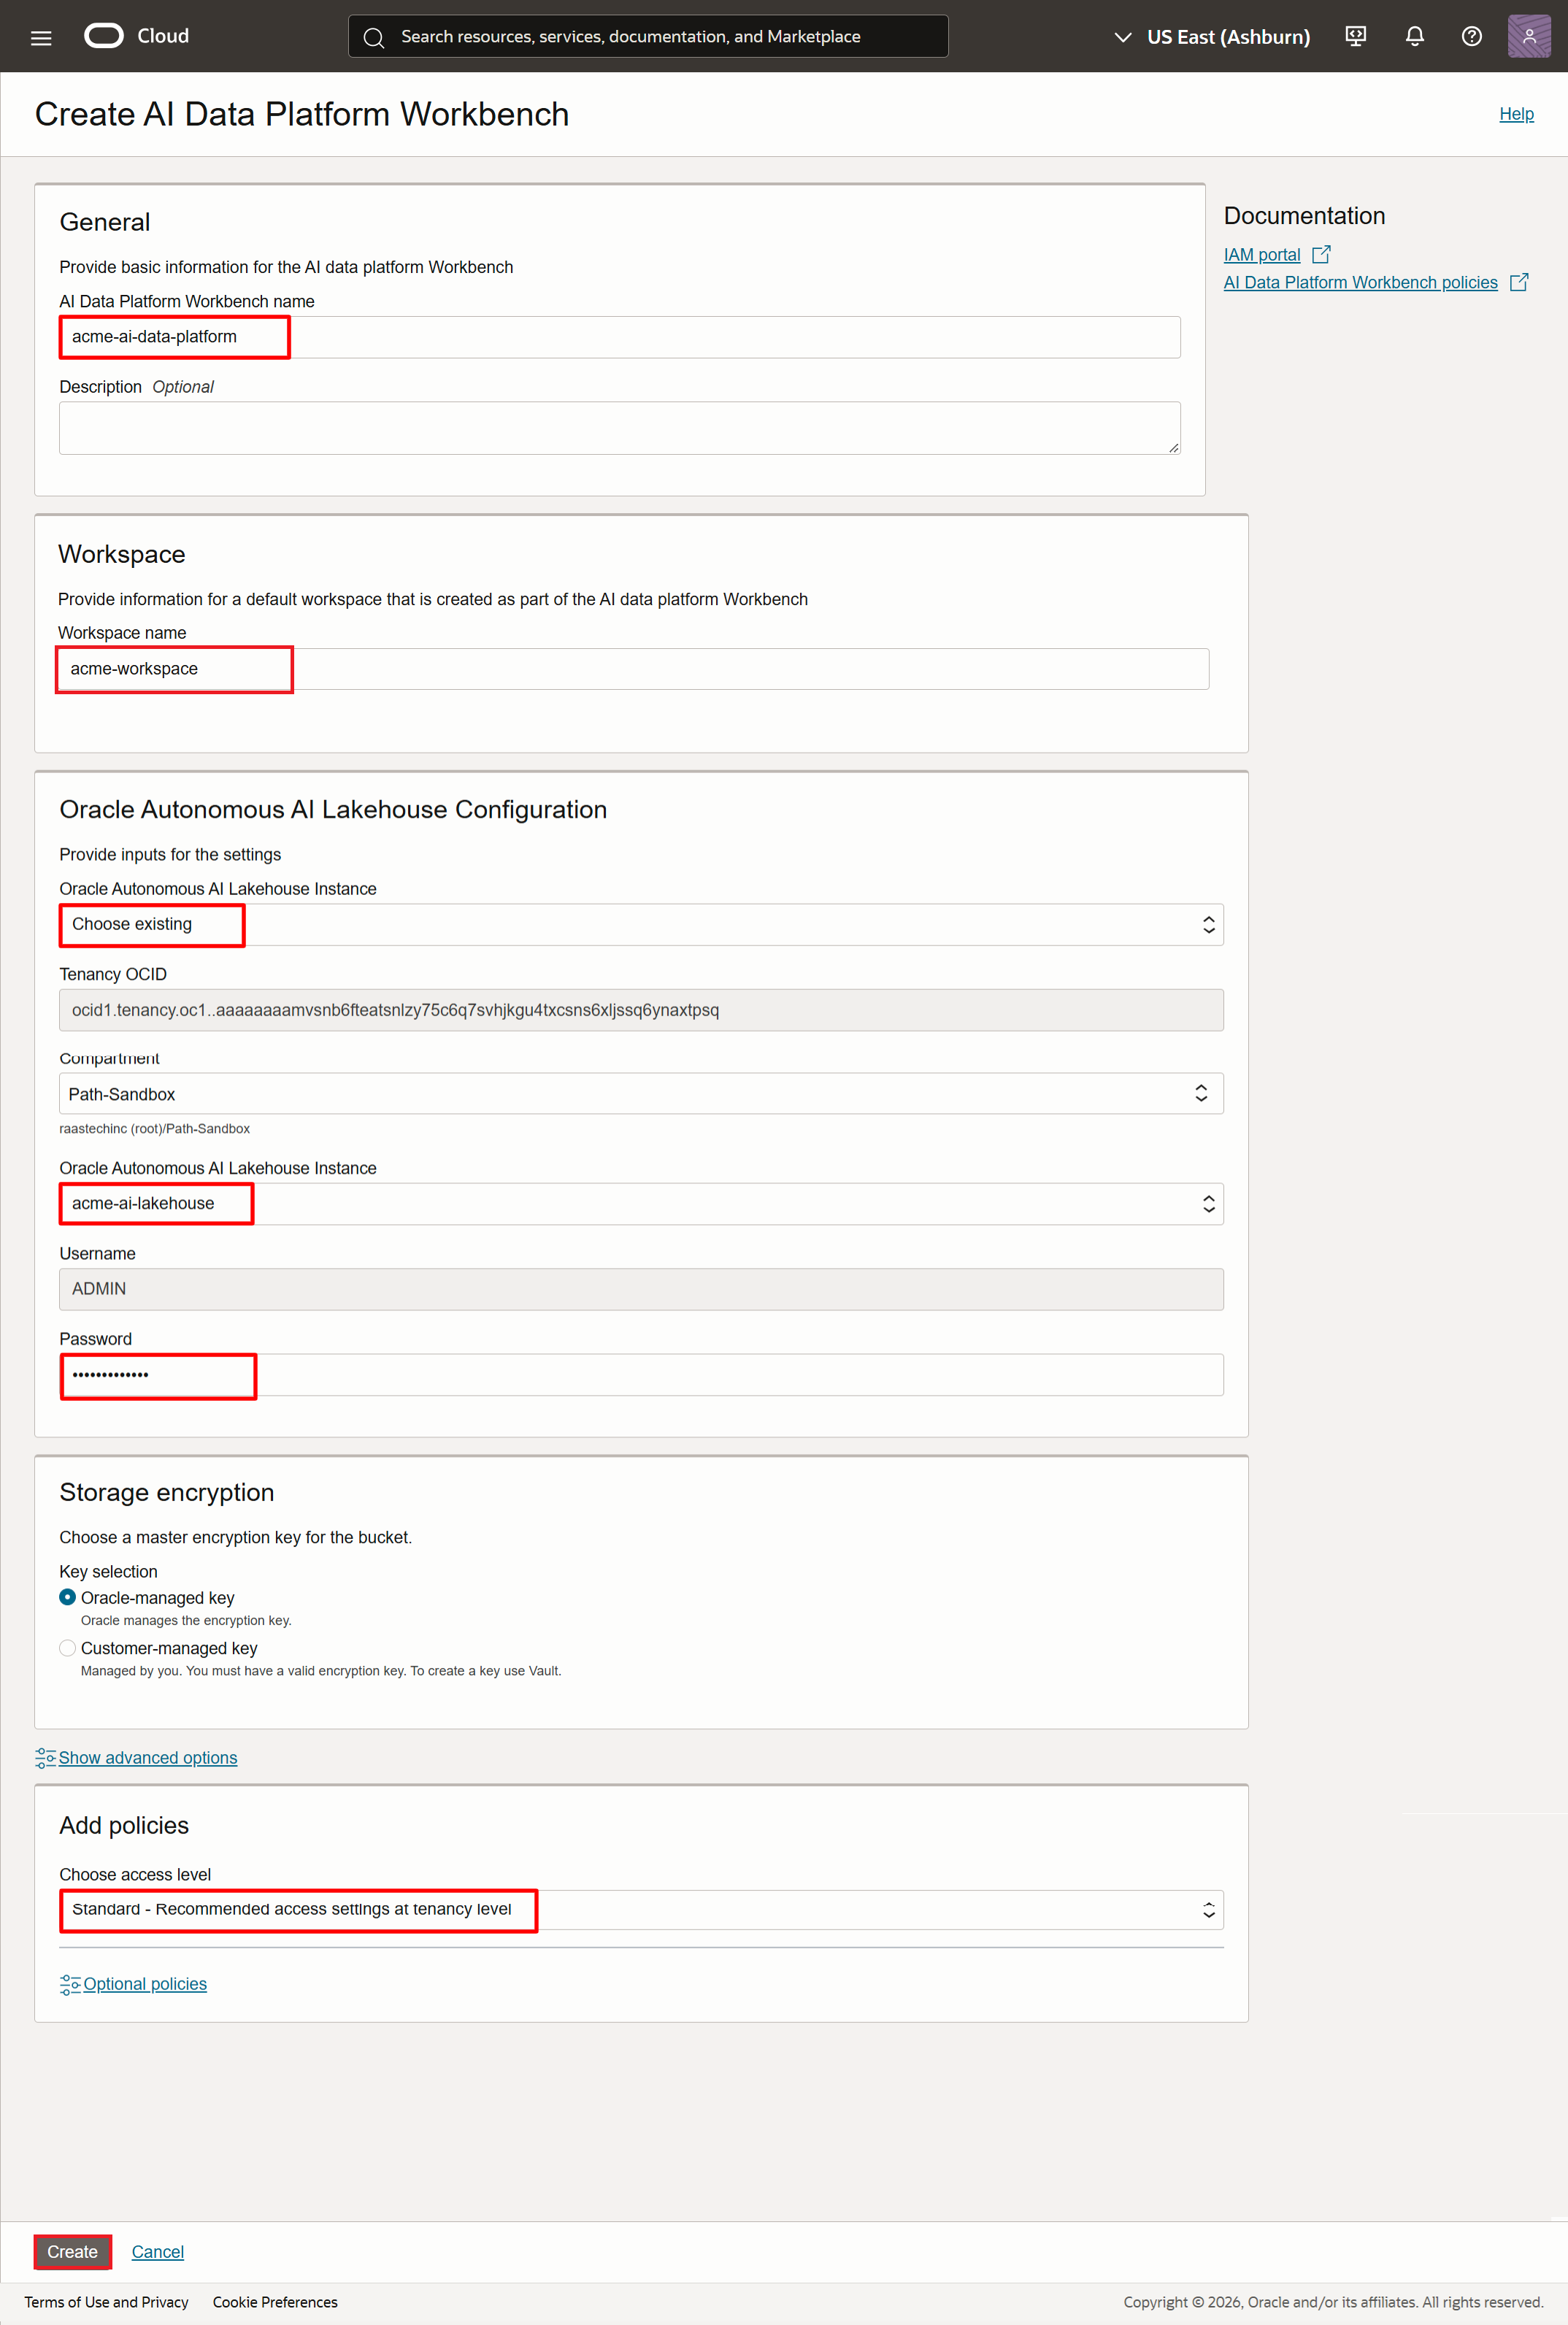
On this screen, enter the AI Data Platform Workbench name acme-ai-data-platform. Enter the Workspace name acme-workspace. Under the Oracle Autonomous AI Lakehouse Instance, select Choose existing, select the lakehouse instance created earlier named acme-ai-lakehouse, and enter its ADMIN password. For the access level, select "Standard" to keep things simple. Click on Create.
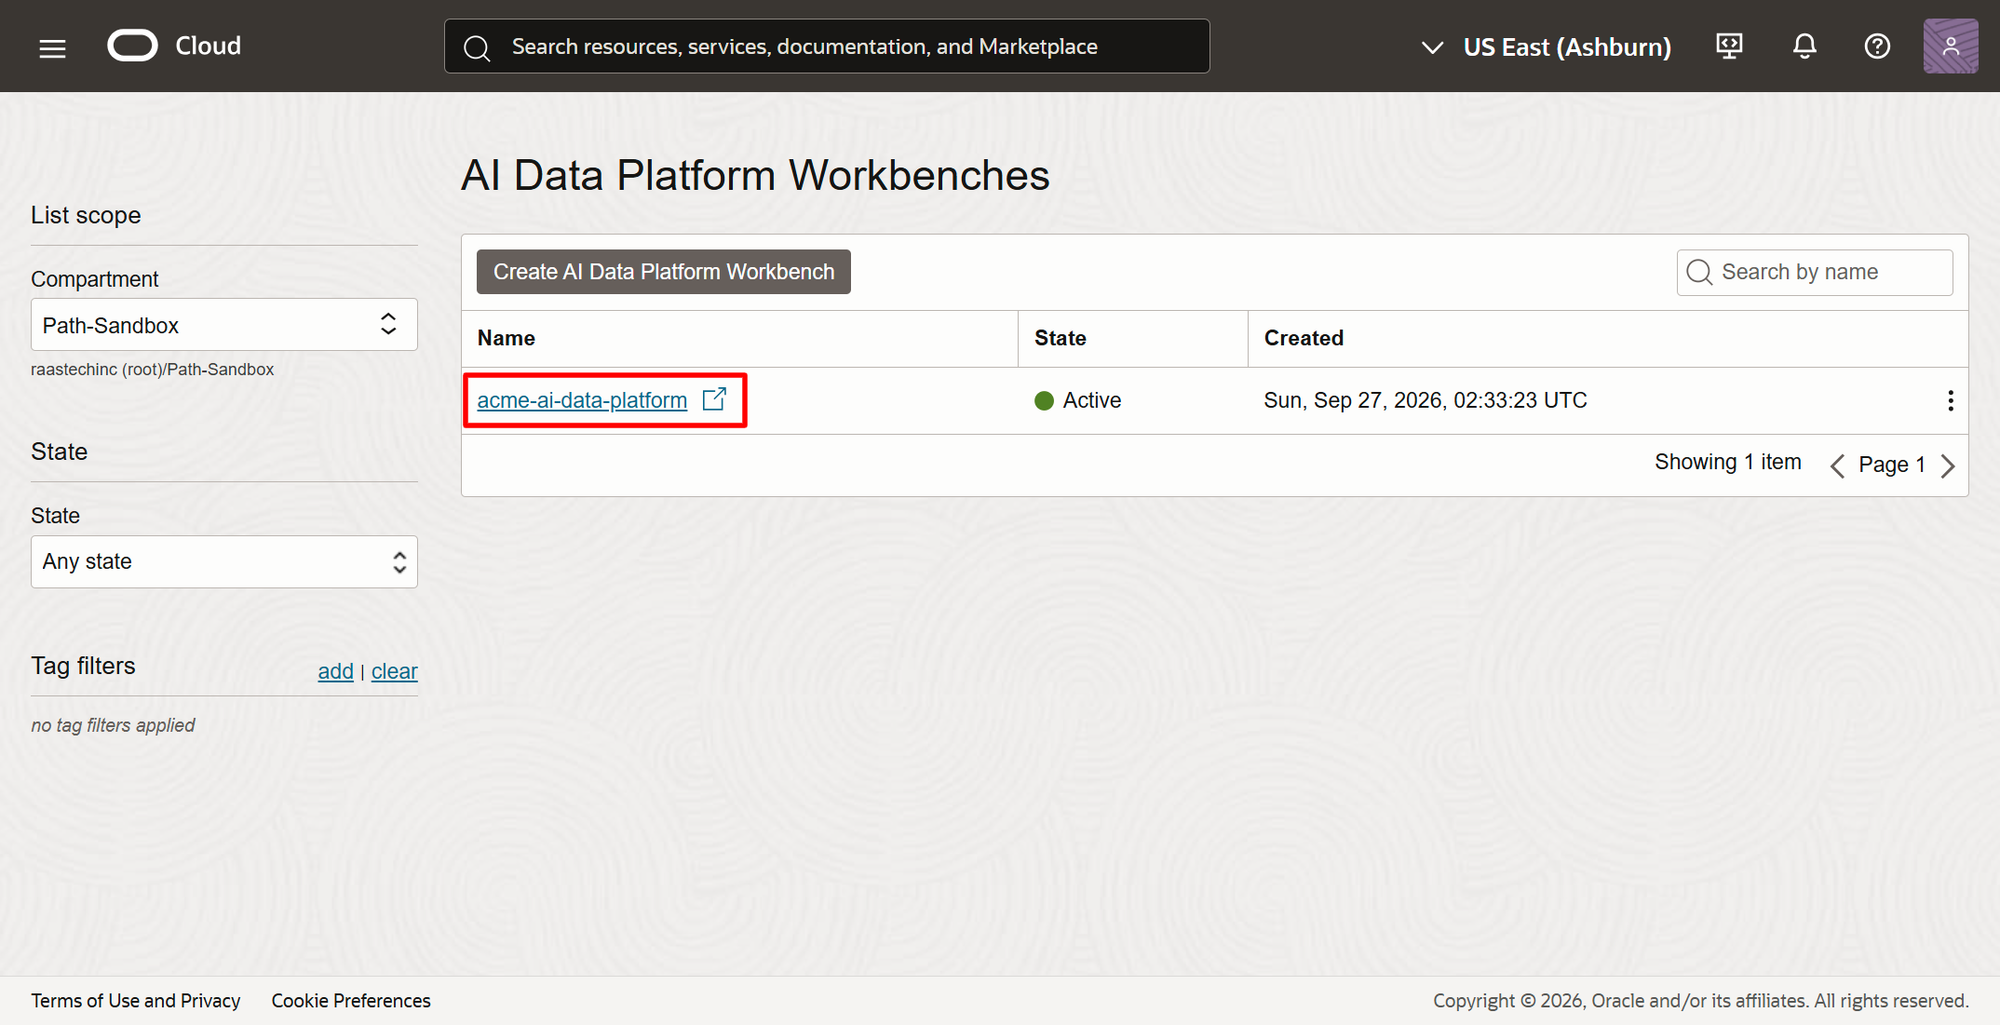
This will take approximately 7 minutes for the platform to be created.
7. Create a master catalog to host our unstructured data
This workbench name is acme-ai-data-platform. Click on it.
A new browser tab will open taking you to the console for this workbench. Select Master catalog to create the knowledge base from the unstructured data.
A master catalog is a central location for organizing, discovering, and governing data assets and their metadata. Think of it as a top-level container for the catalogs, schemas, tables, files, and other data sources referenced within the platform.
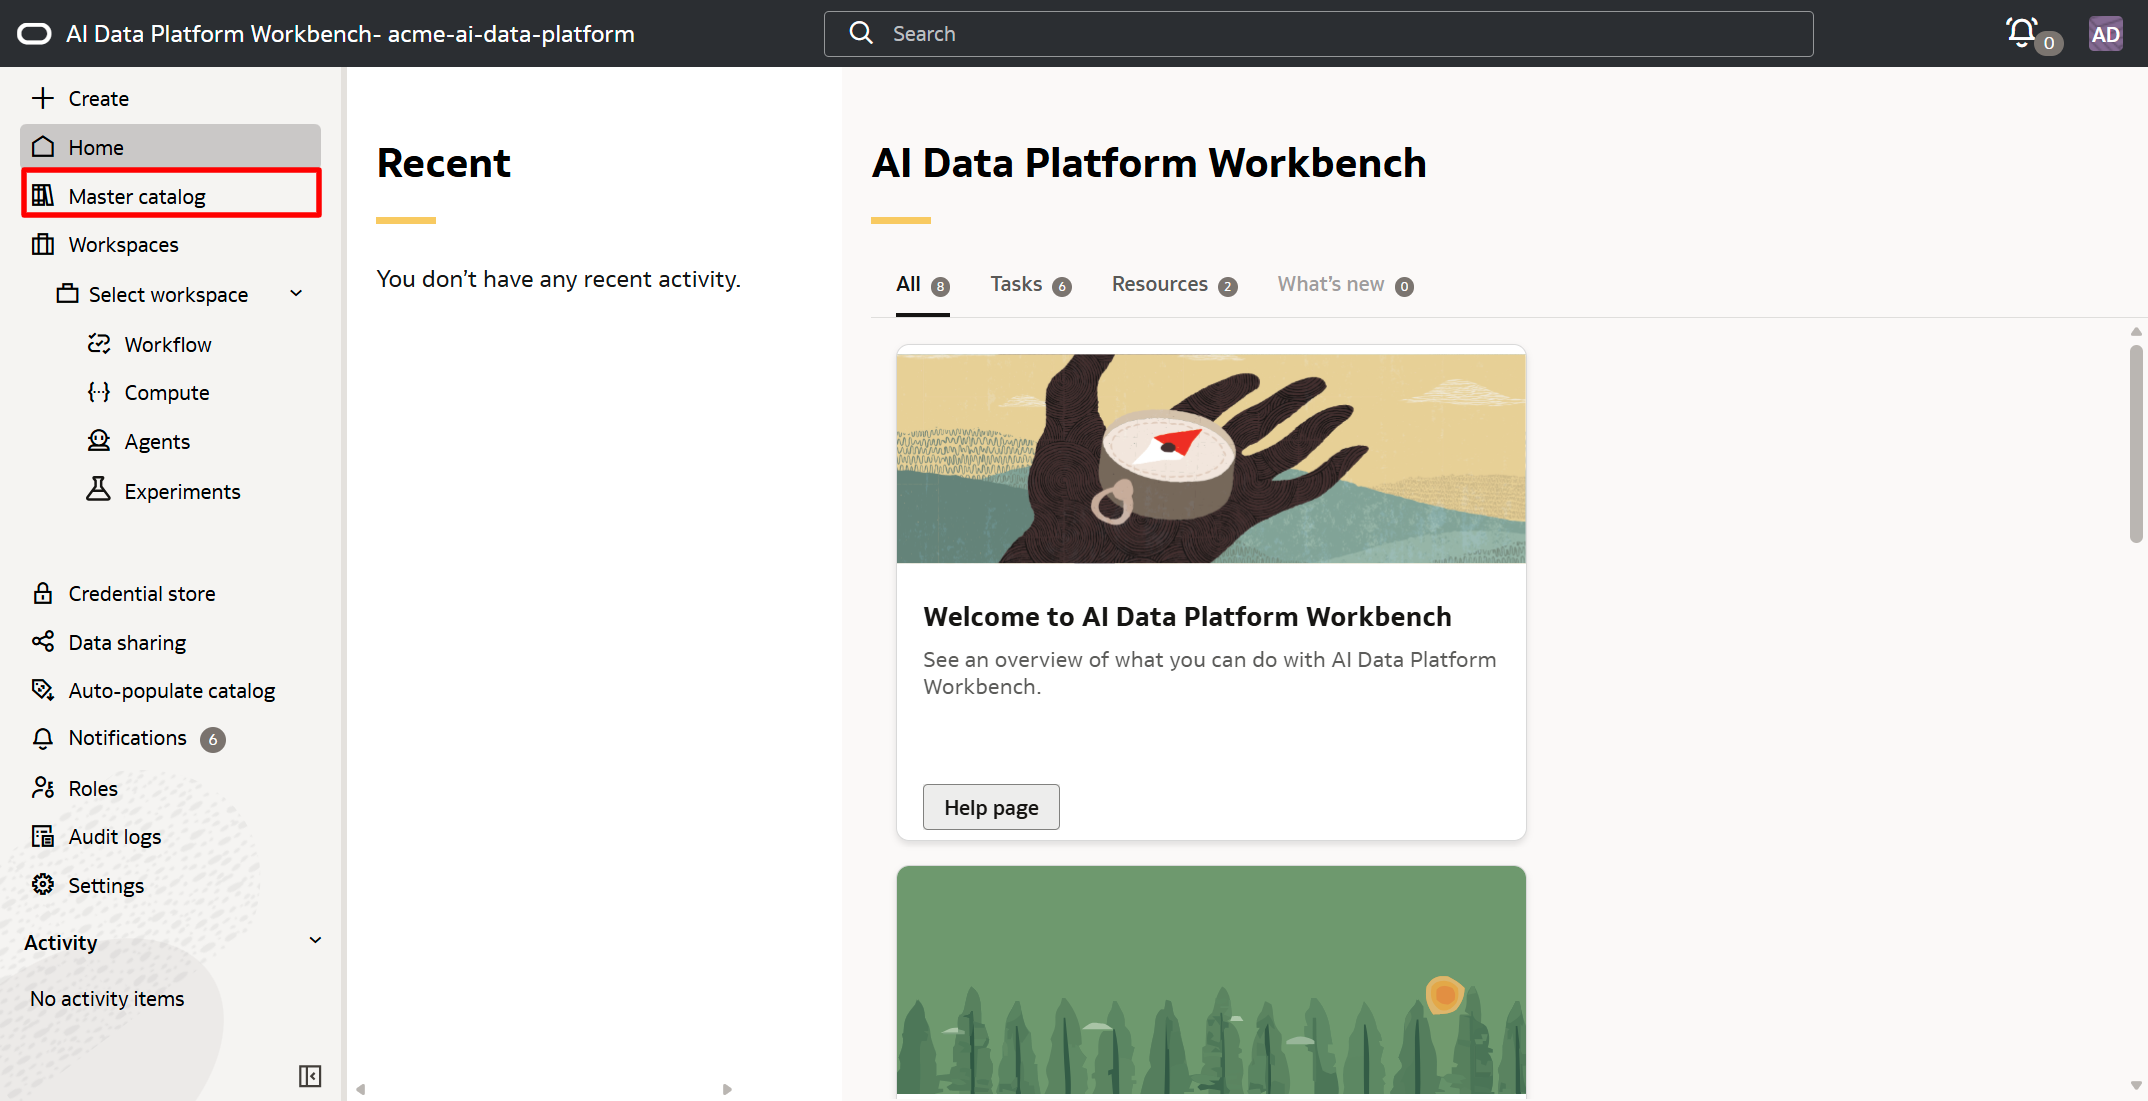
To create a new master catalog, click on the + sign.
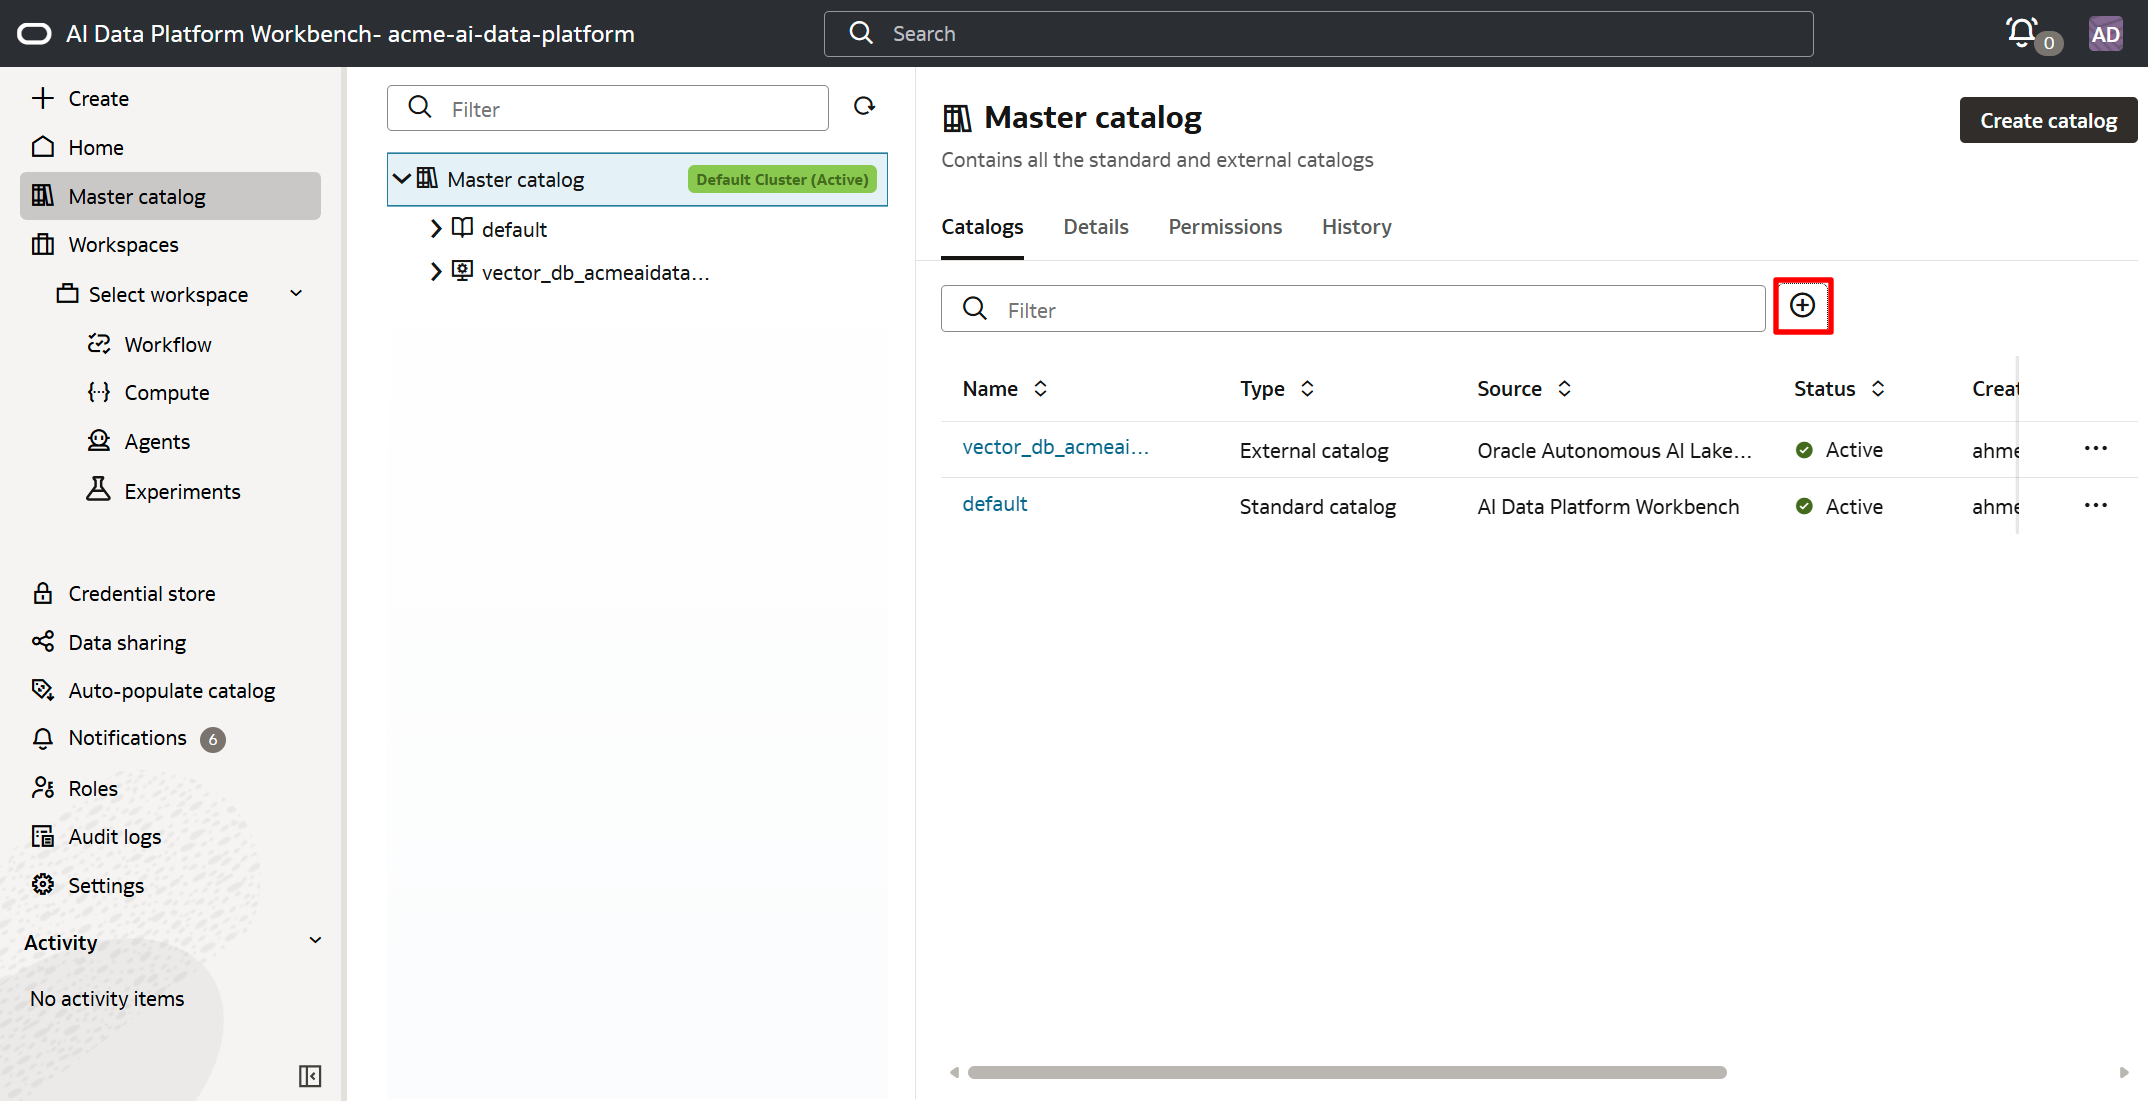
For the catalog name, enter acme_master_catalog_standard. This is intended to reference our unstructured data. Select a catalog type of "Standard catalog". Choose your compartment, then click Create.
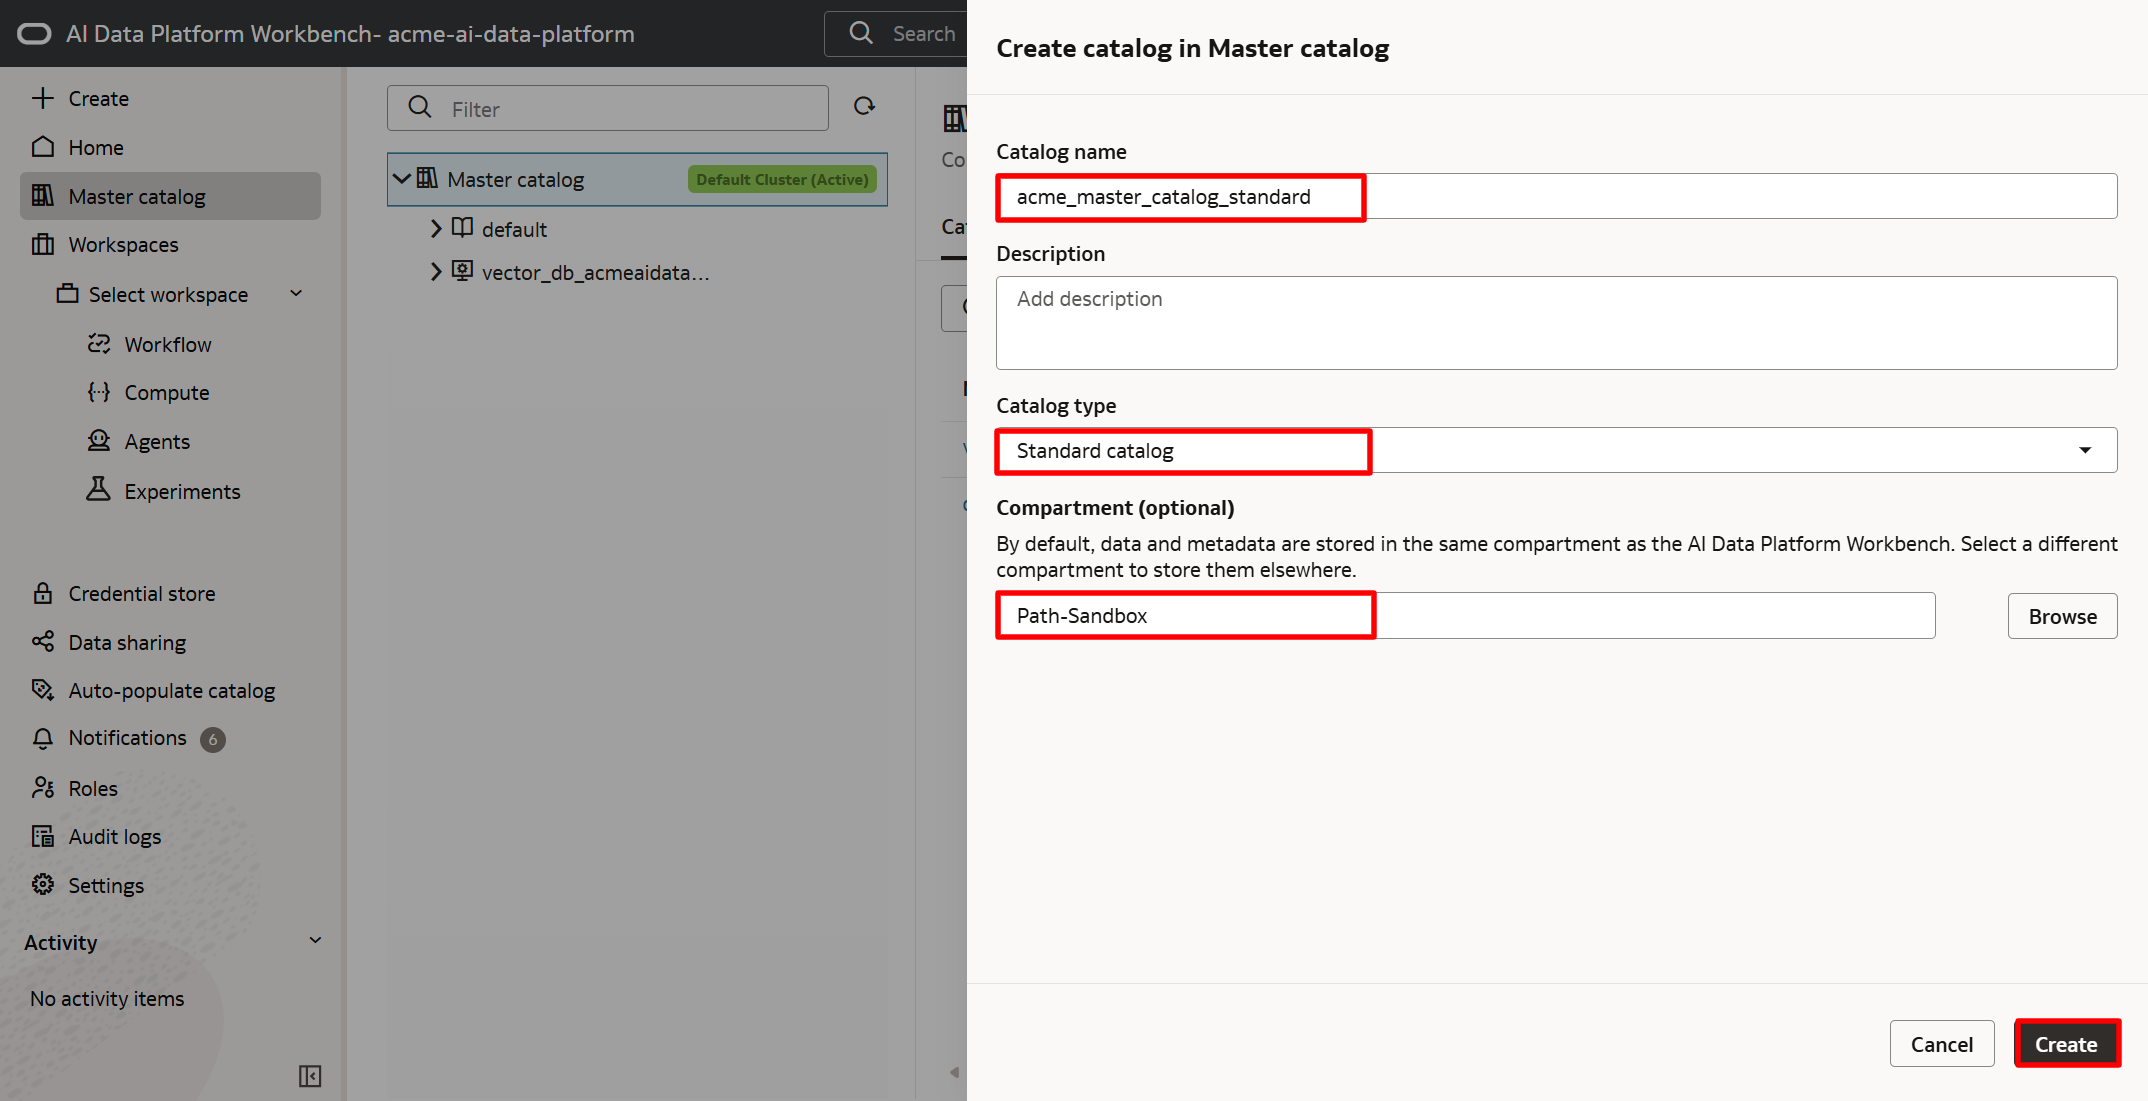
Now click on the master catalog name that was just created.
This newly created master catalog has a schema already created called "default". This will be used for now. Click on the schema name "default".
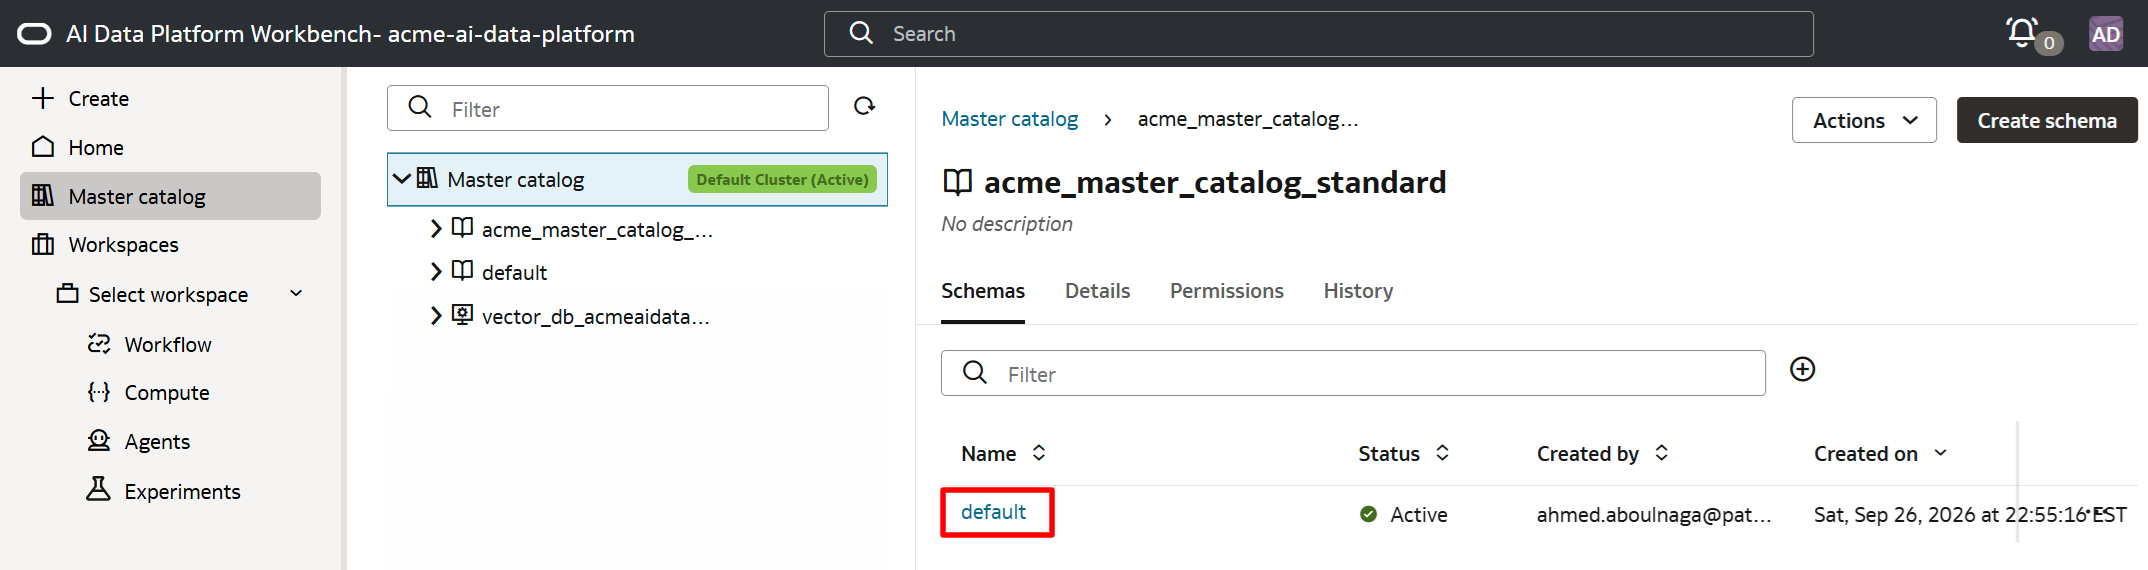
In this schema, both a volume and a knowledge base will be created. The volume operates as an external data source, specifically referring to the bucket created earlier. The knowledge base will then reference the source data in the volume.
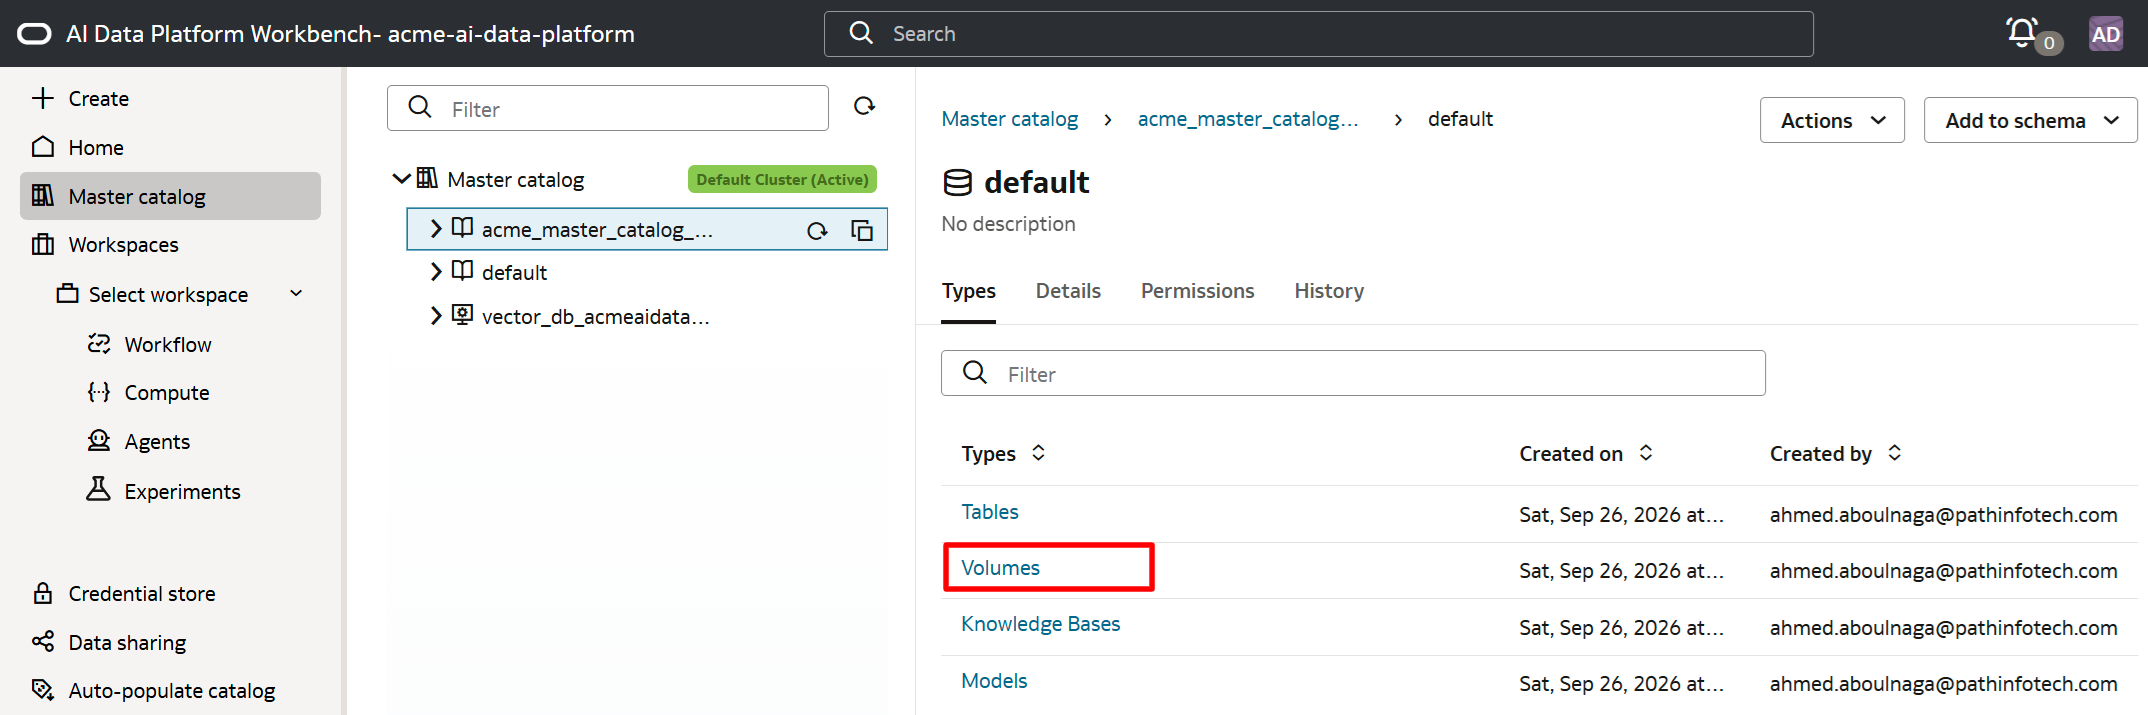
Click on Volumes.
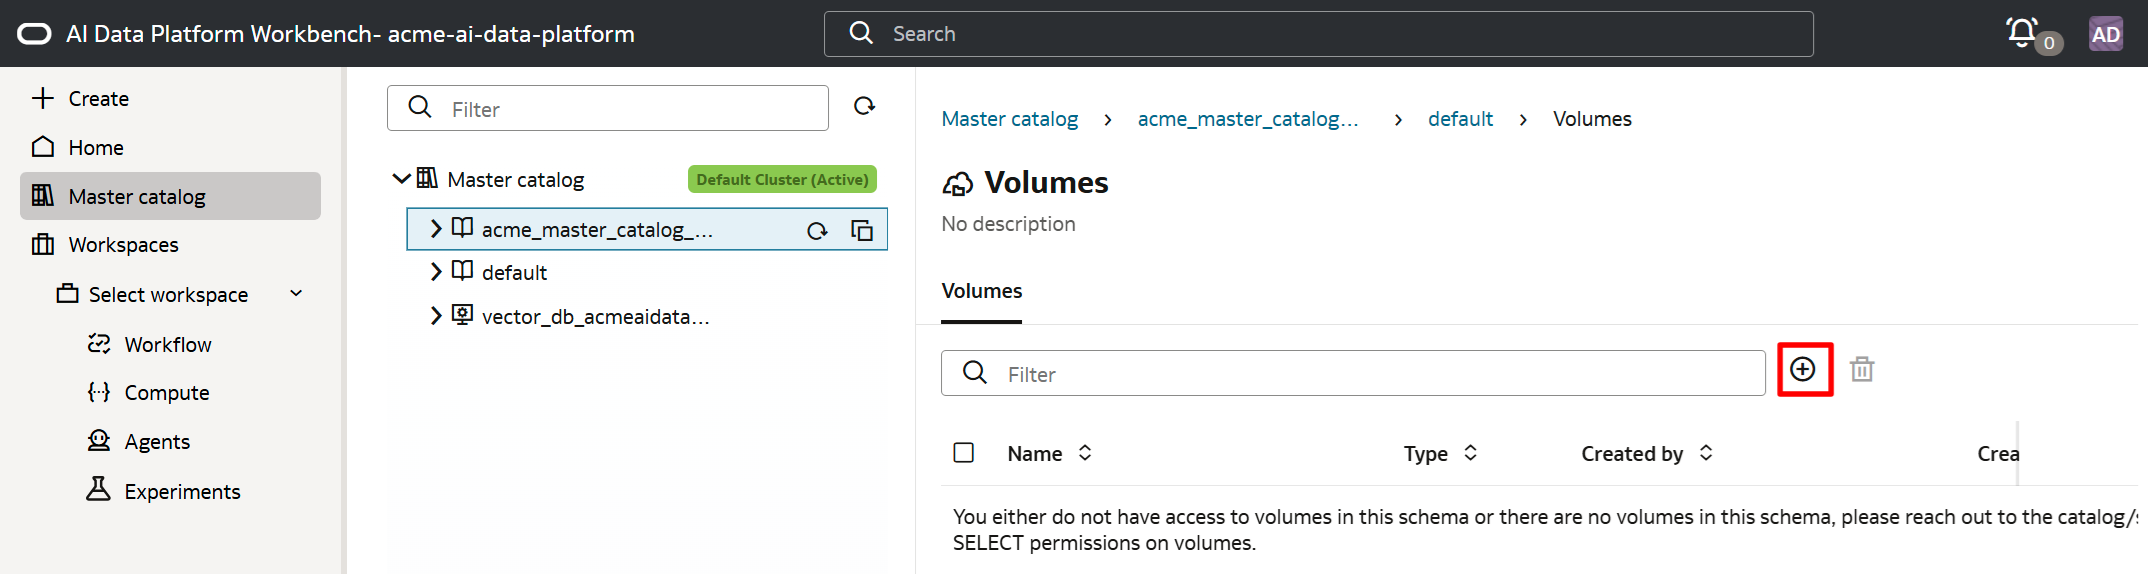
Click the + sign to create a volume.
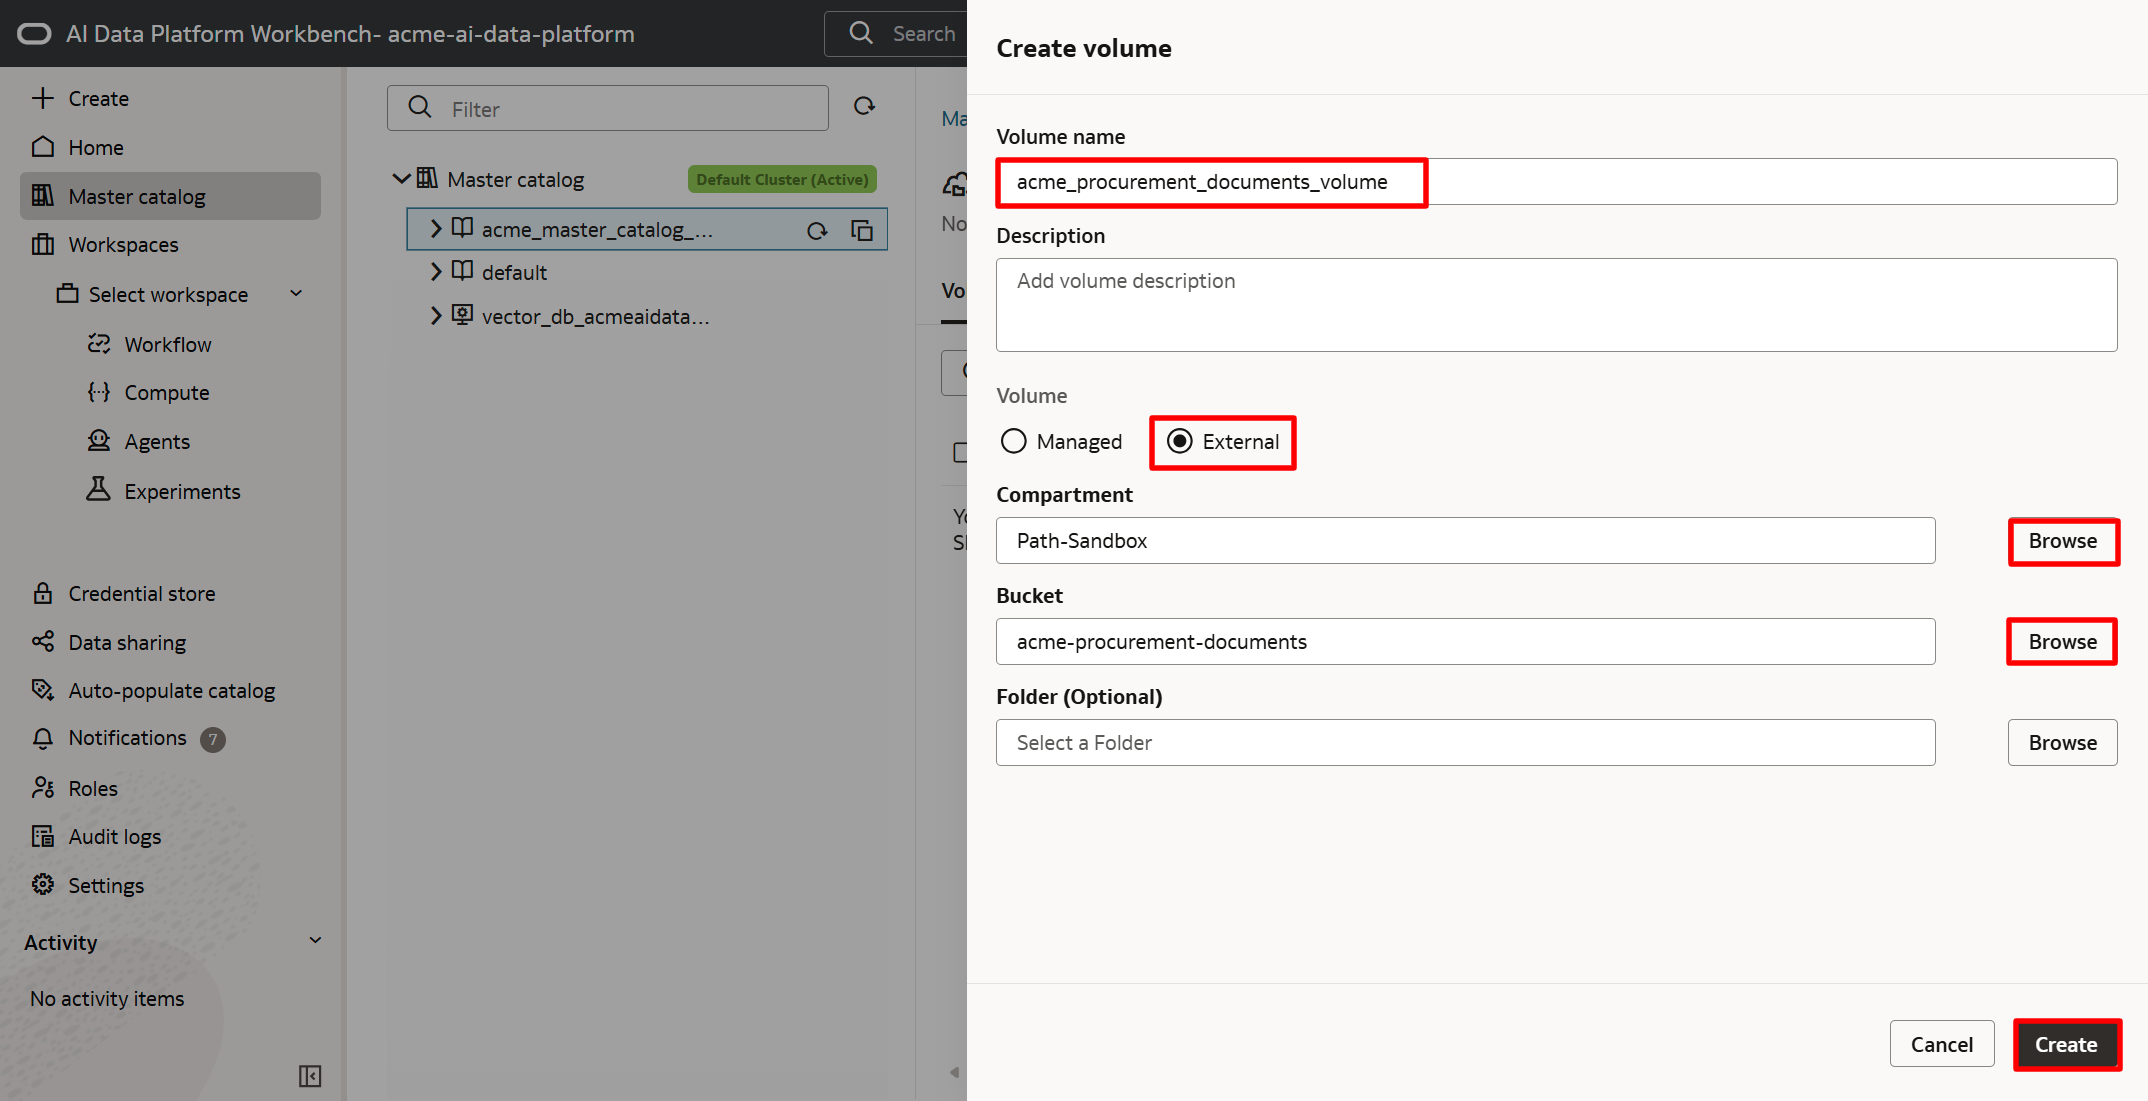
Enter the volume name acme_procurement_documents_volume. Though it is possible to select a managed volume (where we can upload the documents directly from the platform), instead select External to reference the external bucket that was created earlier. Click on Browse to select the compartment and the bucket. Then click Create.
Click on the newly created volume name.
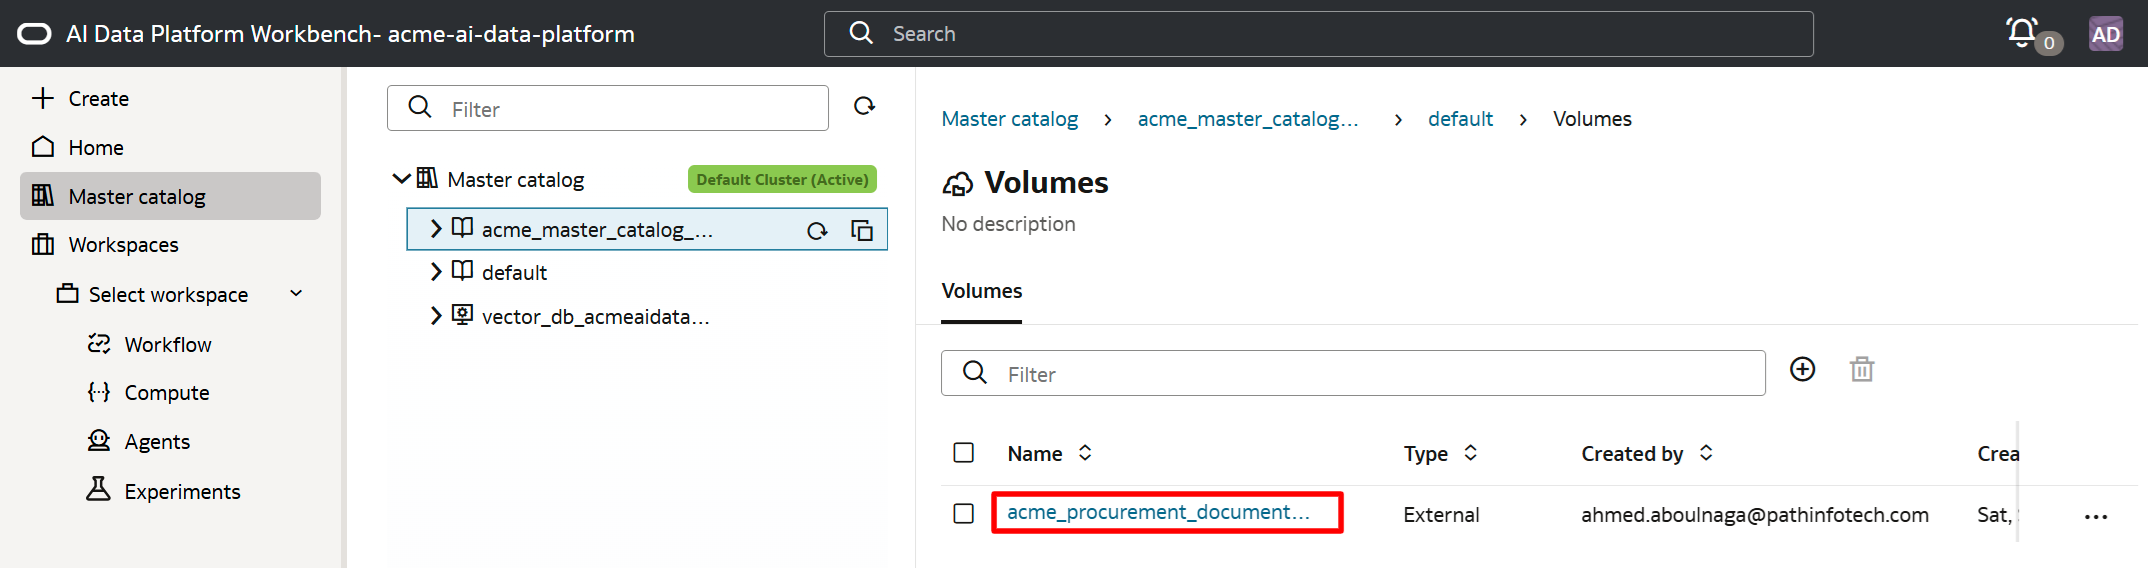
The list of documents that were previously uploaded to the bucket can be seen here. This is not a duplicate of the bucket. This is just a reference to it. By clicking on the + sign, additional documents can be added to this bucket from here as well.
The next step is to create a knowledge base, so click on ... then default to go back.
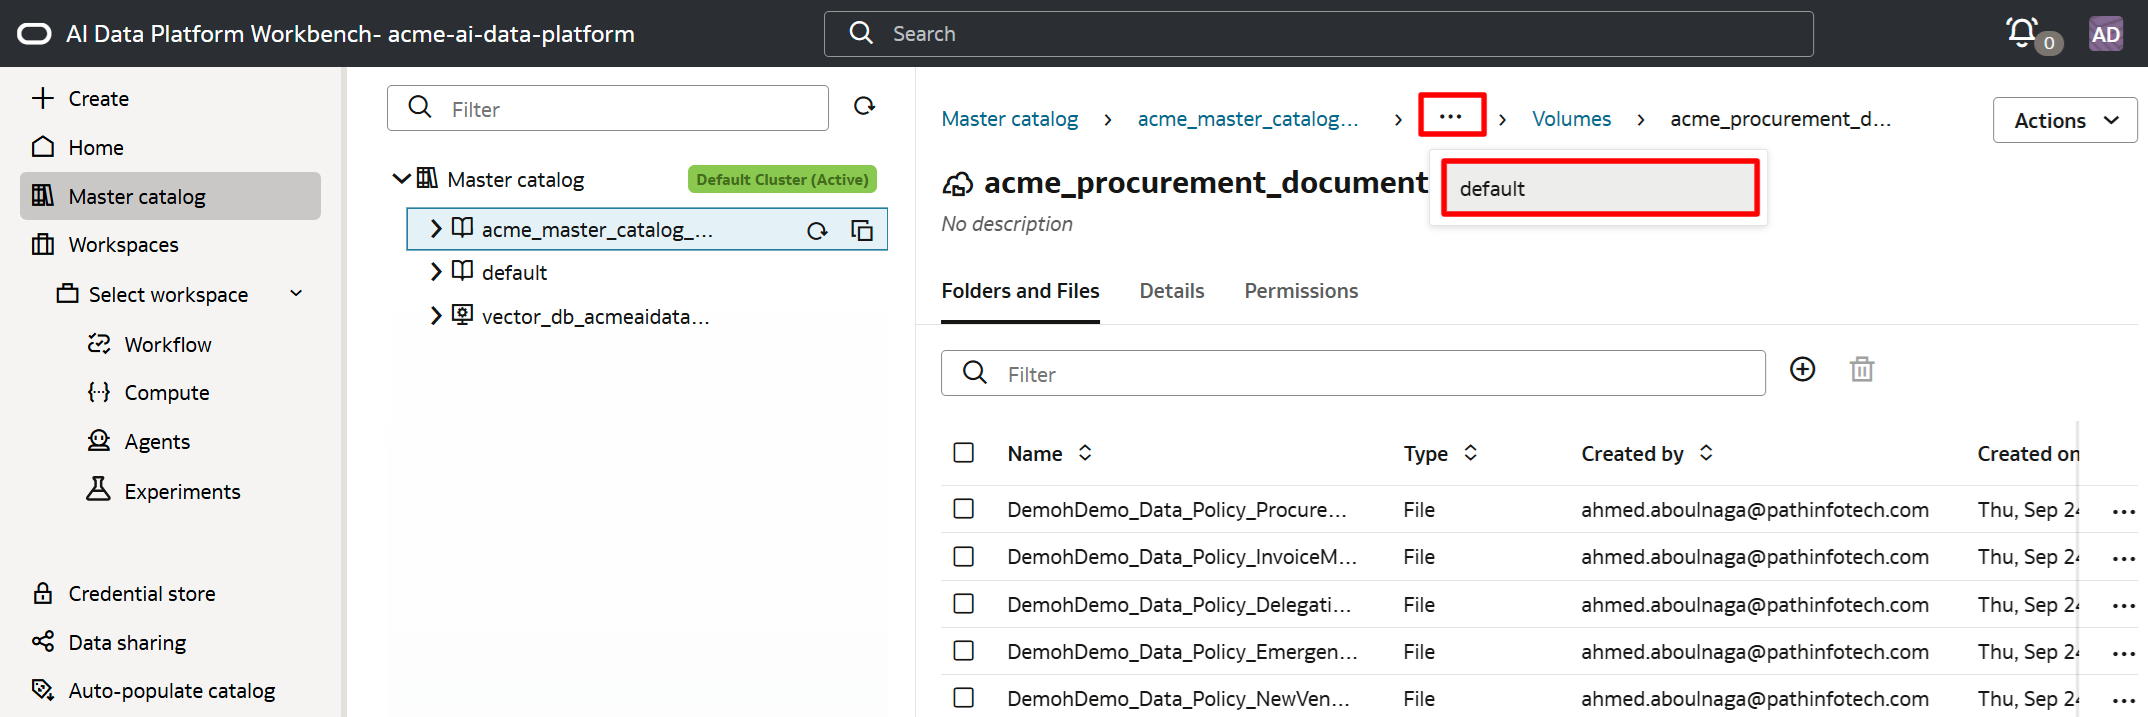
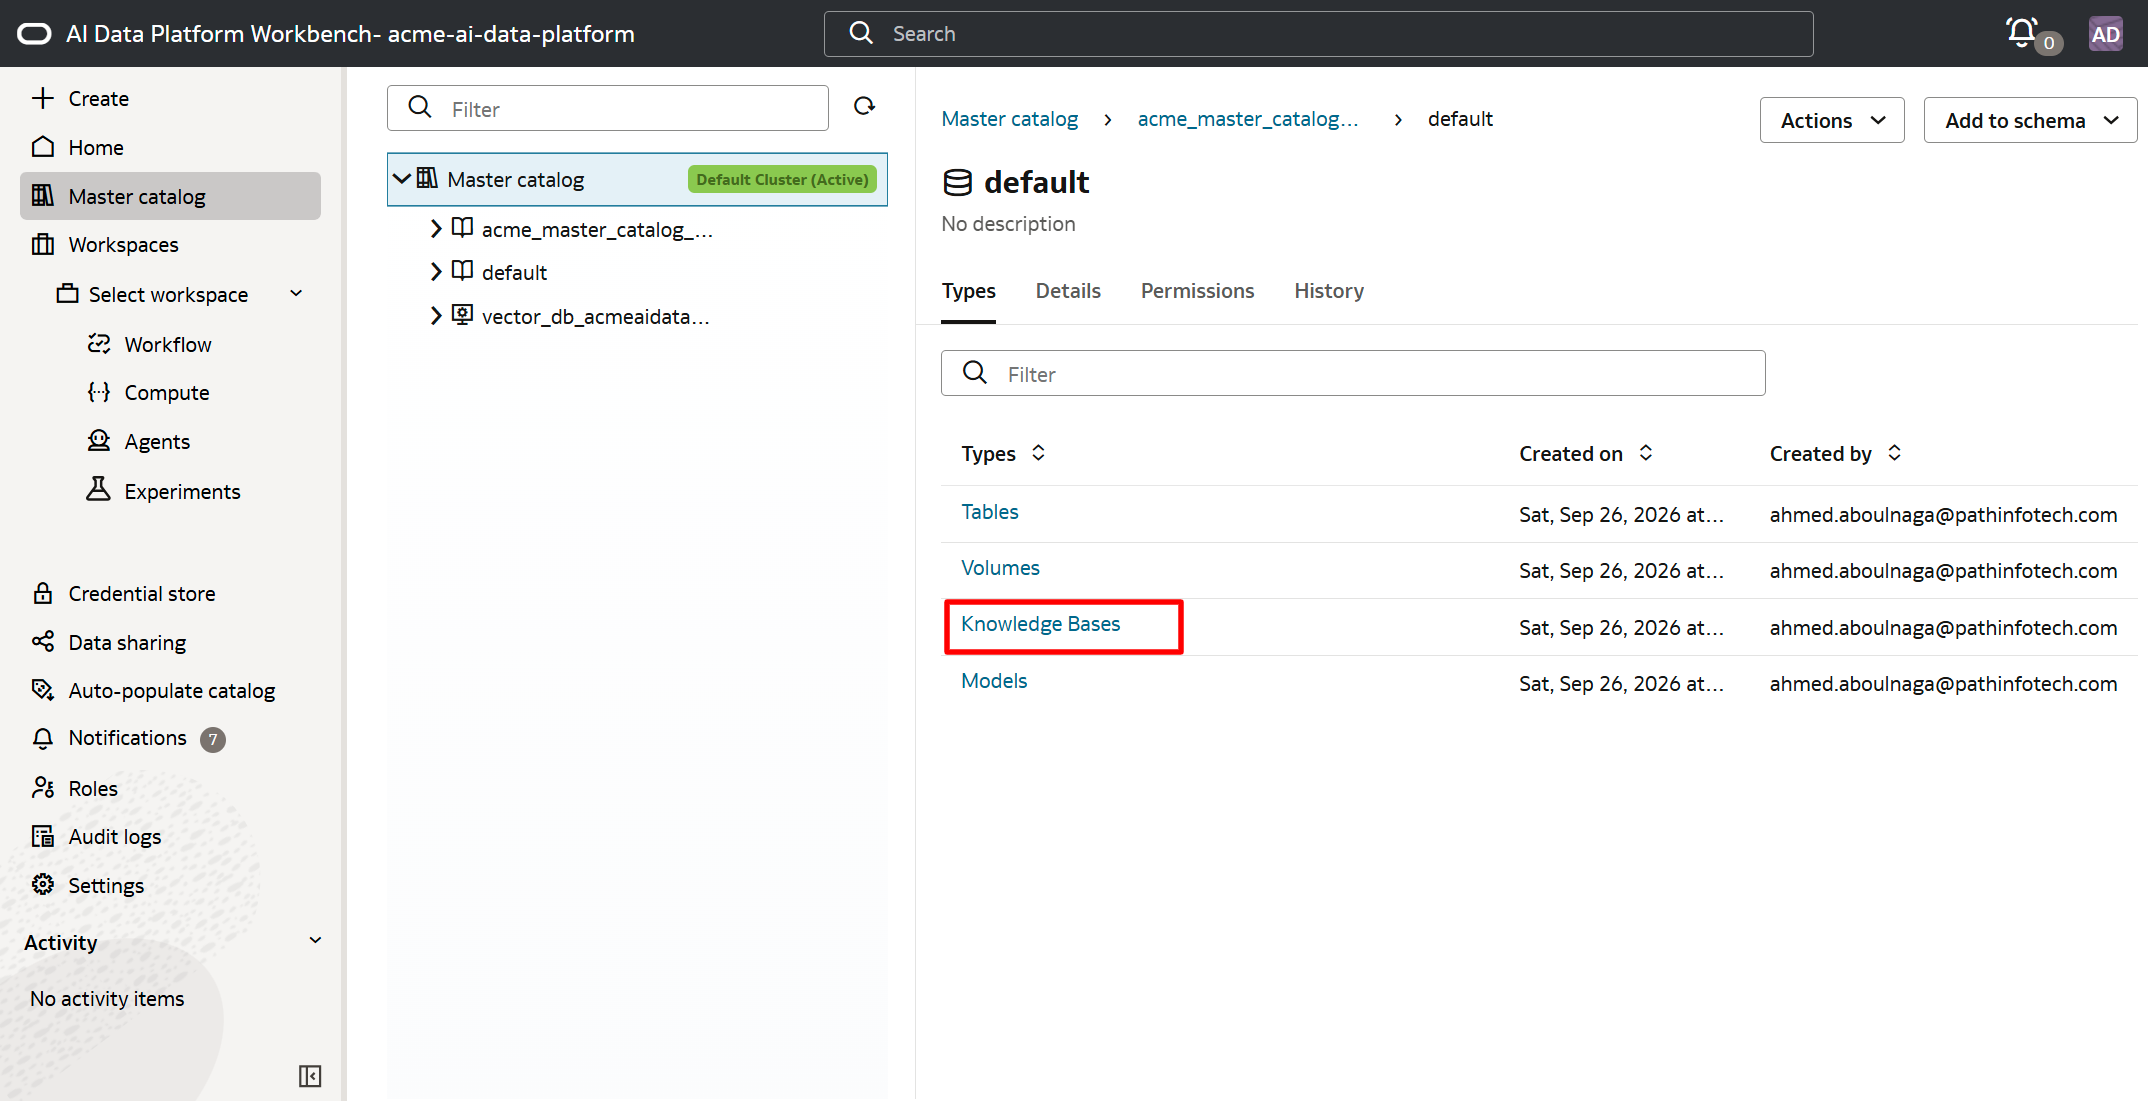
A knowledge base provides the foundation for AI agents to access, search, and reason over curated enterprise knowledge through deeper semantic retrieval grounded in our actual content rather than just keywords. The agent that will be created later interacts with knowledge bases, not volumes.
Click on Knowledge Bases.
Click on the + sign to create a knowledge base.
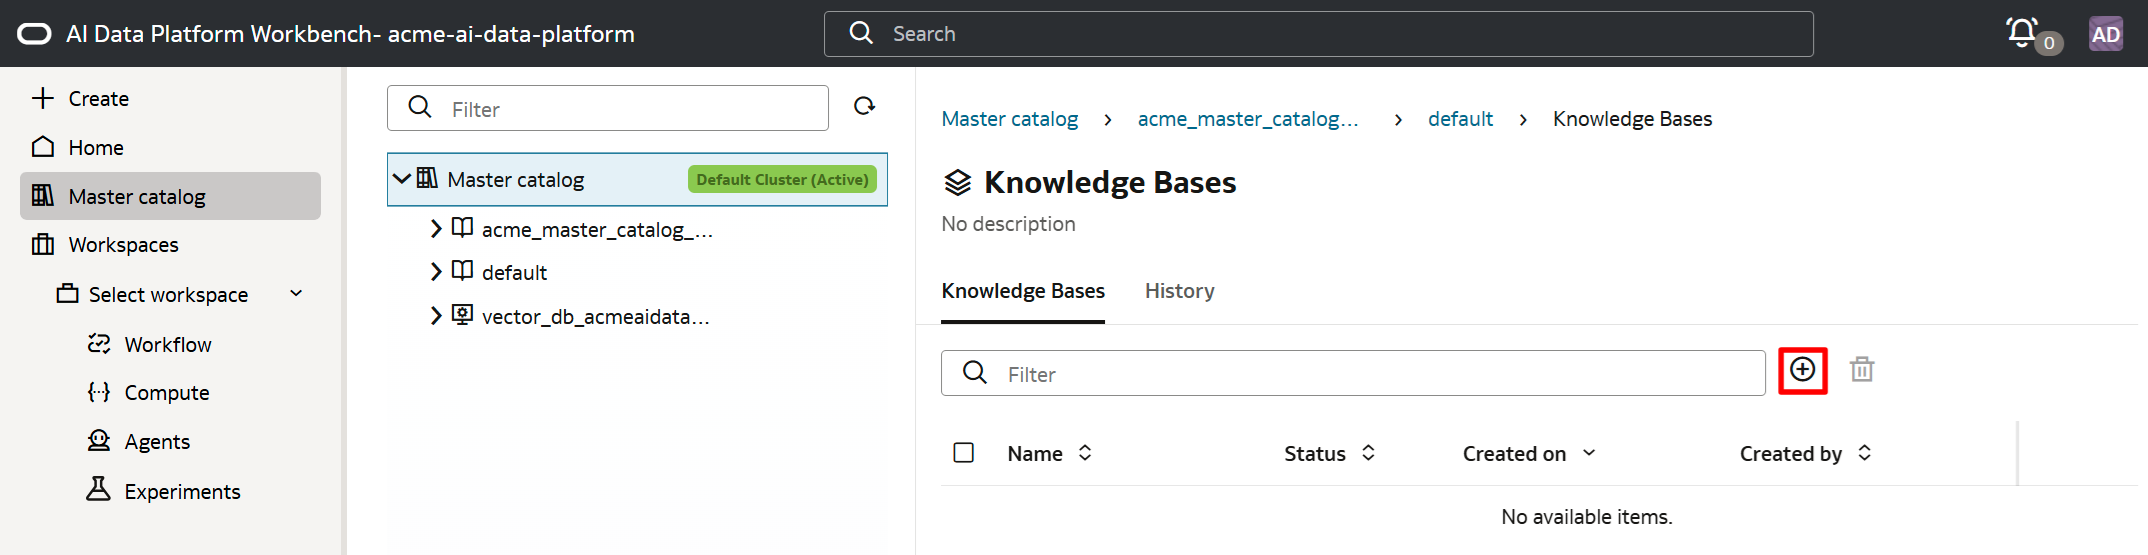
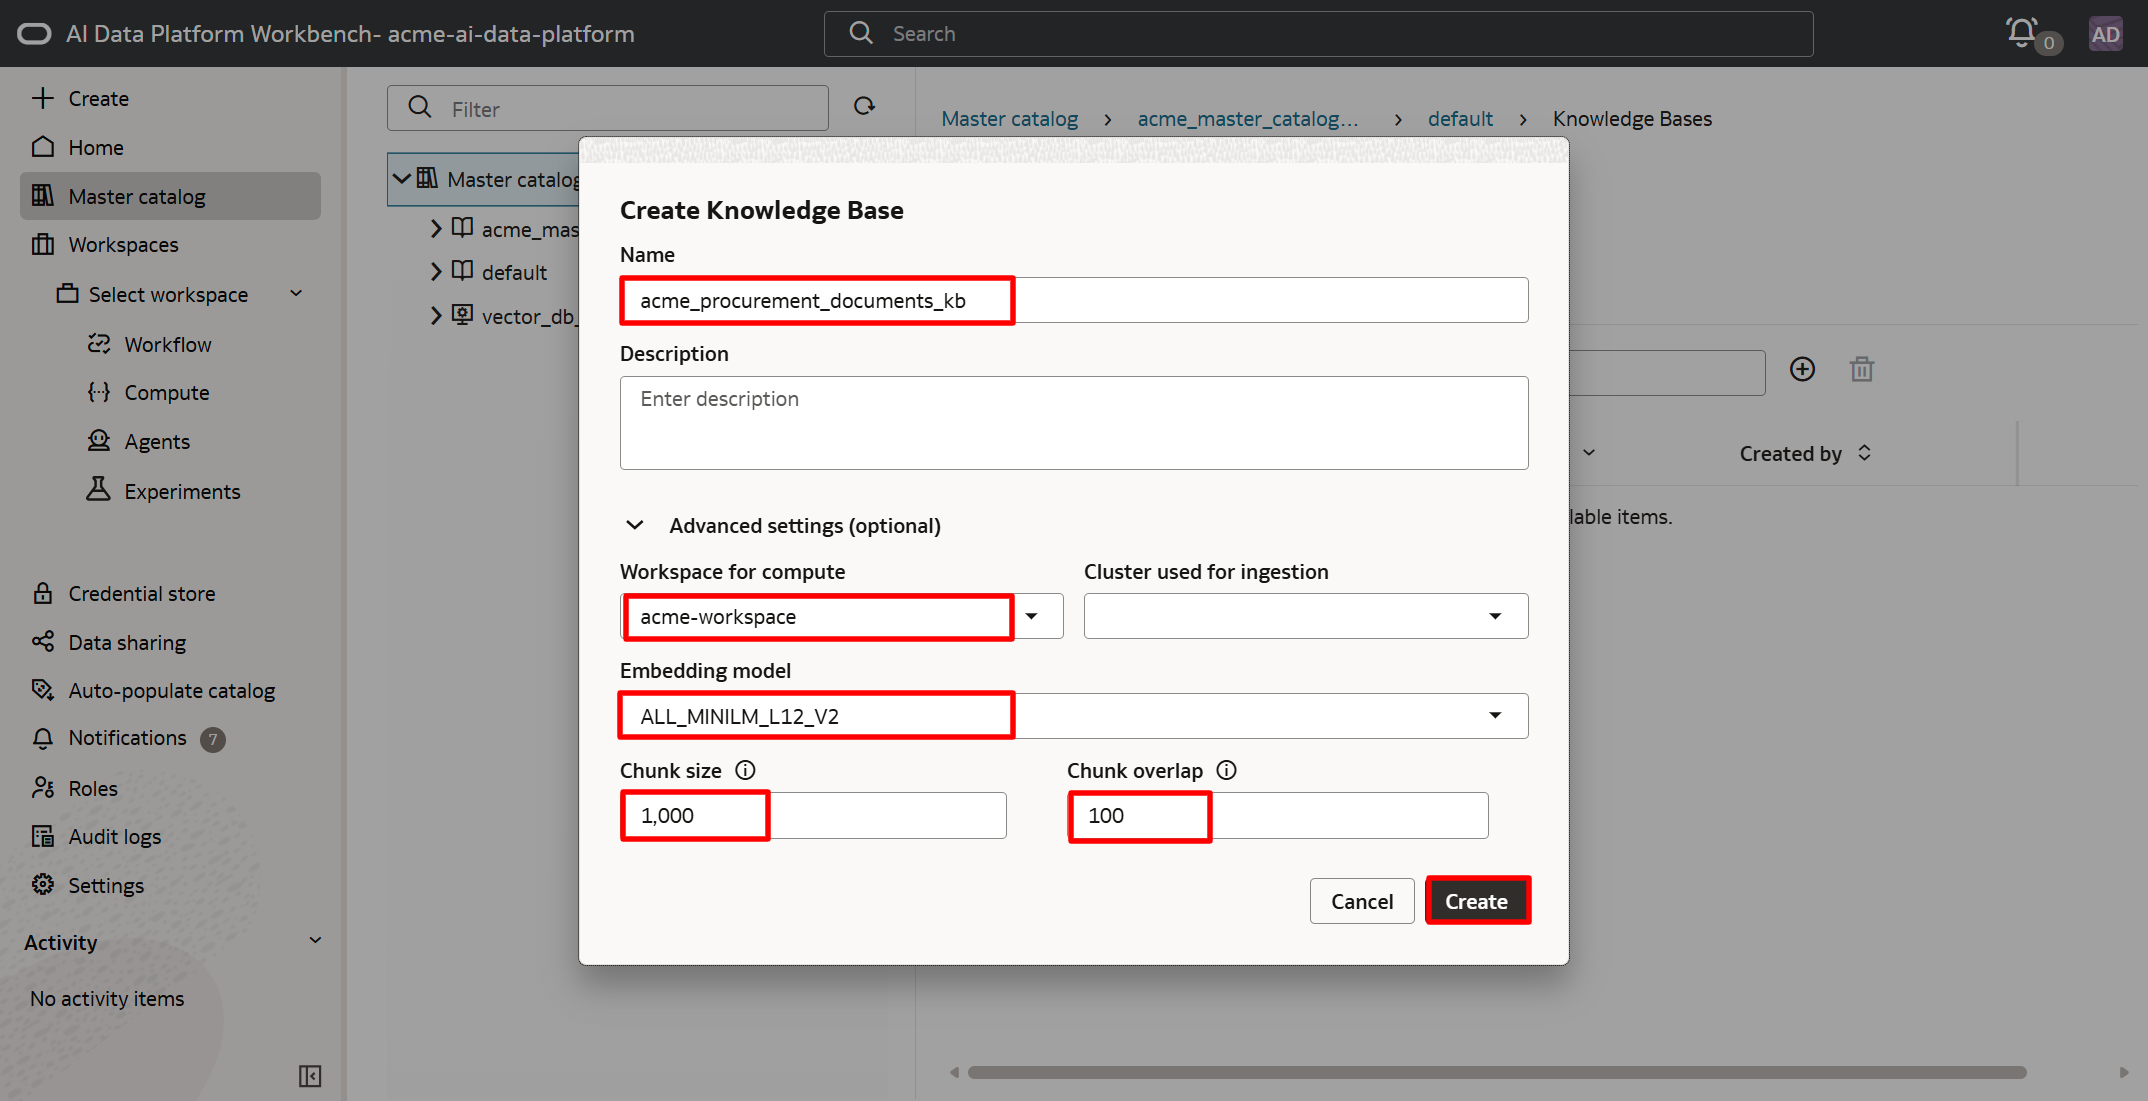
Enter a knowledge base name acme_procurement_documents_kb. Select the existing workspace acme-workspace. Choose the embedding model ALL_MINILM_L12_V2 since we are only working with English documents and not multilingual ones. For the chunk size choose 1000 and for the chunk overlap choose 100. Click on Create.
Let's explain chunk size. Suppose we have this paragraph in our document:
Employees receive 15 days of paid vacation per year. Vacation must be approved by the employee's manager.
If we use small chunks, the information might get split up:
Chunk 1:
Employees receive 15 days of paid vacation per year.
Chunk 2:
Vacation must be approved by the employee's manager.
If we use larger chunks, we might get:
Chunk 1:
Employees receive 15 days of paid vacation per year. Vacation must be approved by the employee's manager.
So the fundamental trade-off is:
| Chunk size | Advantage | Potential problem |
|---|---|---|
| Too small | Very precise; less irrelevant information | Important context can be separated |
| Too large | More context is preserved | Search results contain more irrelevant information |
| Reasonable size | Relevant information + enough context | Usually the desired balance |
This is where chunk overlap comes into play. Now imagine that an important sentence happens to fall right at the boundary between two chunks.
Without overlap:
Chunk 1:
Employees receive 15 days of paid vacation per year. Vacation must be approved by the employee's
Chunk 2:
manager. Employees may carry over up to 5 unused days...
The meaning of the sentence has been split.
With overlap, the end of Chunk 1 is repeated at the beginning of Chunk 2:
Chunk 1:
Employees receive 15 days of paid vacation per year. Vacation must be approved by the employee's manager.
Chunk 2:
...approved by the employee's manager. Employees may carry over up to 5 unused days...
The overlap gives the second chunk some context from the first chunk.
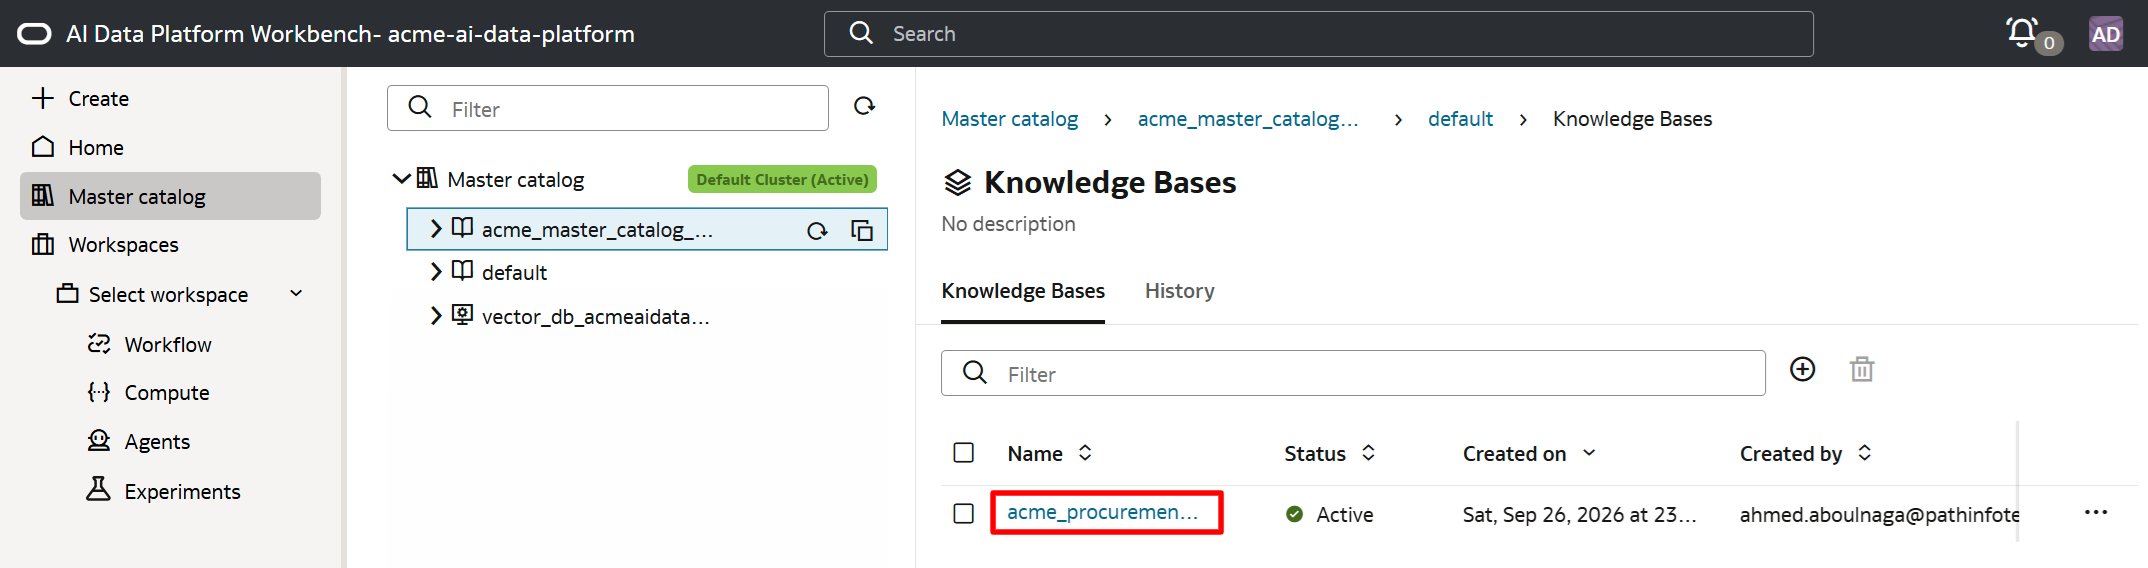
Click on the knowledge base name that was just created.
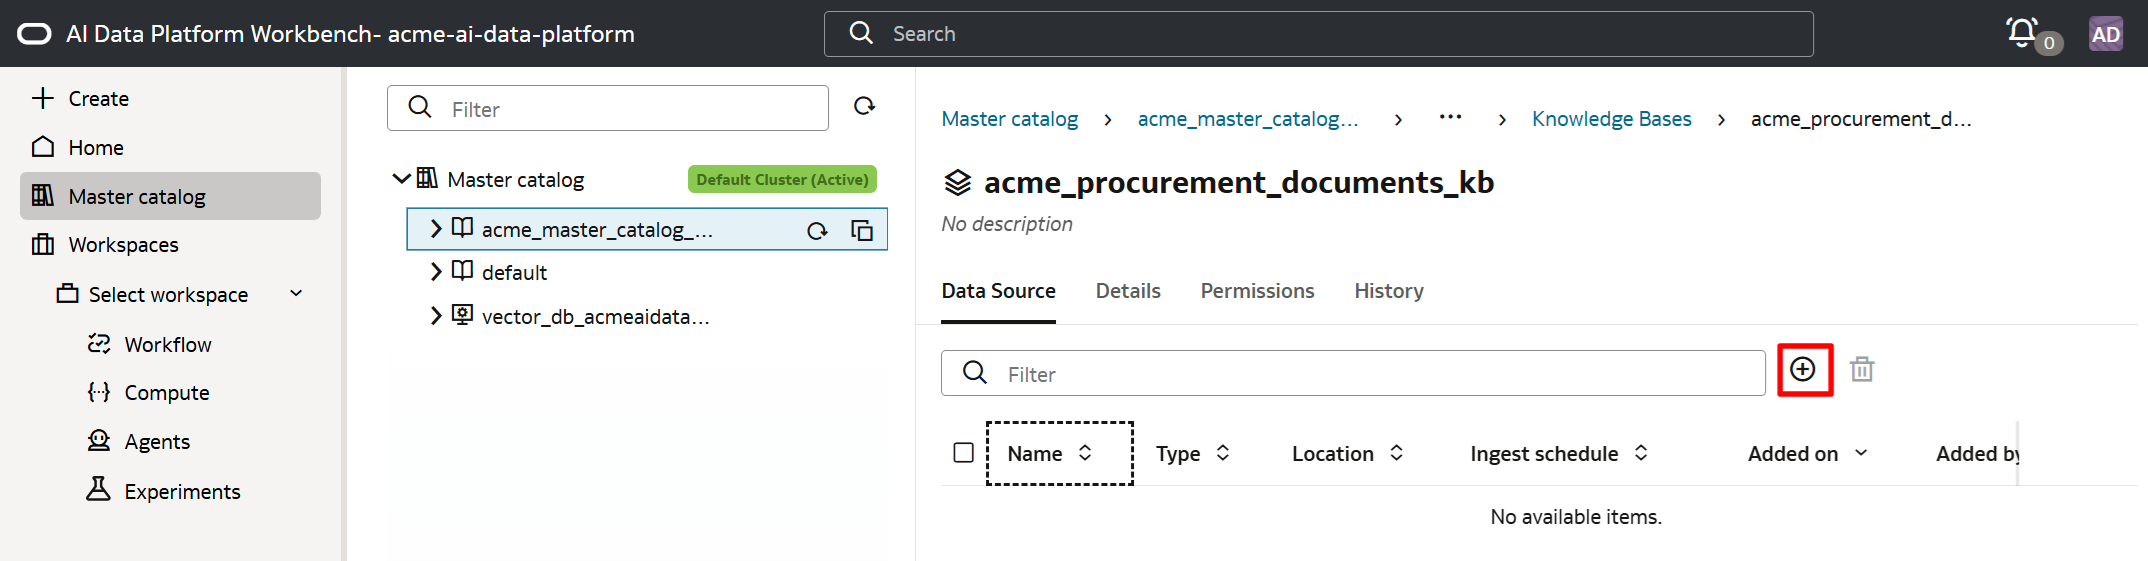
Click on the + sign to add a data source. In this example, the data source will be the volume (i.e., bucket) that we just created.
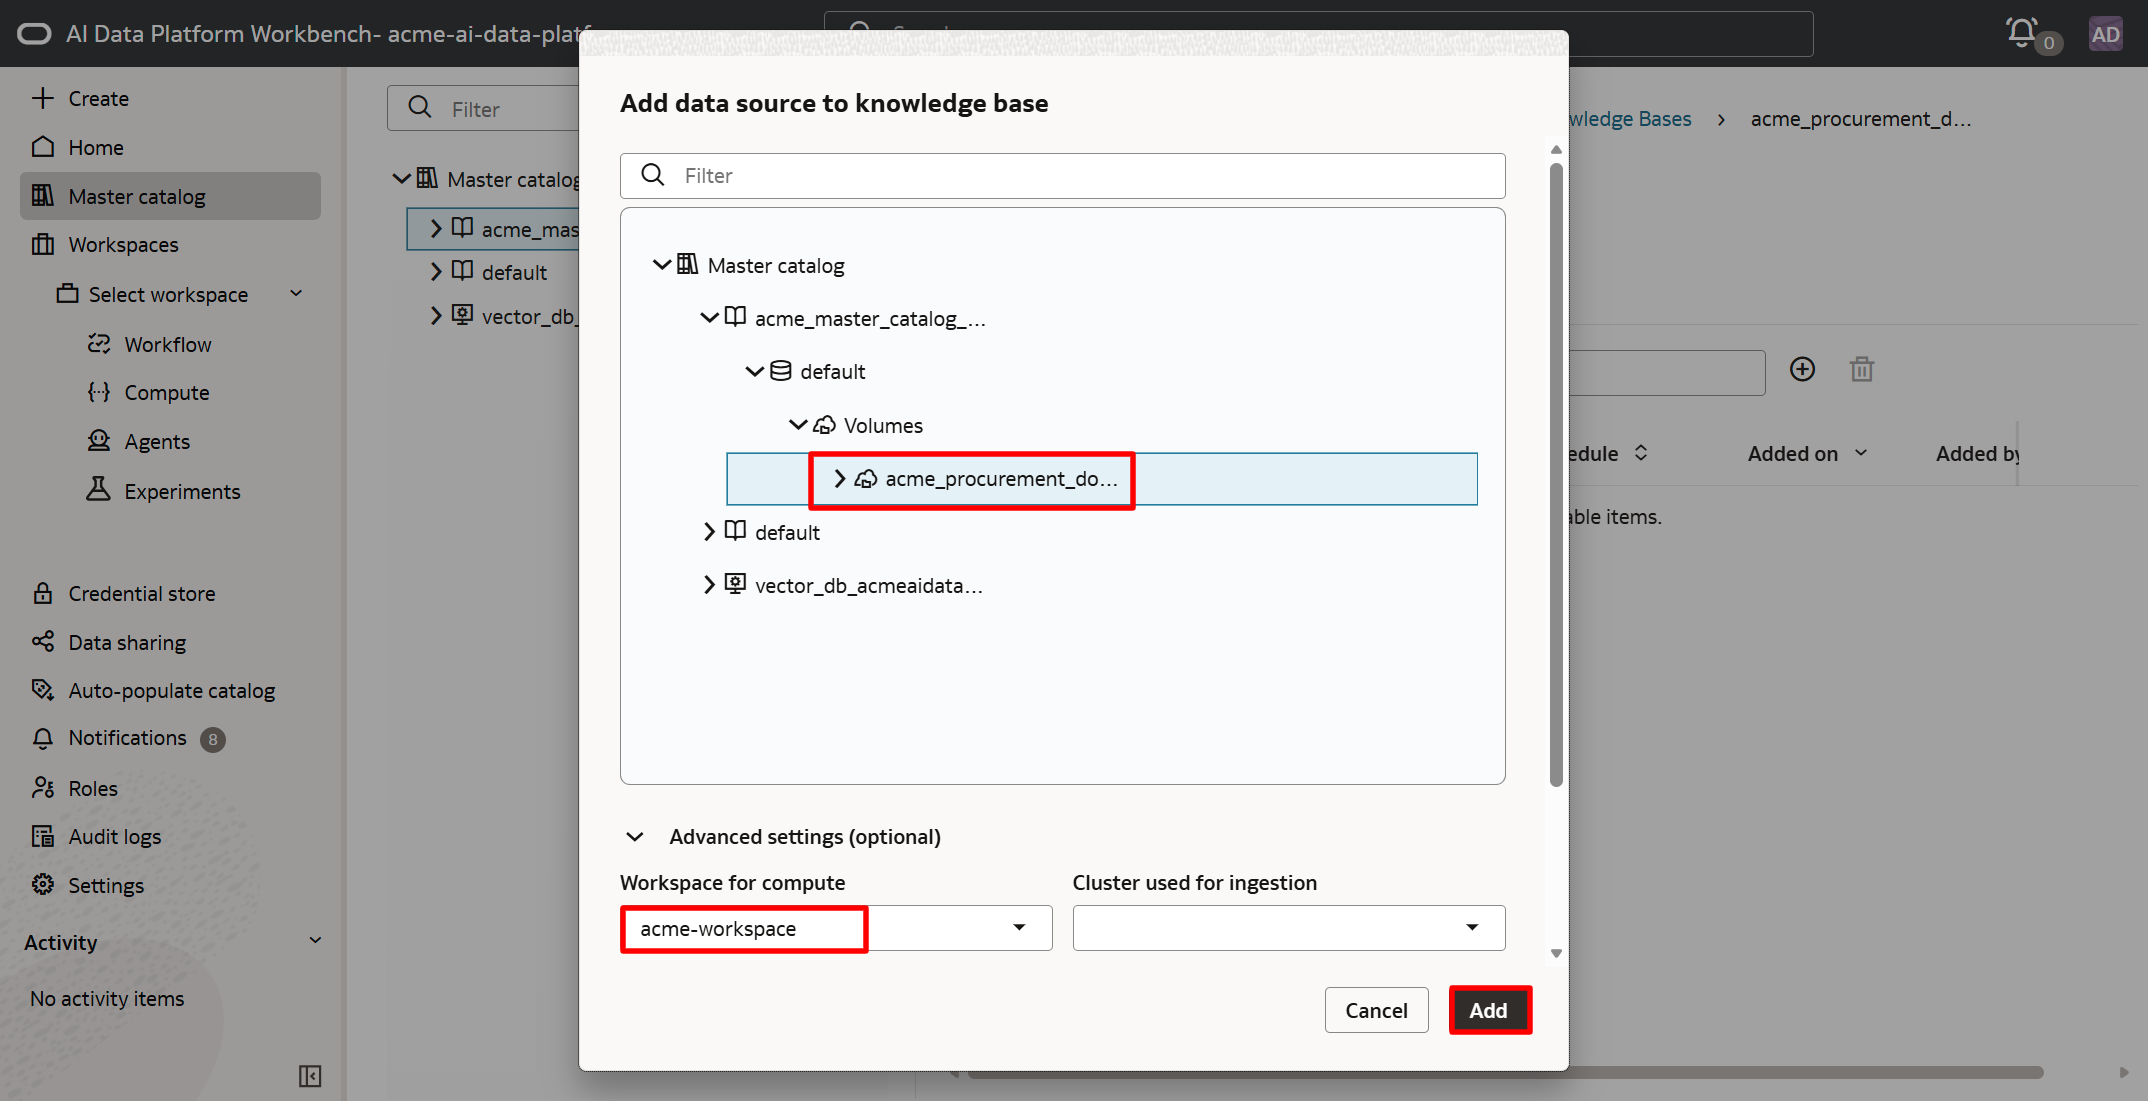
Expand the fields to find the acme_procurement_documents_volume. Select the workspace acme-workspace, then click on Add.
The knowledge base is now referencing this volume which is going to be part of our data set. The documents are not copied from the volume to this knowledge base.
Click on the volume name to continue.
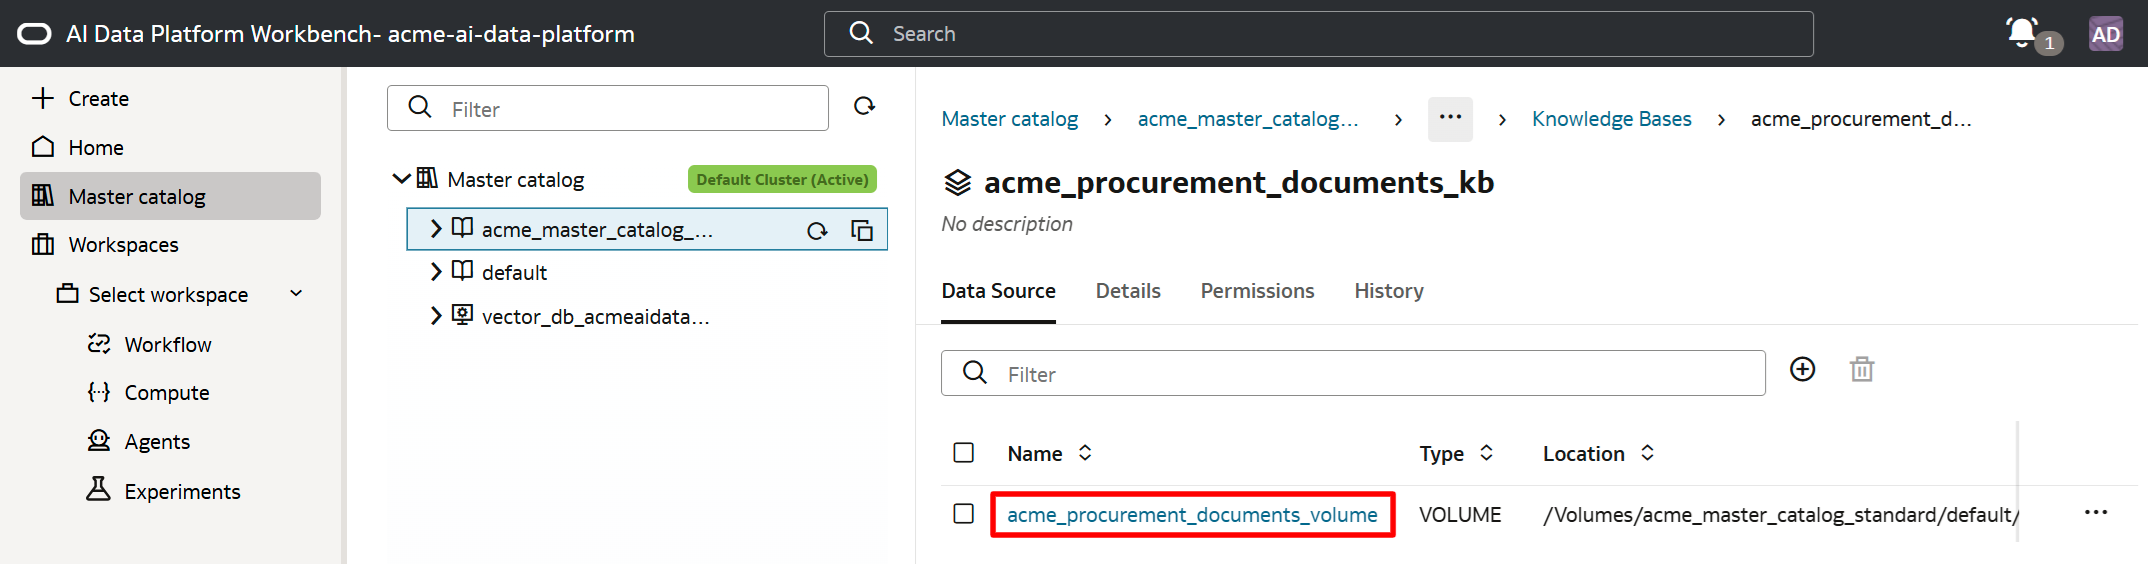
Here, this page that shows the volume as a data source to our knowledge base. So this is a knowledge base subpage, not in the volume page. Click on Ingest now.
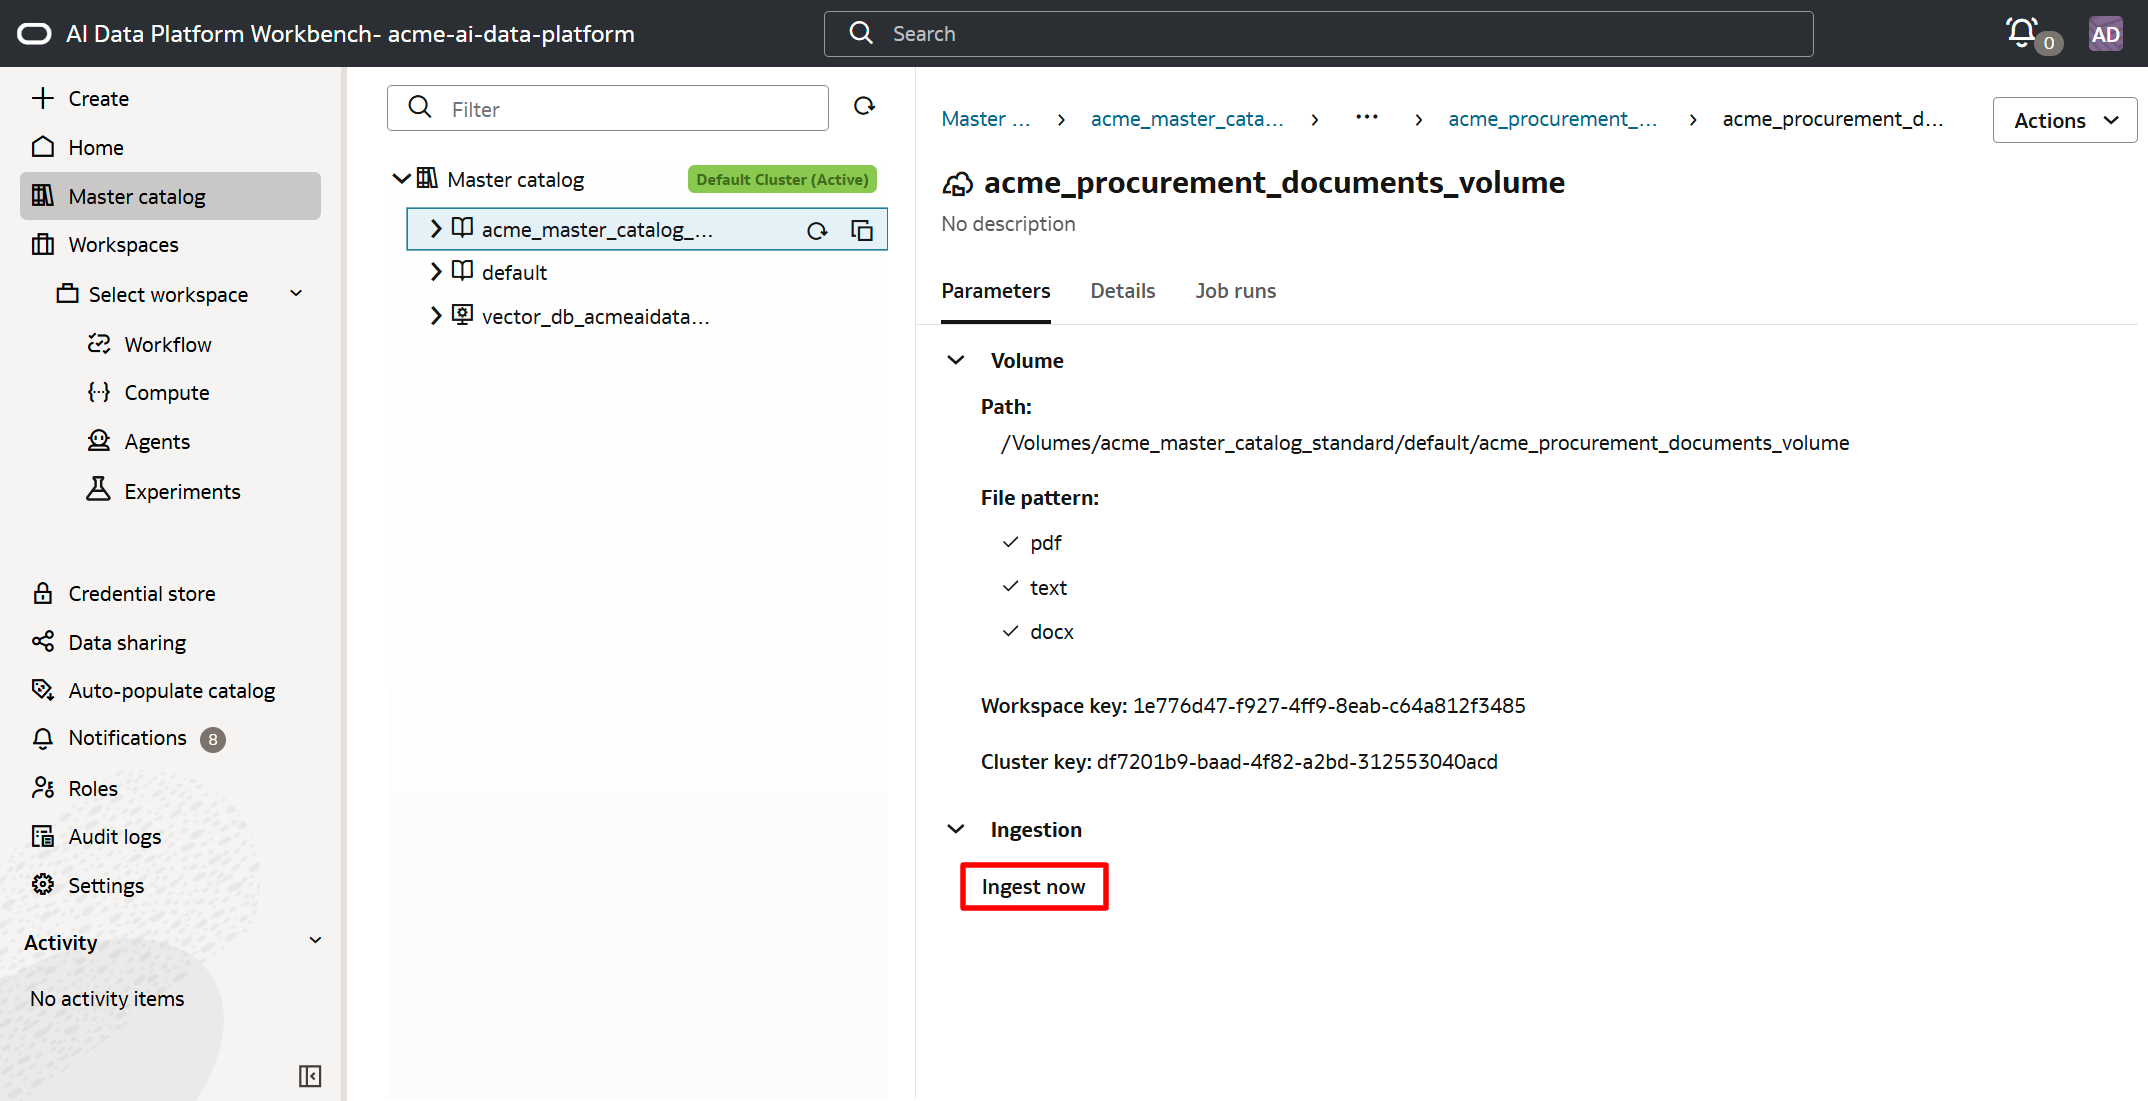
What this will do is pull the data from the volume, break it up into 1,000 character chunks, embed the chunks (meaning, translate the raw data into a string of numbers called vectors), and index the data. These vector embeddings are maintained in the knowledge base.
If additional documents are later added to the data source (aka volume, aka bucket), the ingestion process will need to be run again (must be invoked manually).
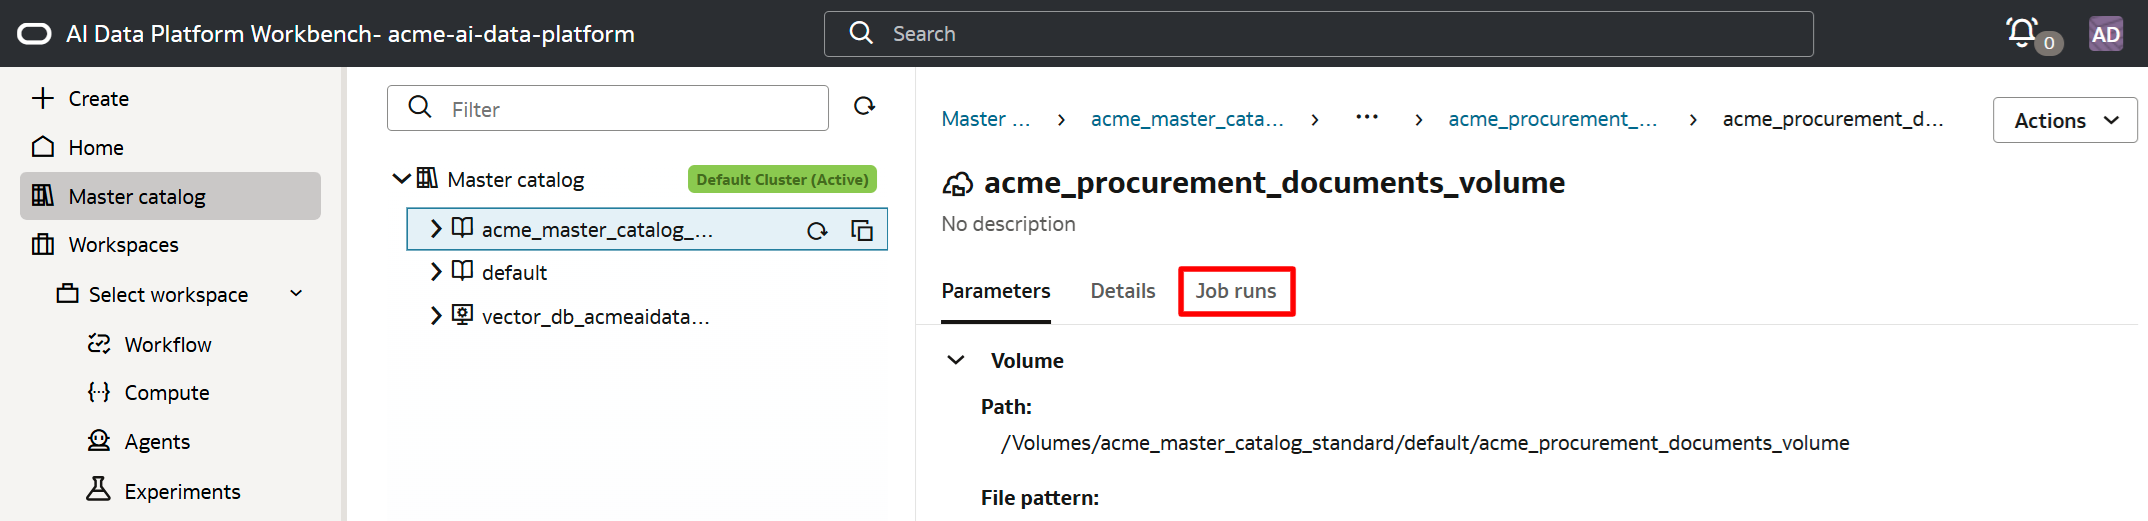
Click on the Job runs tab.
Here it is noted that 5 files were ingested successfully.
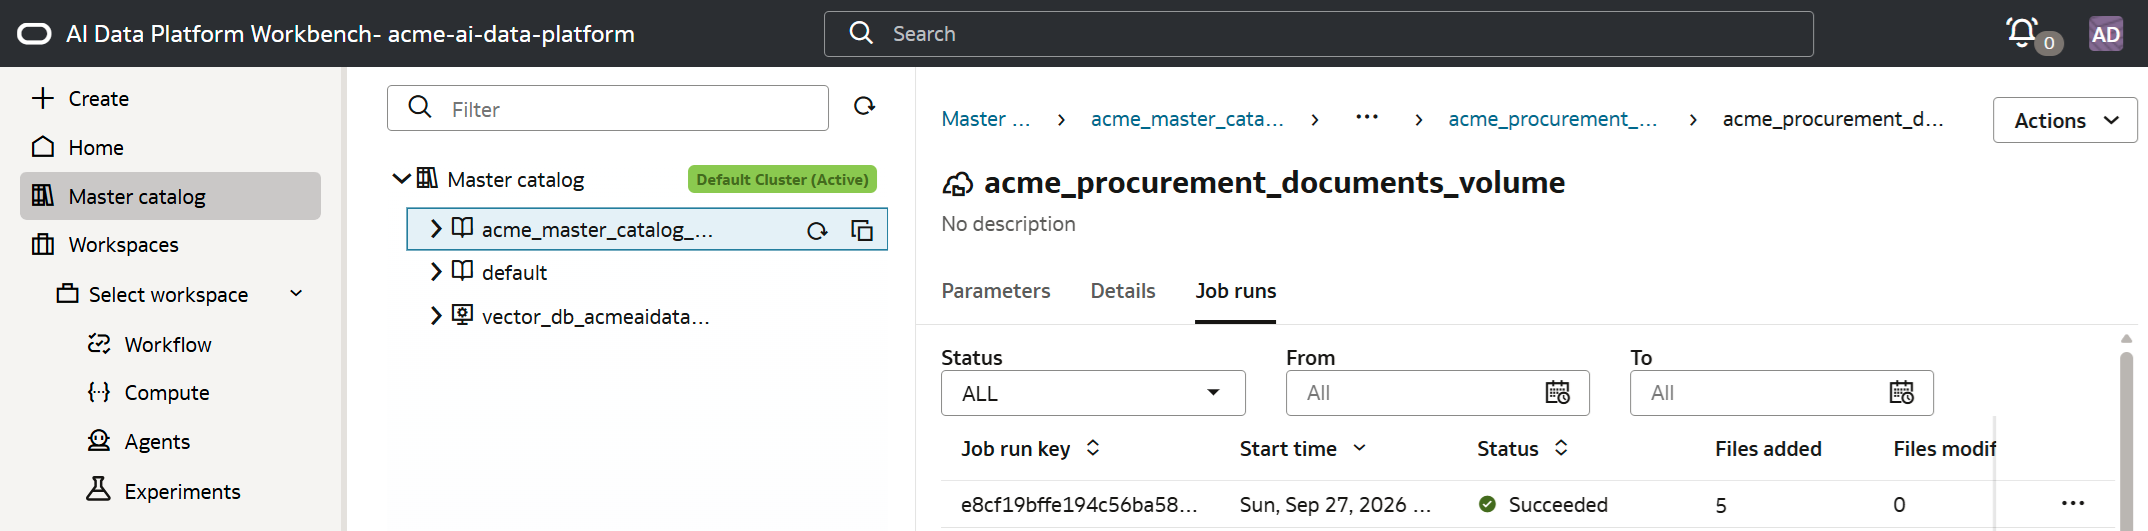
This knowledge base is what will be referenced from our agent. In the Oracle AI Data Platform, an AI agent cannot directly talk to or read from a raw volume, it must reference a knowledge base. Thus, volumes and knowledge bases serve entirely different architectural purposes in the AI workflow.
- Volume: A storage location. It serves raw unstructured files (PDF, DOCX, TXT).
- Knowledge base: A search index. It holds mathematically processed text chunks and vector embeddings.
8. Create a master catalog to host our structured data
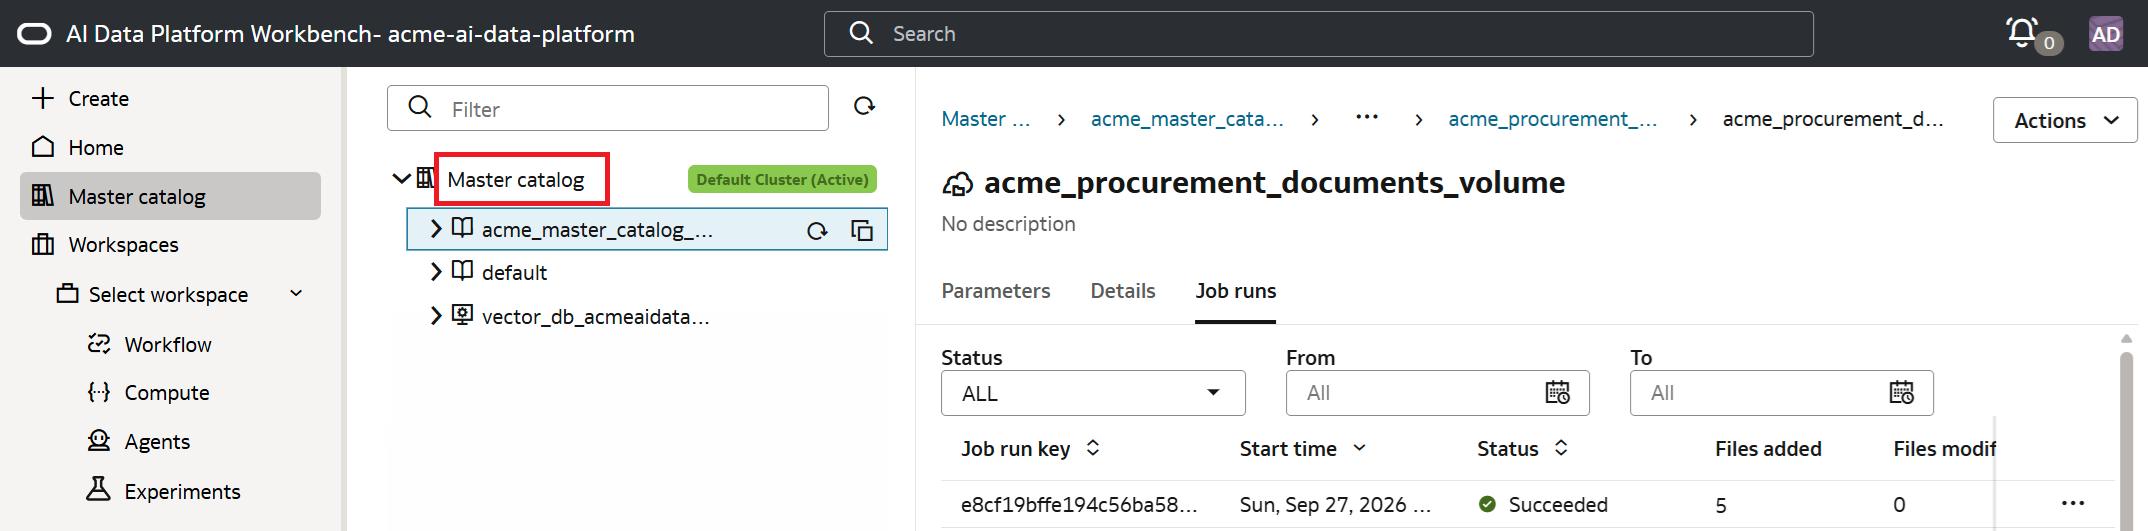
Every database source that is to be referenced by our agent needs to be created as an external master catalog. Another master catalog will be created that will reference our Oracle Autonomous AI Lakehouse that was created earlier.
Click on Master catalog.
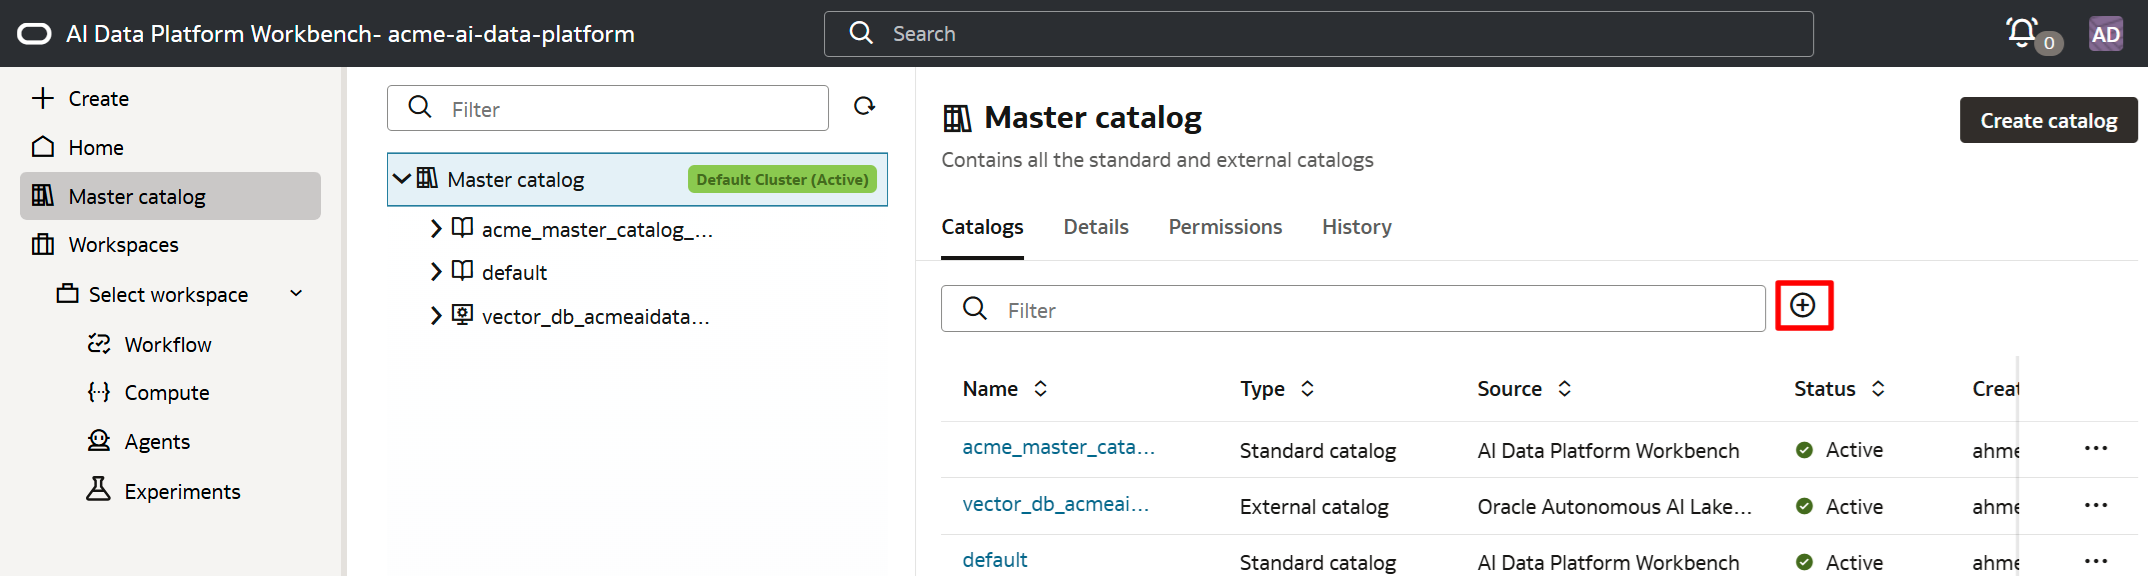
Click on the + sign to create a new master catalog.
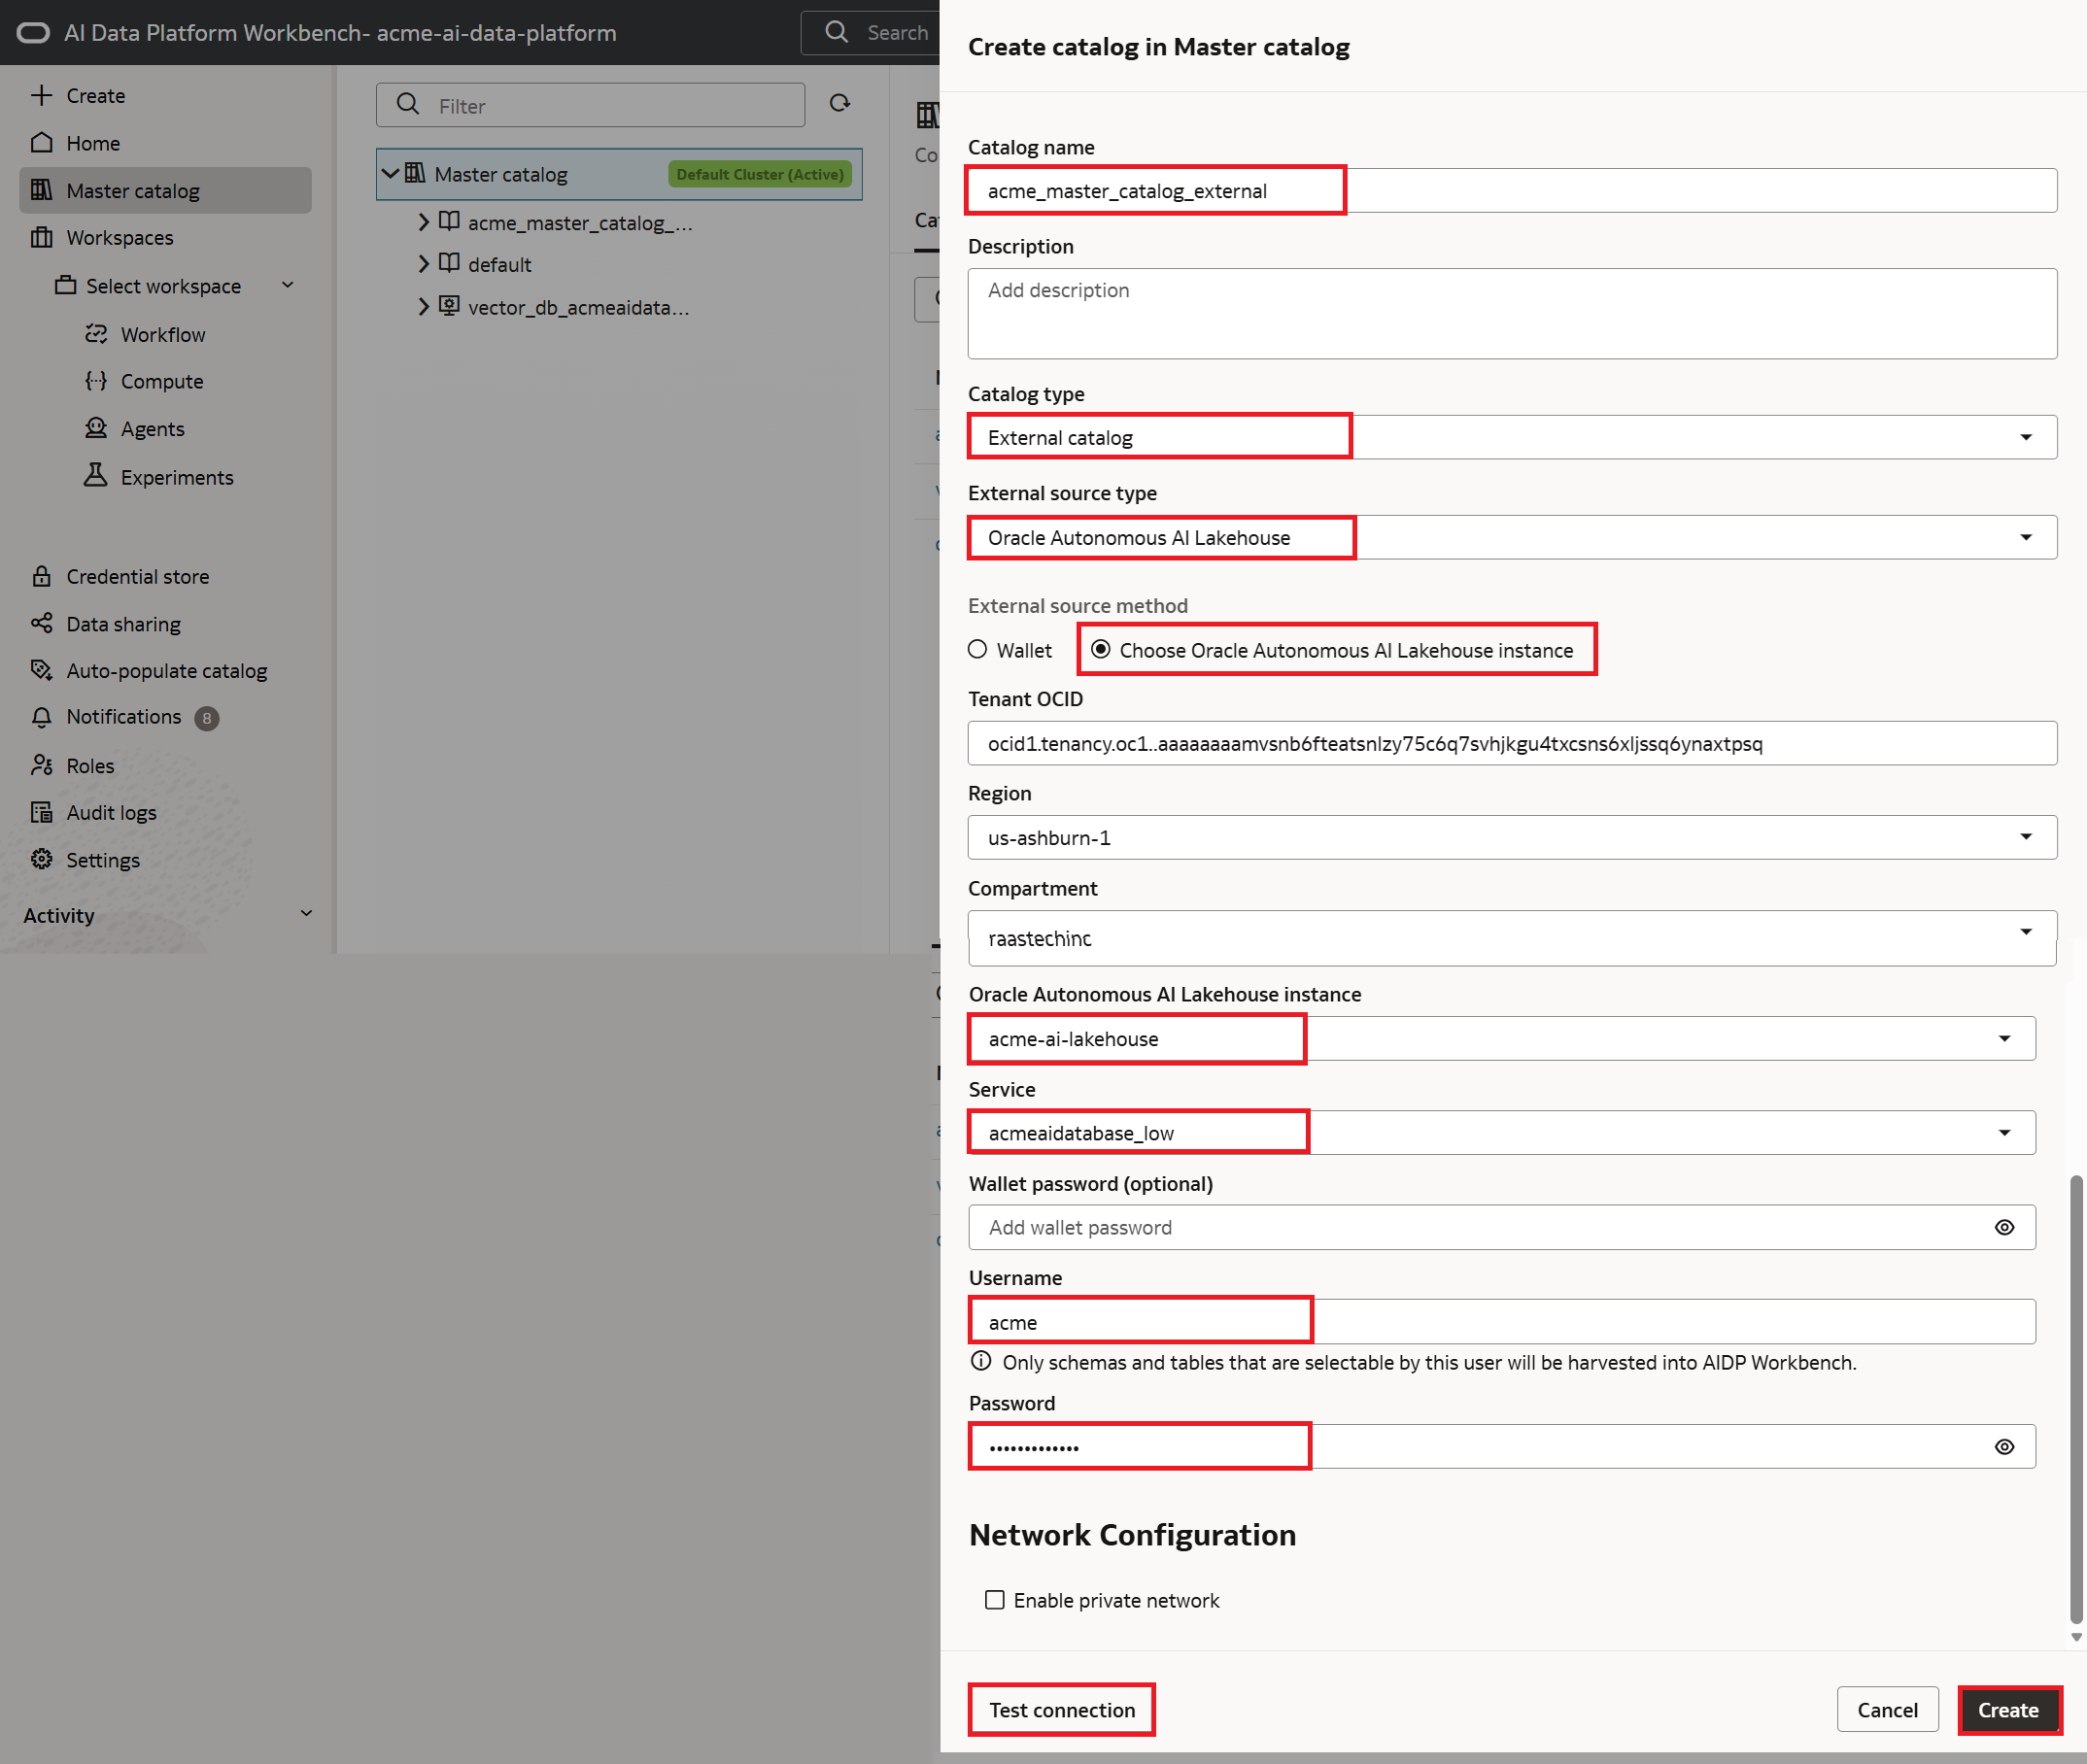
For the catalog name, enter acme_master_catalog_external. Select a catalog type of "External catalog". Select Choose Oracle Autonomous AI Lakehouse instance. Some fields will be auto-populated, after which we select the Oracle Autonomous AI Lakehouse instance name acme-ai-lakehouse. For service, select the lower acmeaidatabase_low (it is possible to select some of the other options). Then enter the ACME username and password created earlier. Click on Test connection to validate connectivity, then Create.
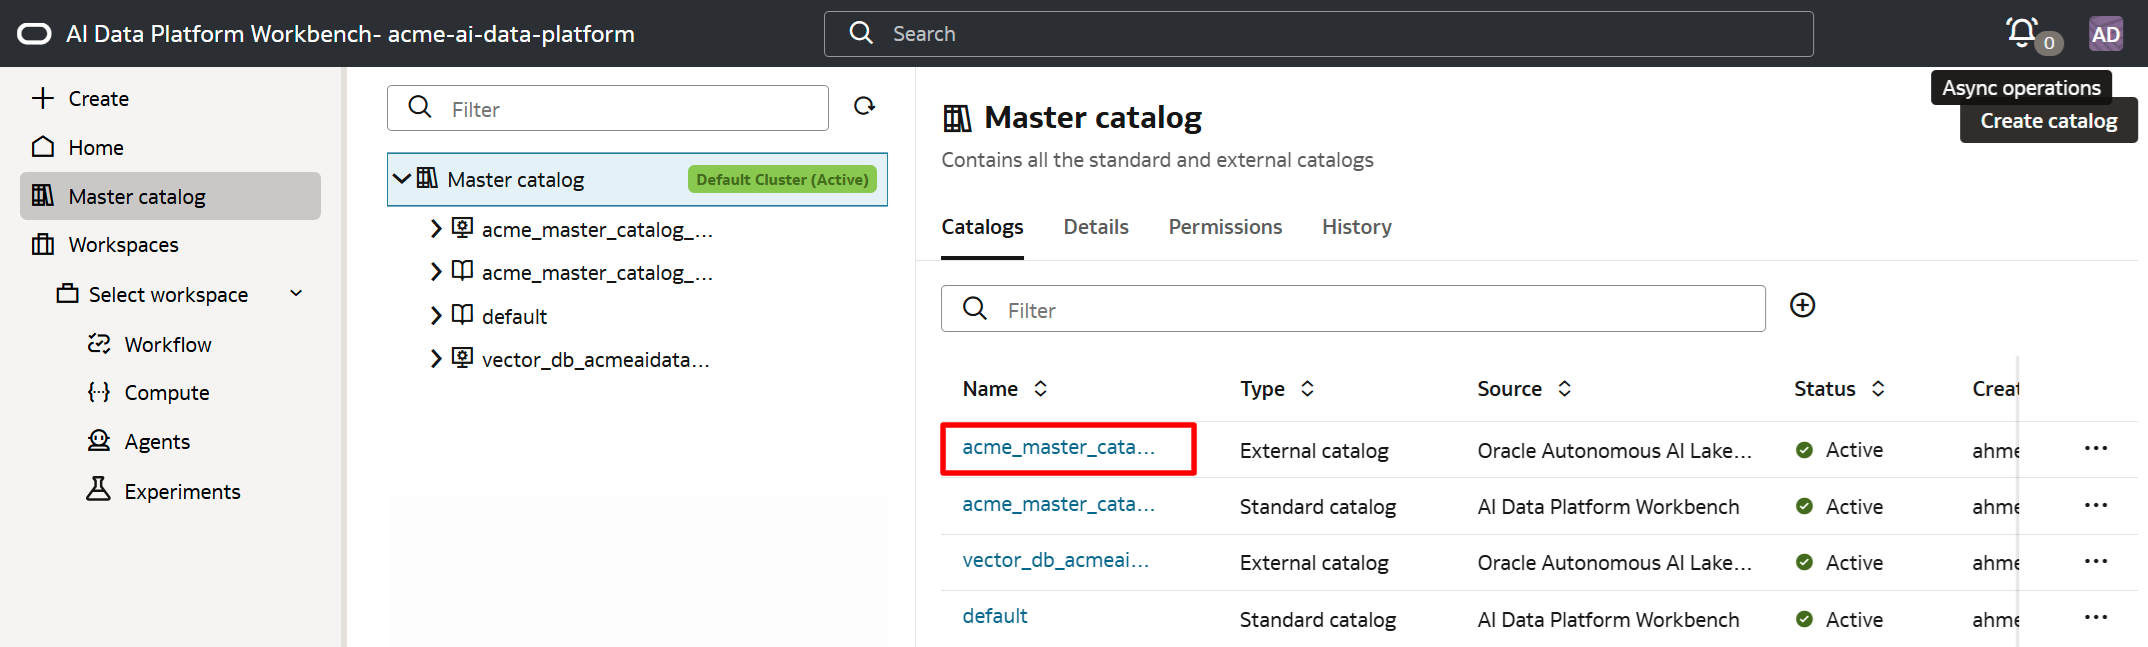
Click on the external catalog that is just created to see its contents.
The schema (i.e., user schema) is shown. Click on the schema name.
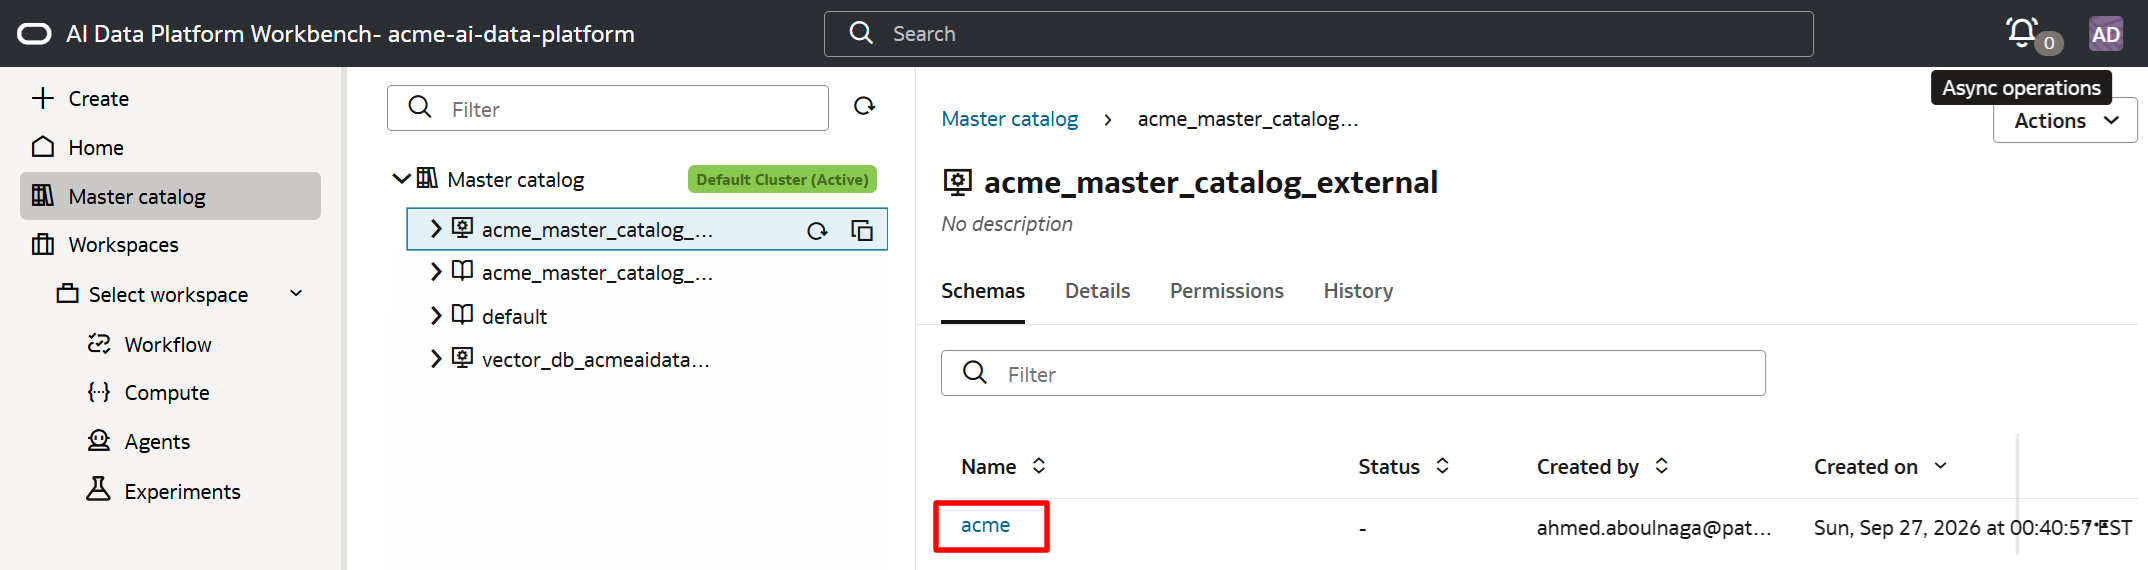
Here the tables within this schema are listed. Click on one of the table names.
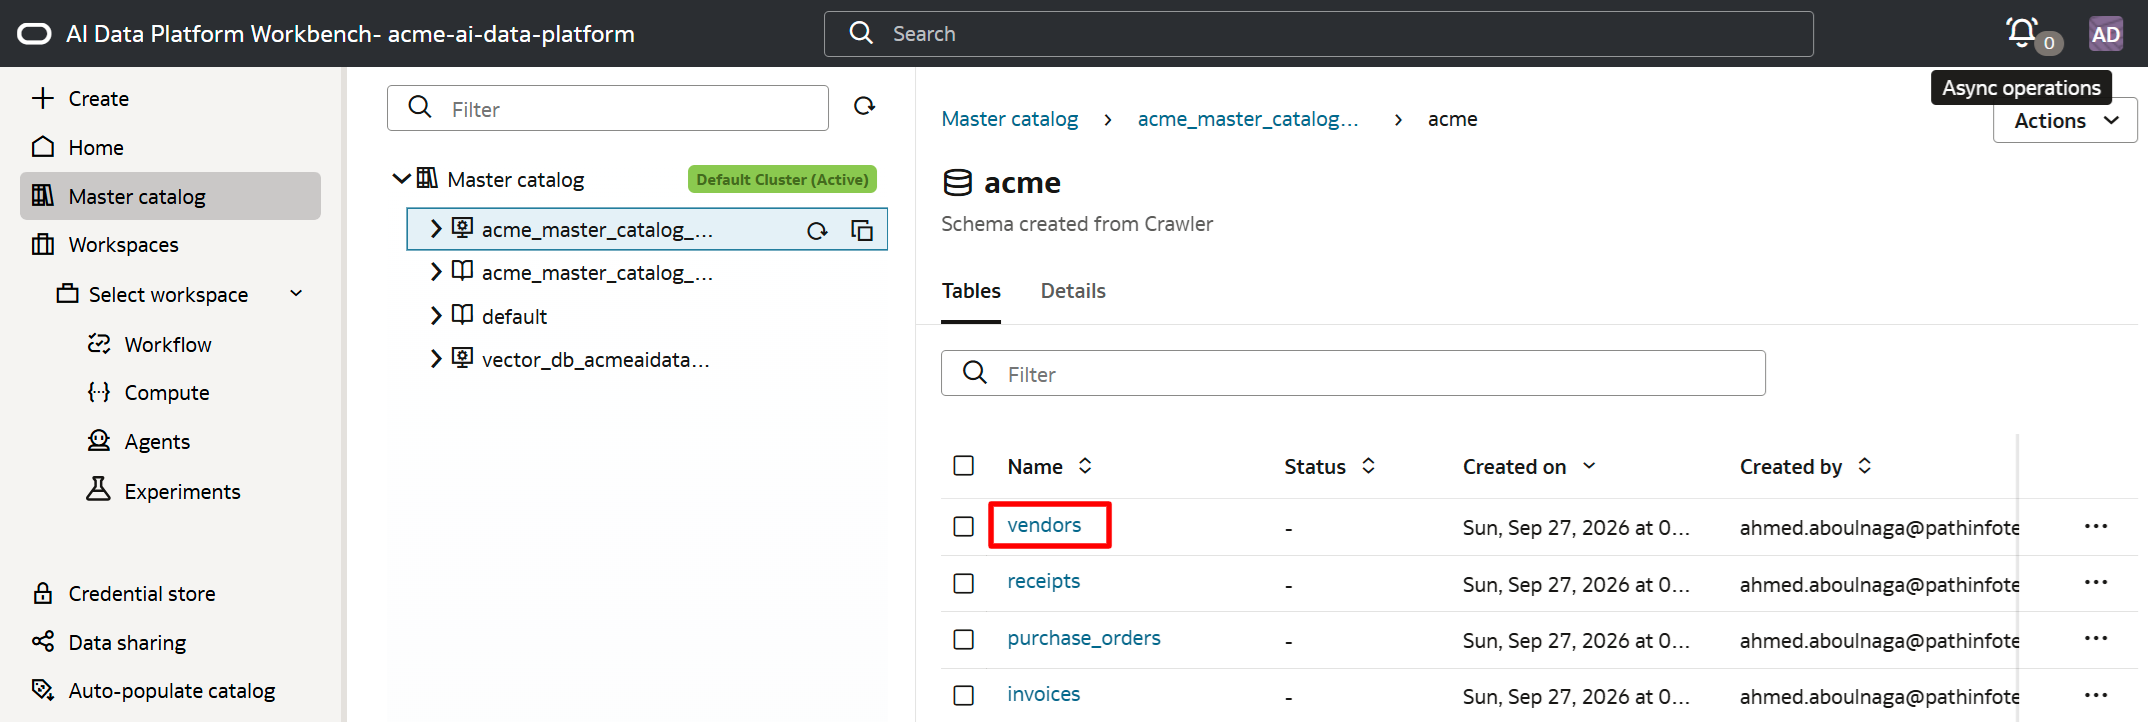
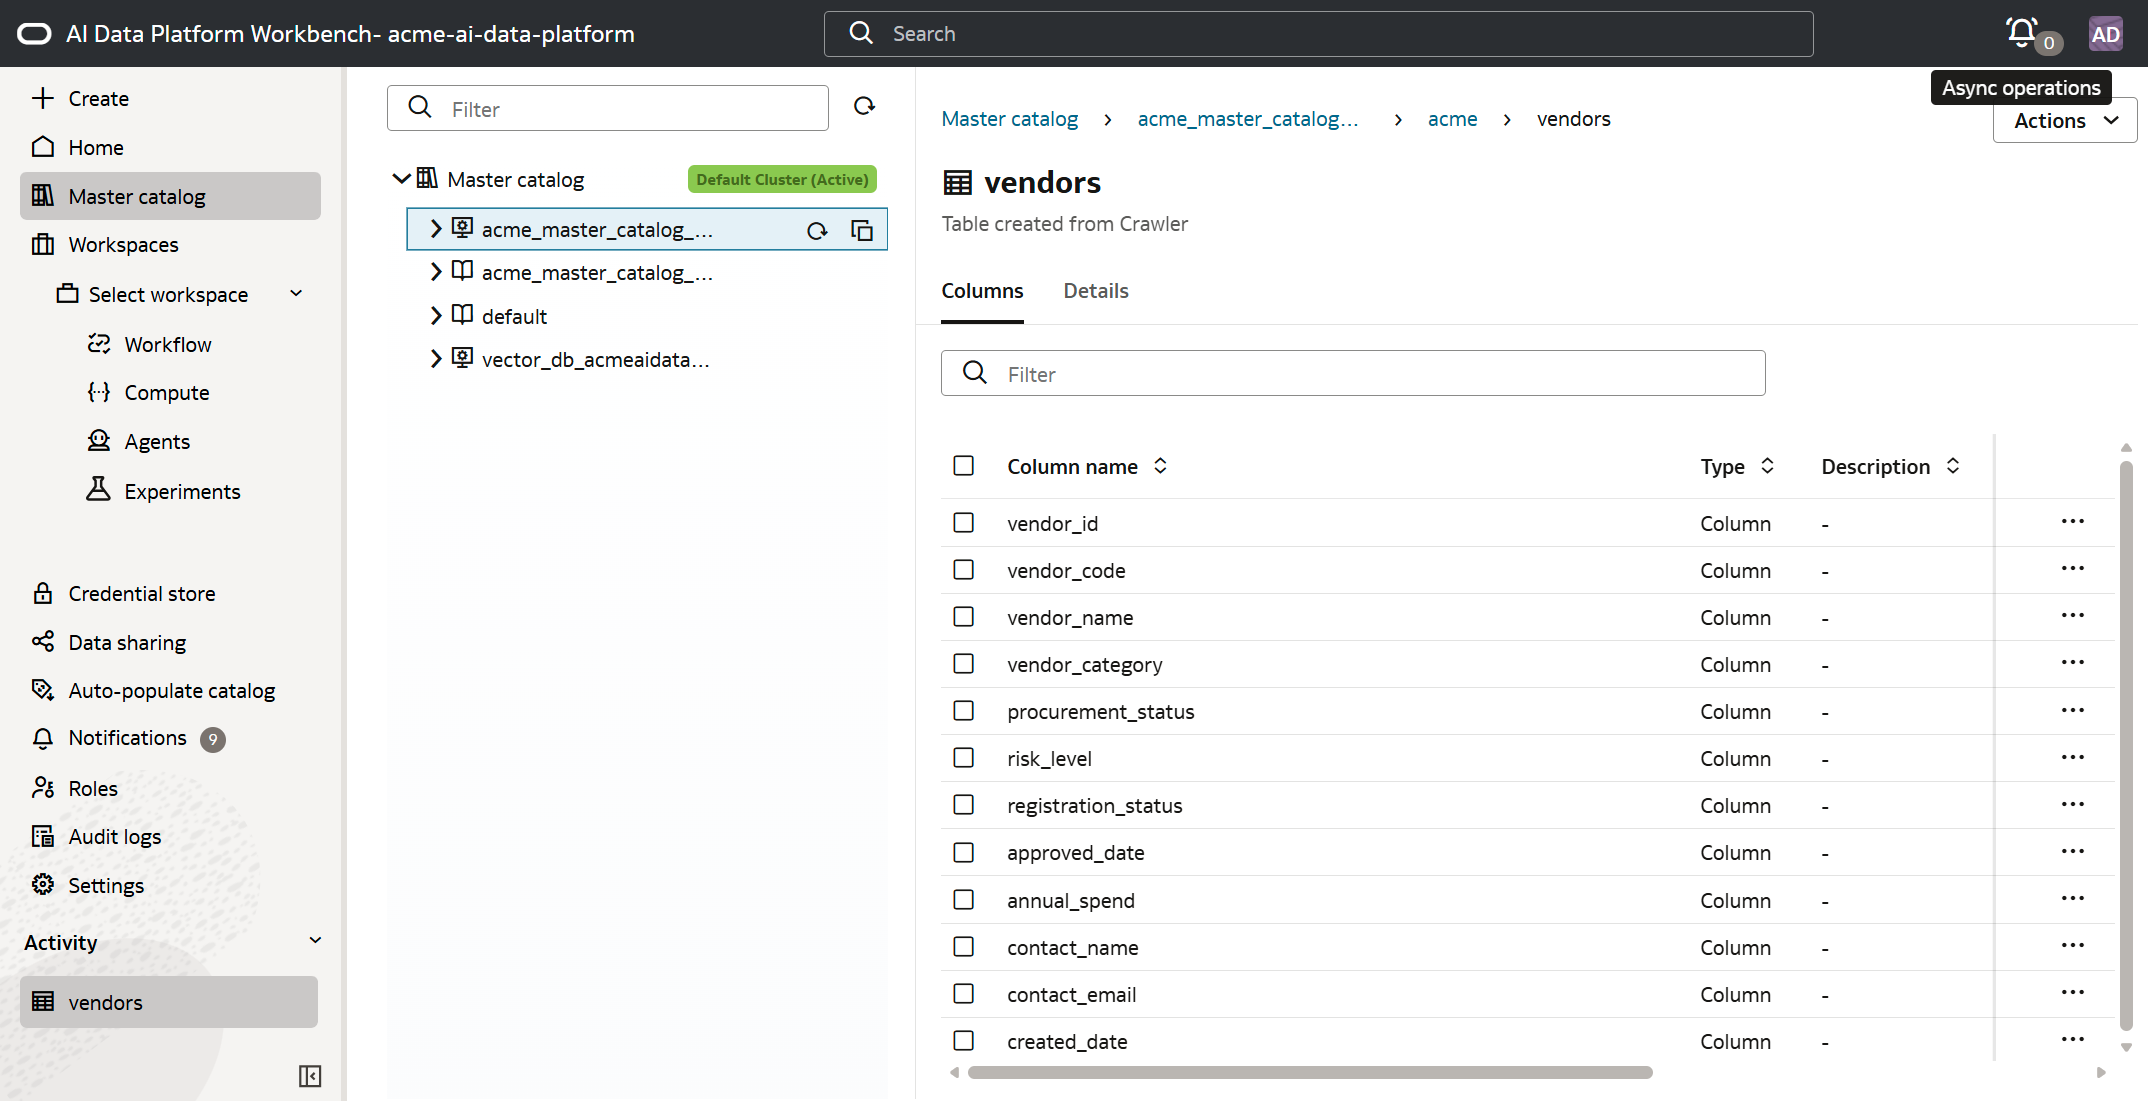
Only the column name definitions are shown.
9. Create an AI compute for the agent
When it is time to create an agent, the agent needs to be attached to an AI compute instance to run (this is not to be confused with the Compute service in OCI). This AI compute instance runs strictly within the AI Data Platform instance. It is not necessary to create a separate compute instances for every agent though.
Beside Select workspace, click the down arrow. Then select acme-workspace.
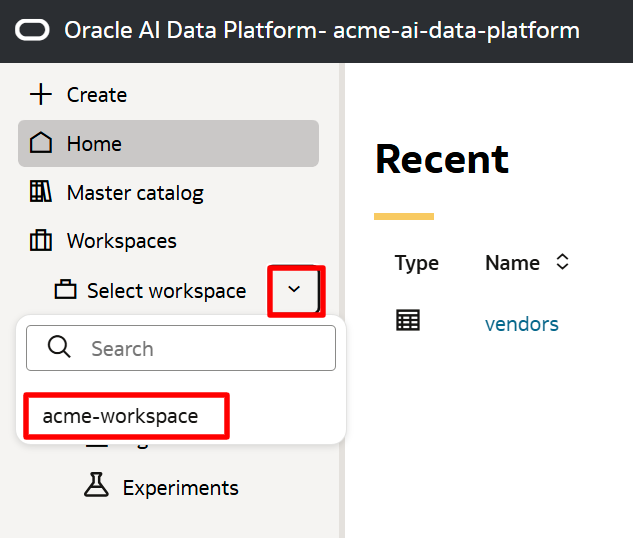
The actual OCI name of the service we have been using is "AI Data Platform". In the beginning of this exercise, an "instance" of this was created. An instance is the overall environment. You cannot start or stop this instance. It is simply an area to create workflows and agents through its own console. In essence, it is a platform. In this exercise, it was named acme-ai-data-platform. This is also referred to as the "AI Data Platform Workbench".
Each instance can have one or more "workspaces". A workspace is a logical container/collection of resources within the workbench/instance. When a new instance is created, an initial workspace is created. In this exercise, the workspace name is acme-workspace. Ideally, workspace names would be organized functionally, such as "acme-hr-workspace" and "acme-it-workspace".
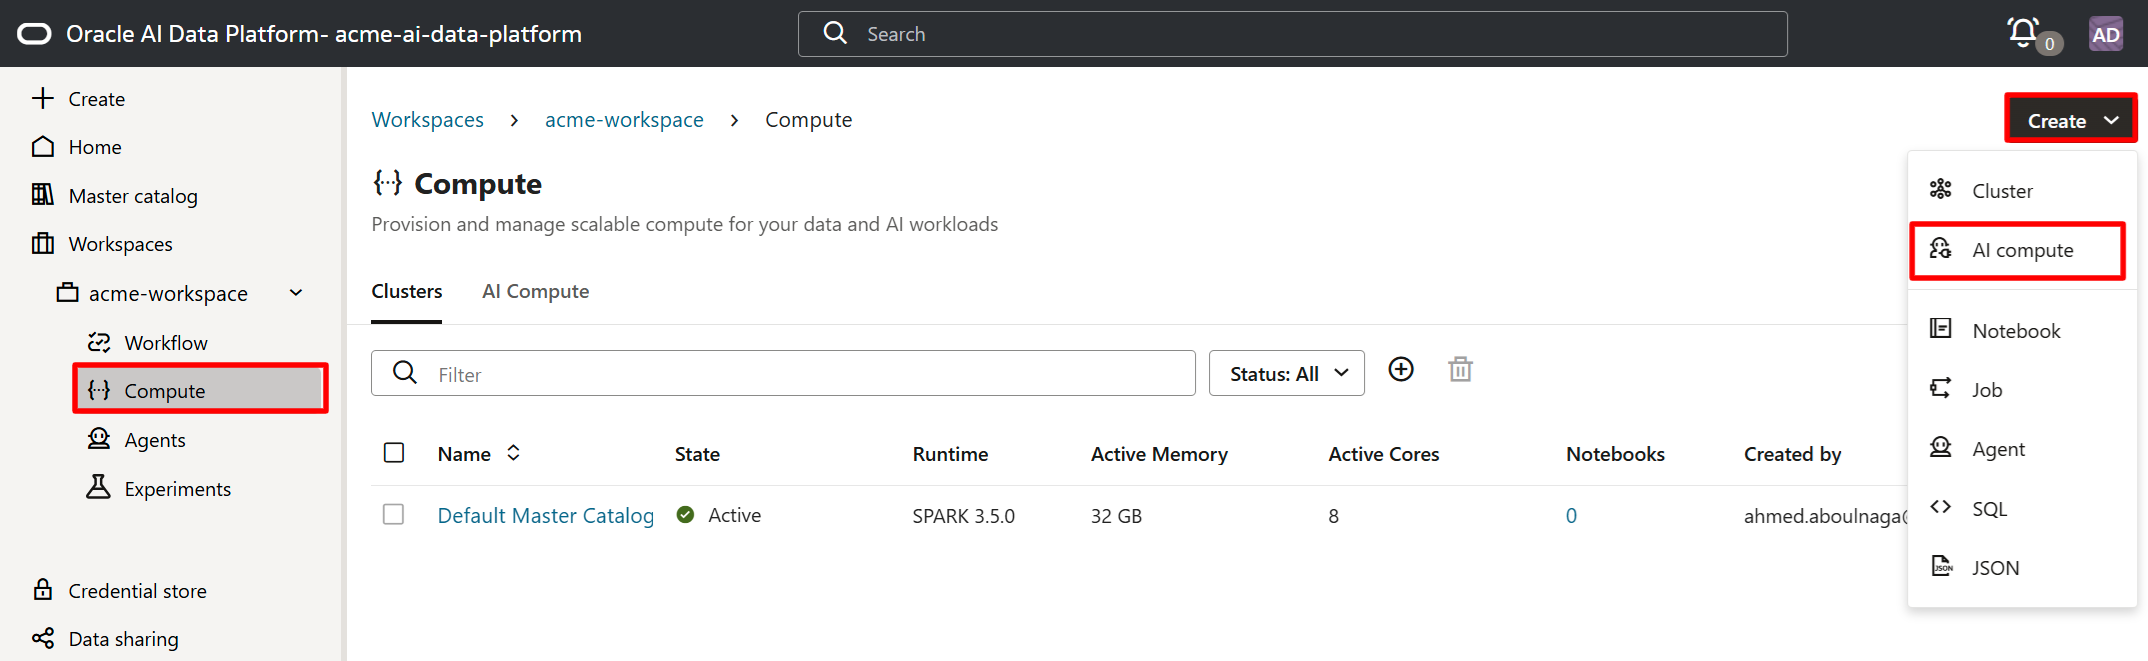
Click on Compute, click on Create, then click on AI compute.
Enter an AI compute name "acme_ai_compute" then click on Create.
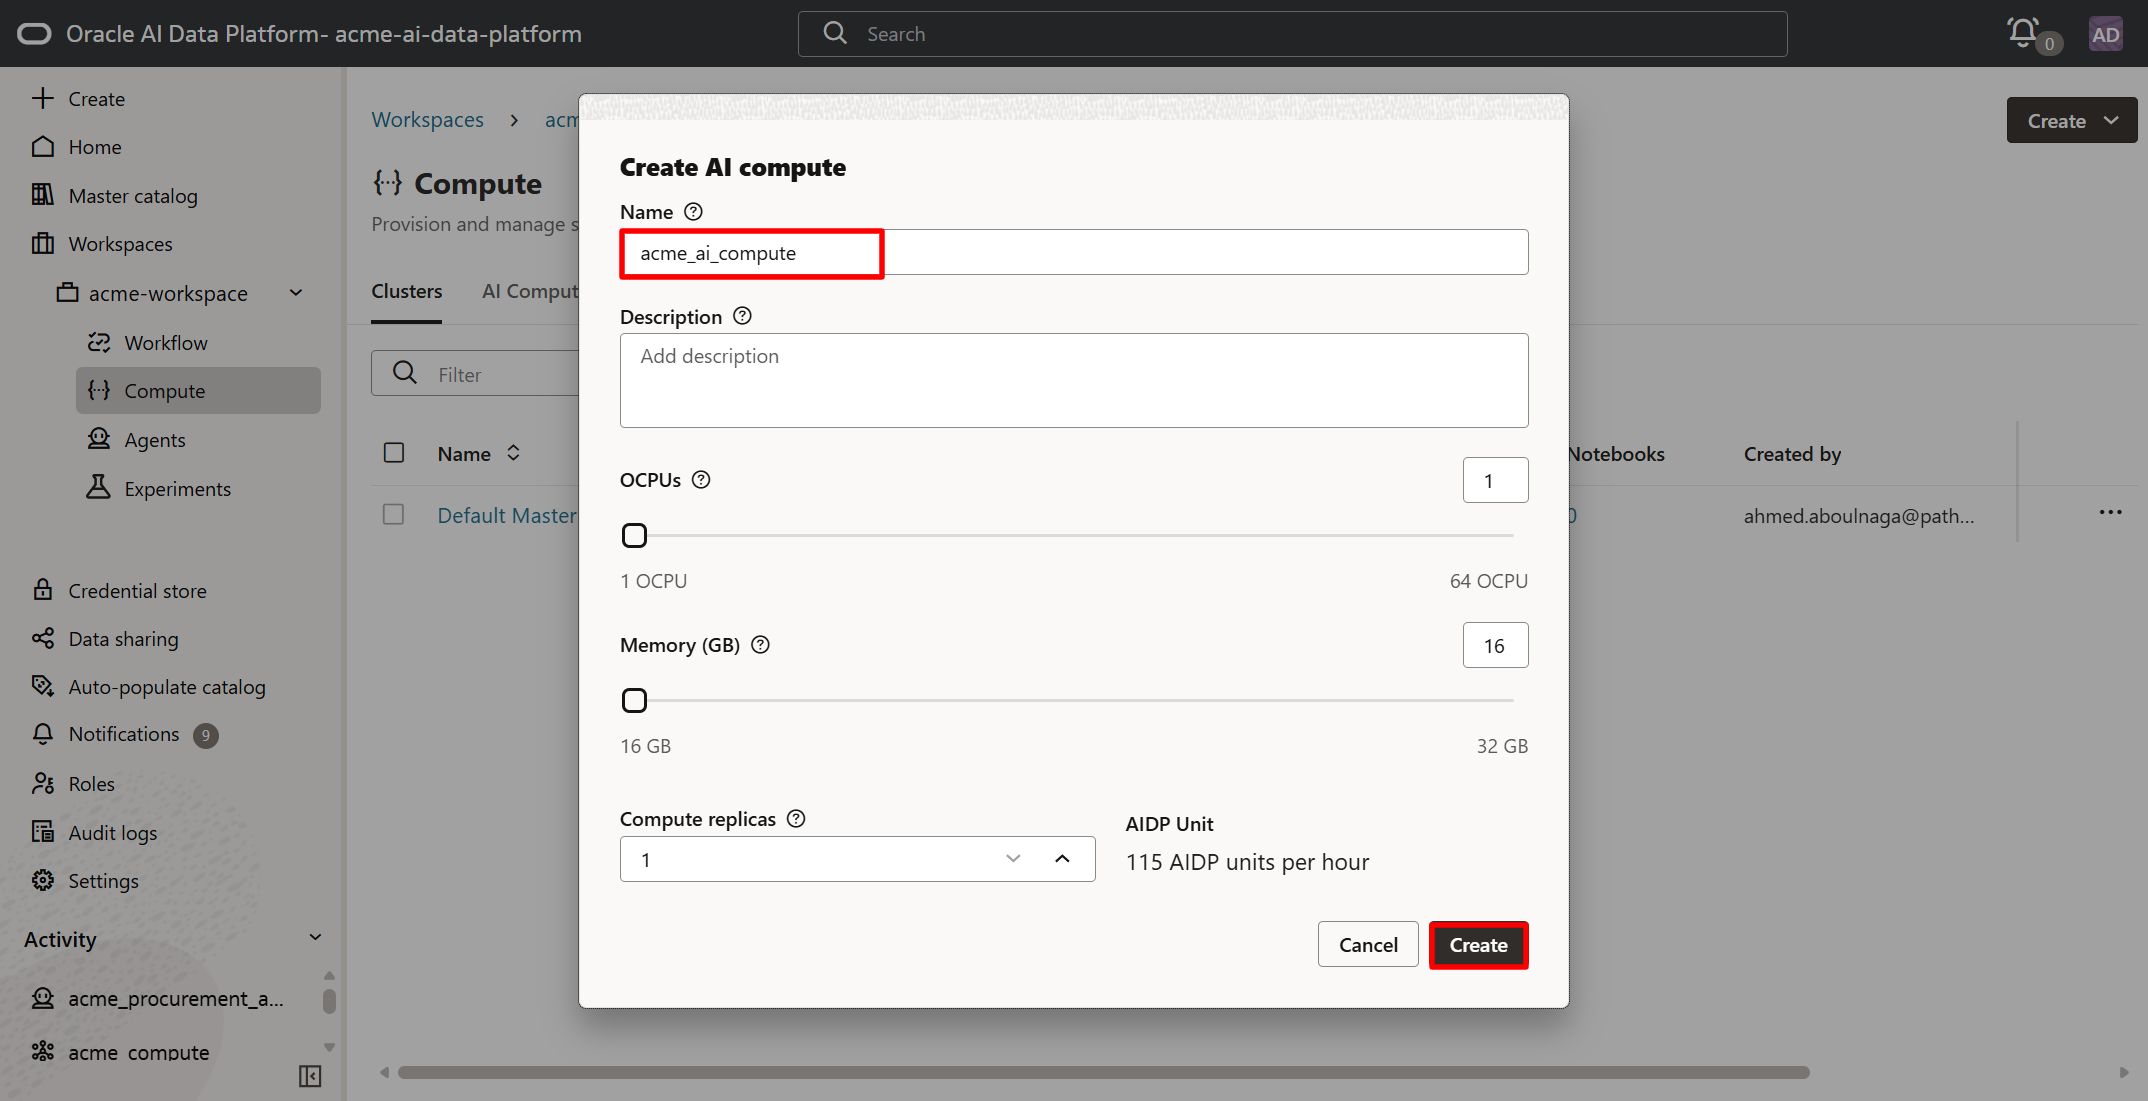
In about 8 minutes, the AI compute instance will be created.
An AIDP Unit (AI Data Platform Unit) is Oracle AI Data Platform's unit of measurement for metering resource consumption. Rather than looking only at OCPUs or memory, Oracle expresses the cost of platform resources in AIDP Units. In the last screenshot, it is estimated that the instance will consume 115 AIDP units per hour.
Click on the AI Compute tab to observe the newly created AI compute instance. (Note: This is different from a Spark cluster under the Clusters tab.)
Again, this is not a compute instance created within the Compute service. As seen in the following screenshot, no OCI compute instances have been created after creating the AI compute instance within the Oracle AI Data Platform.
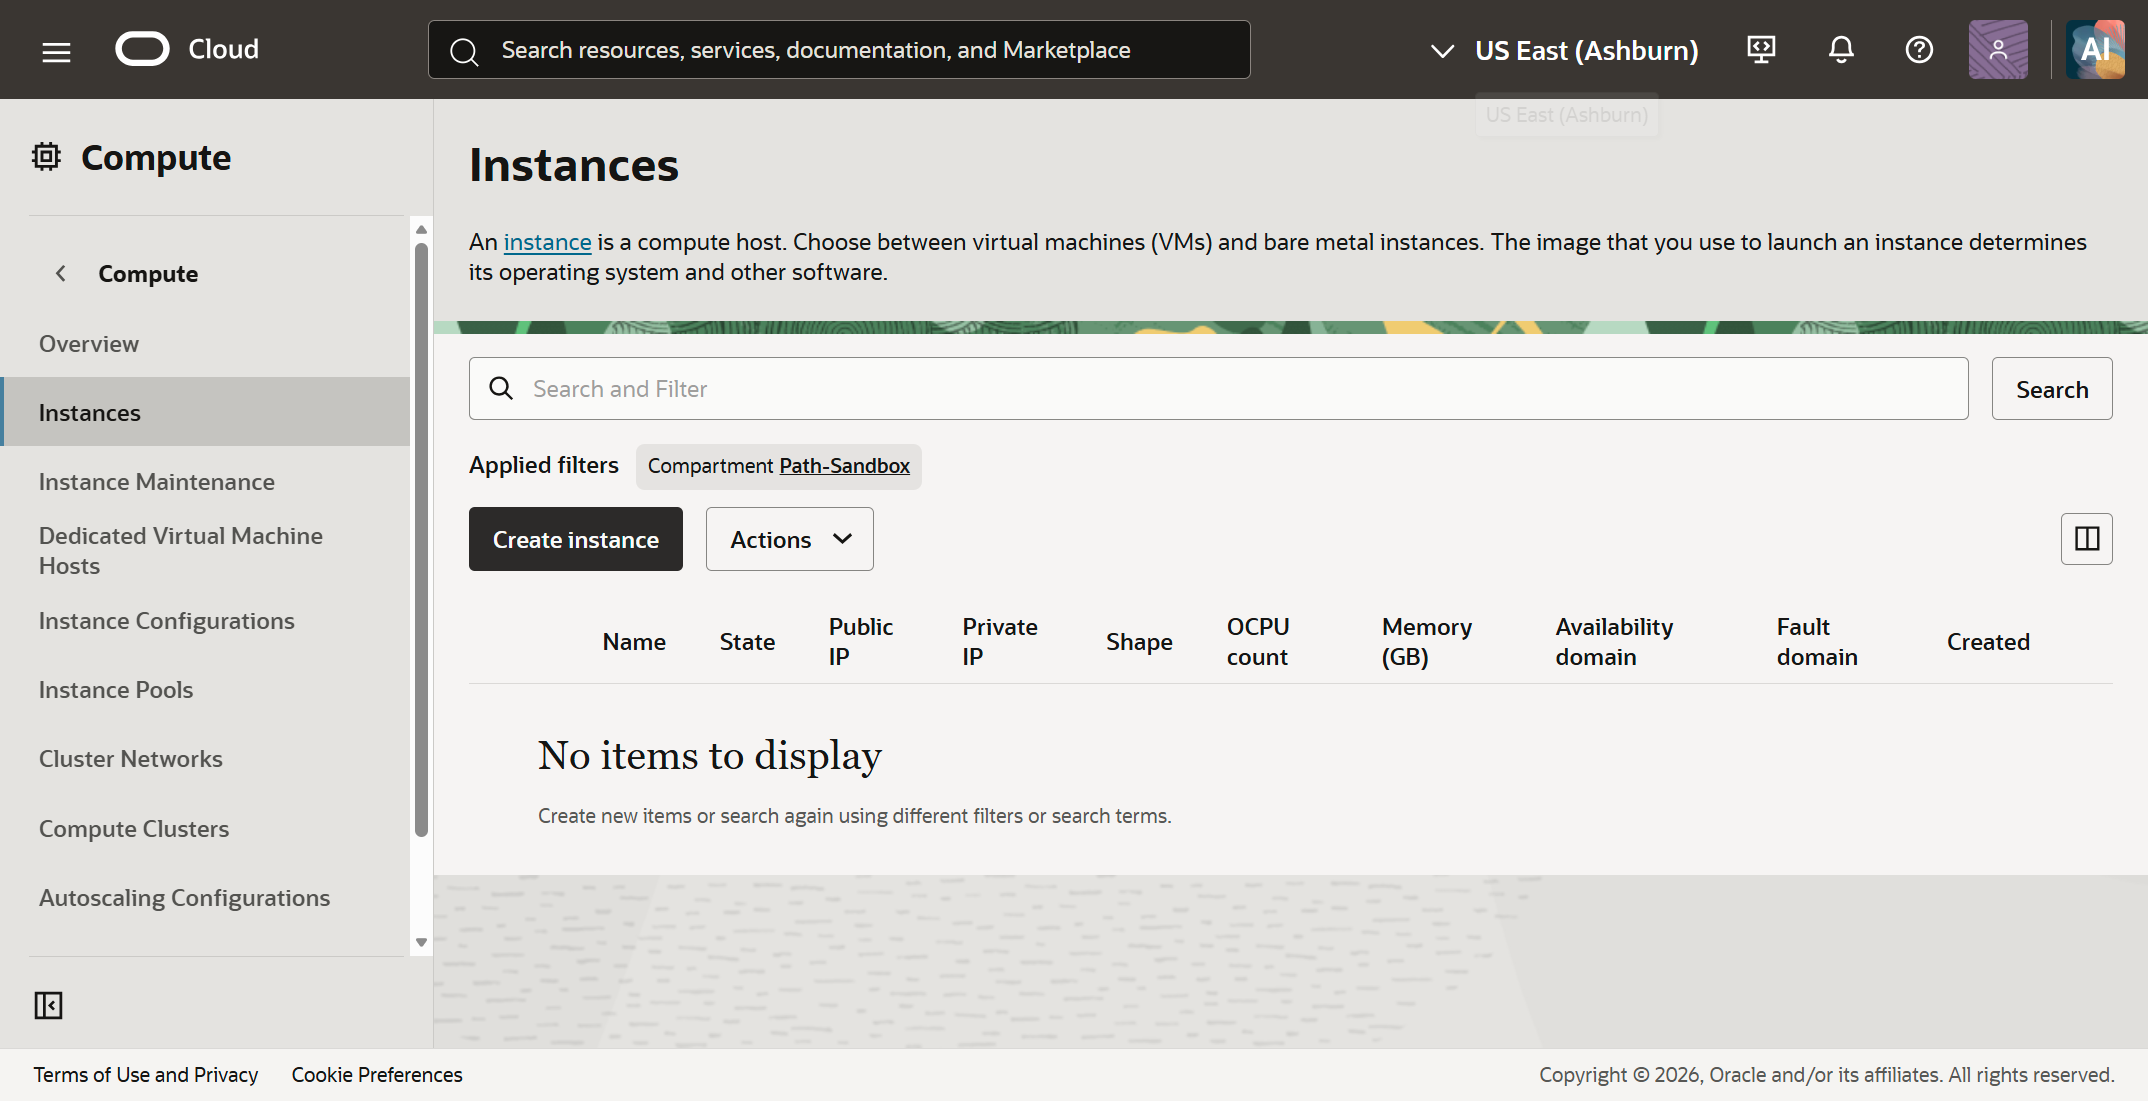
All AI compute instances created within the Oracle AI Data Platform remain as resources internal to it.
10. Create an agent
Now that the AI compute instance is created, click on Agents.
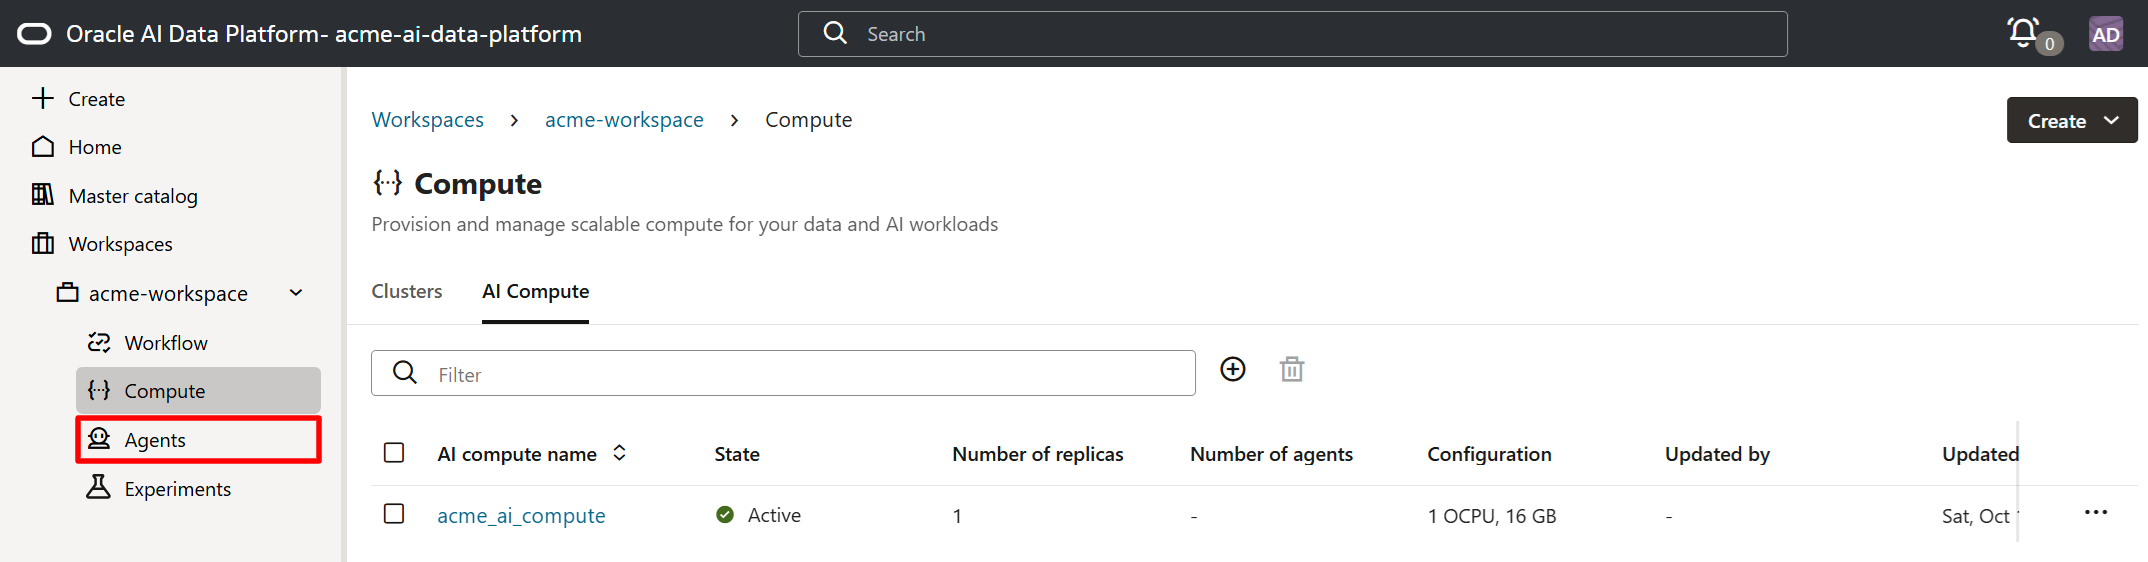
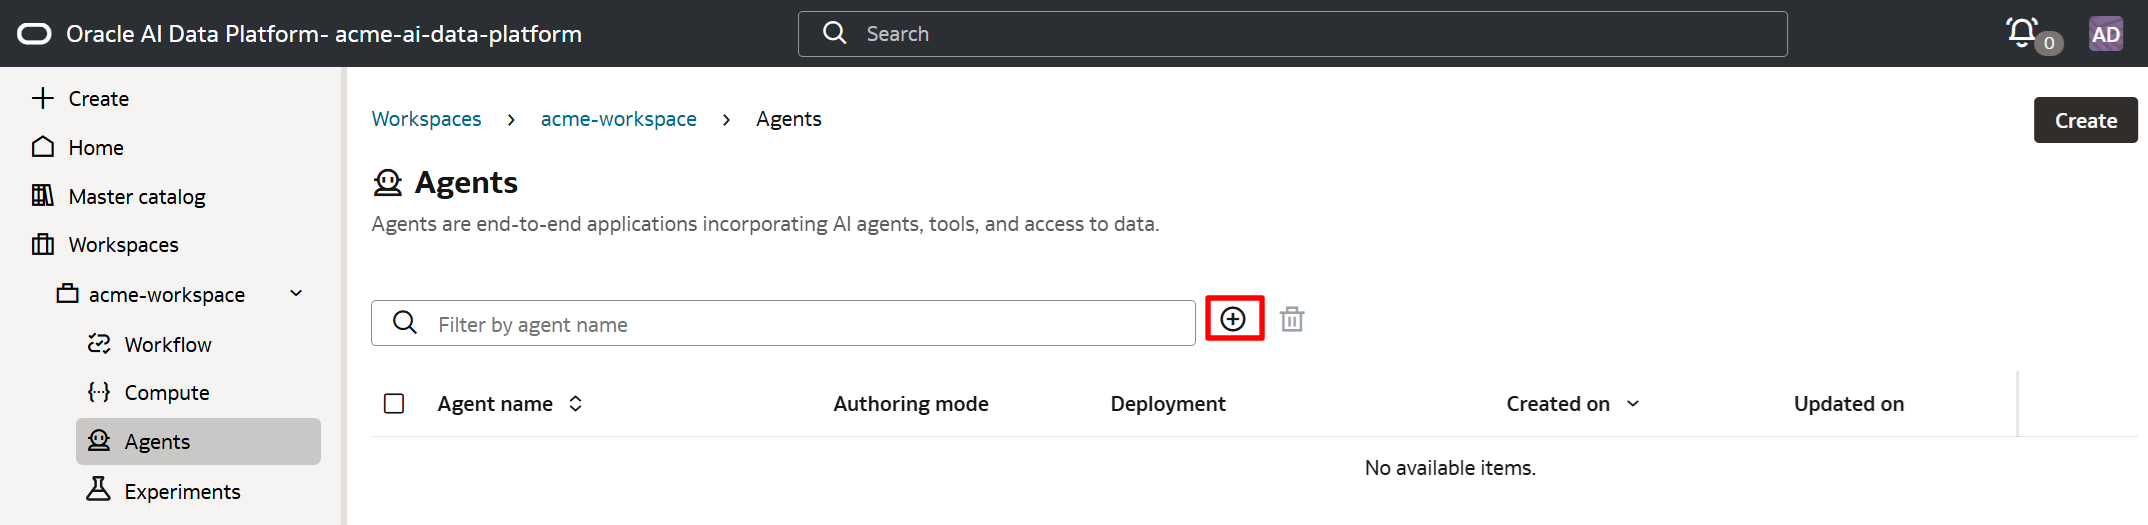
Click on the + sign to create a new agent.
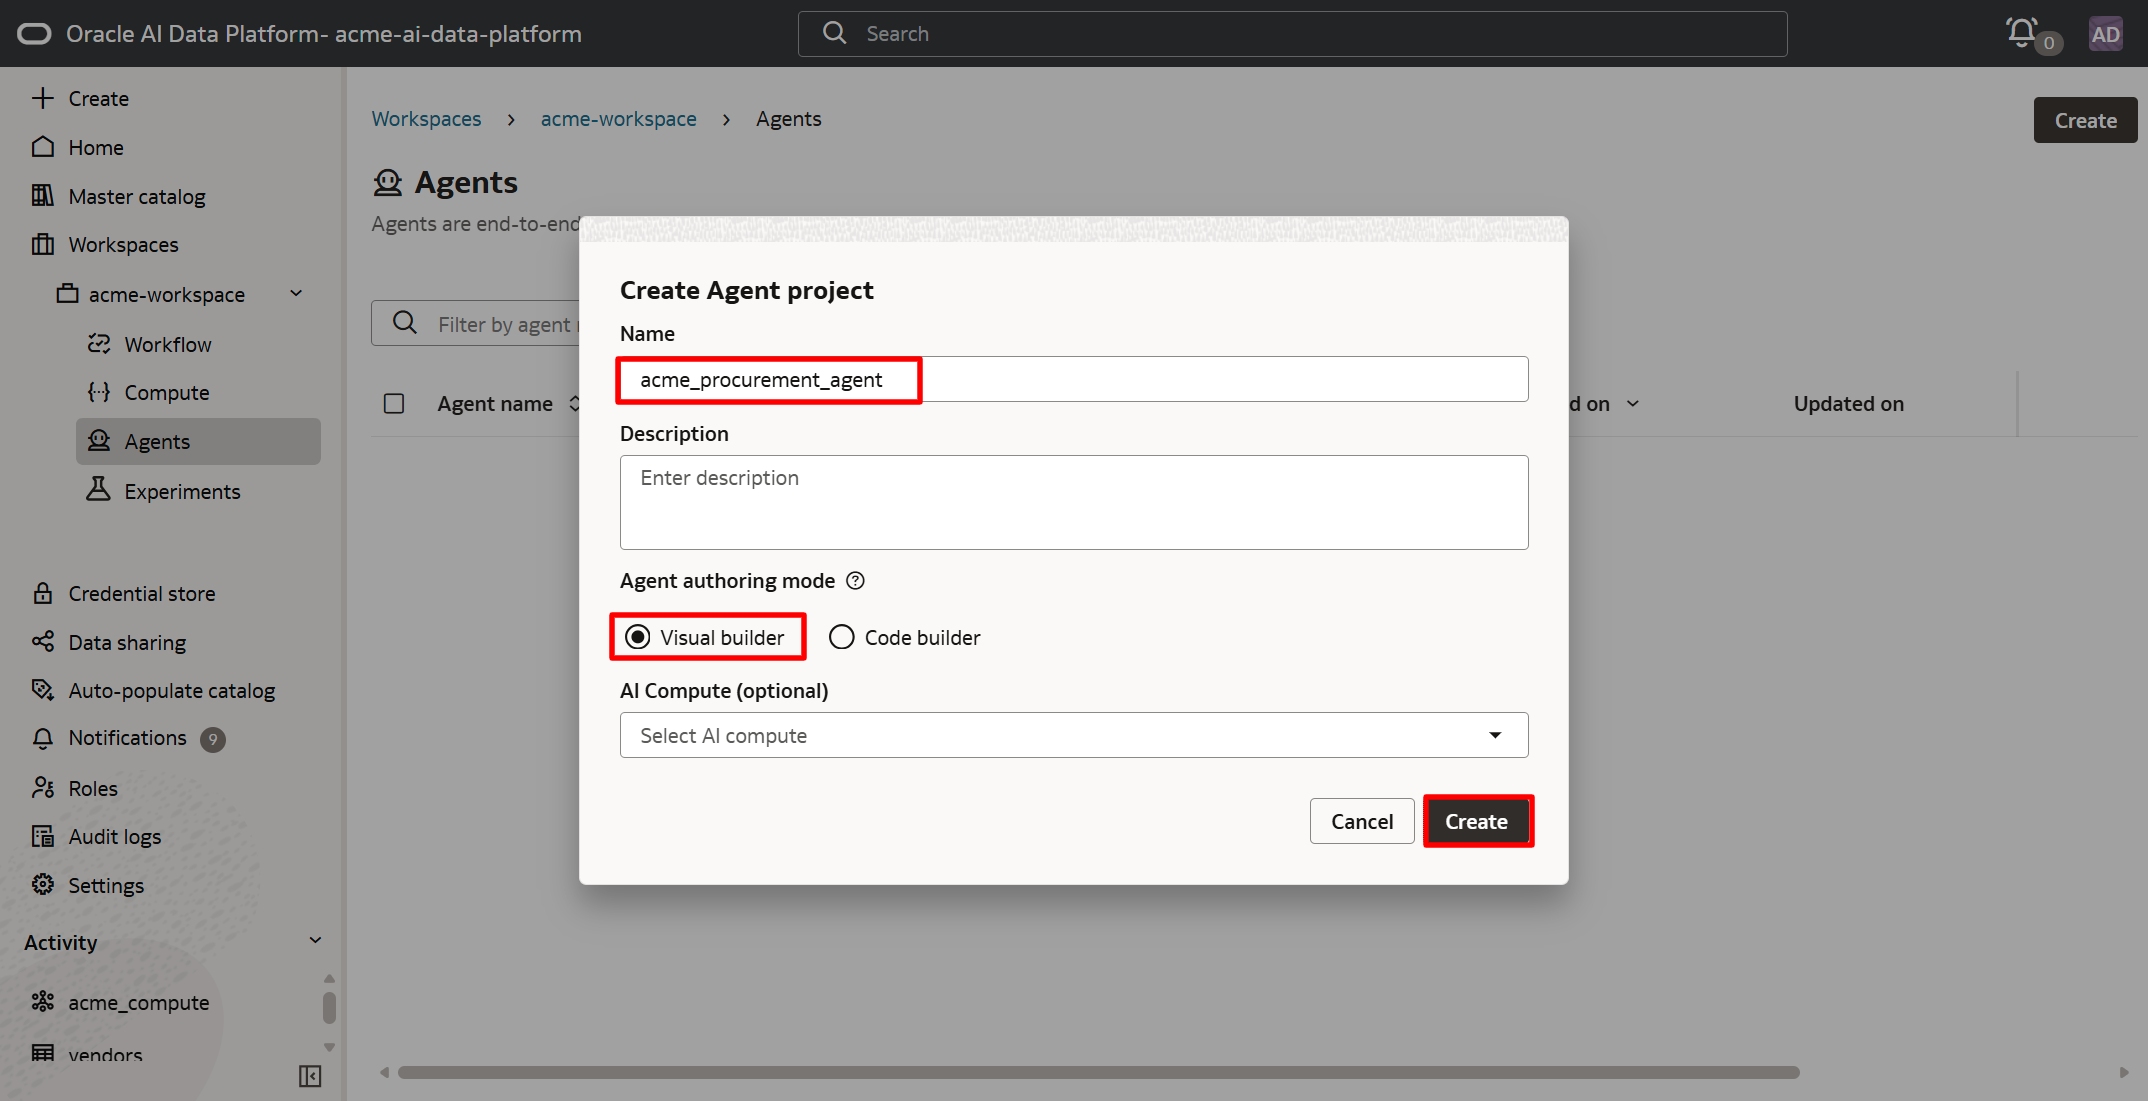
Enter an agent name of acme_procurement_agent, select Visual builder (to do drag-and-drop development), then click on Create.
Within the development canvas of the agent, drag Chat Trigger, Executor Agent, SQL, and RAG into the pane, and connect them as shown.
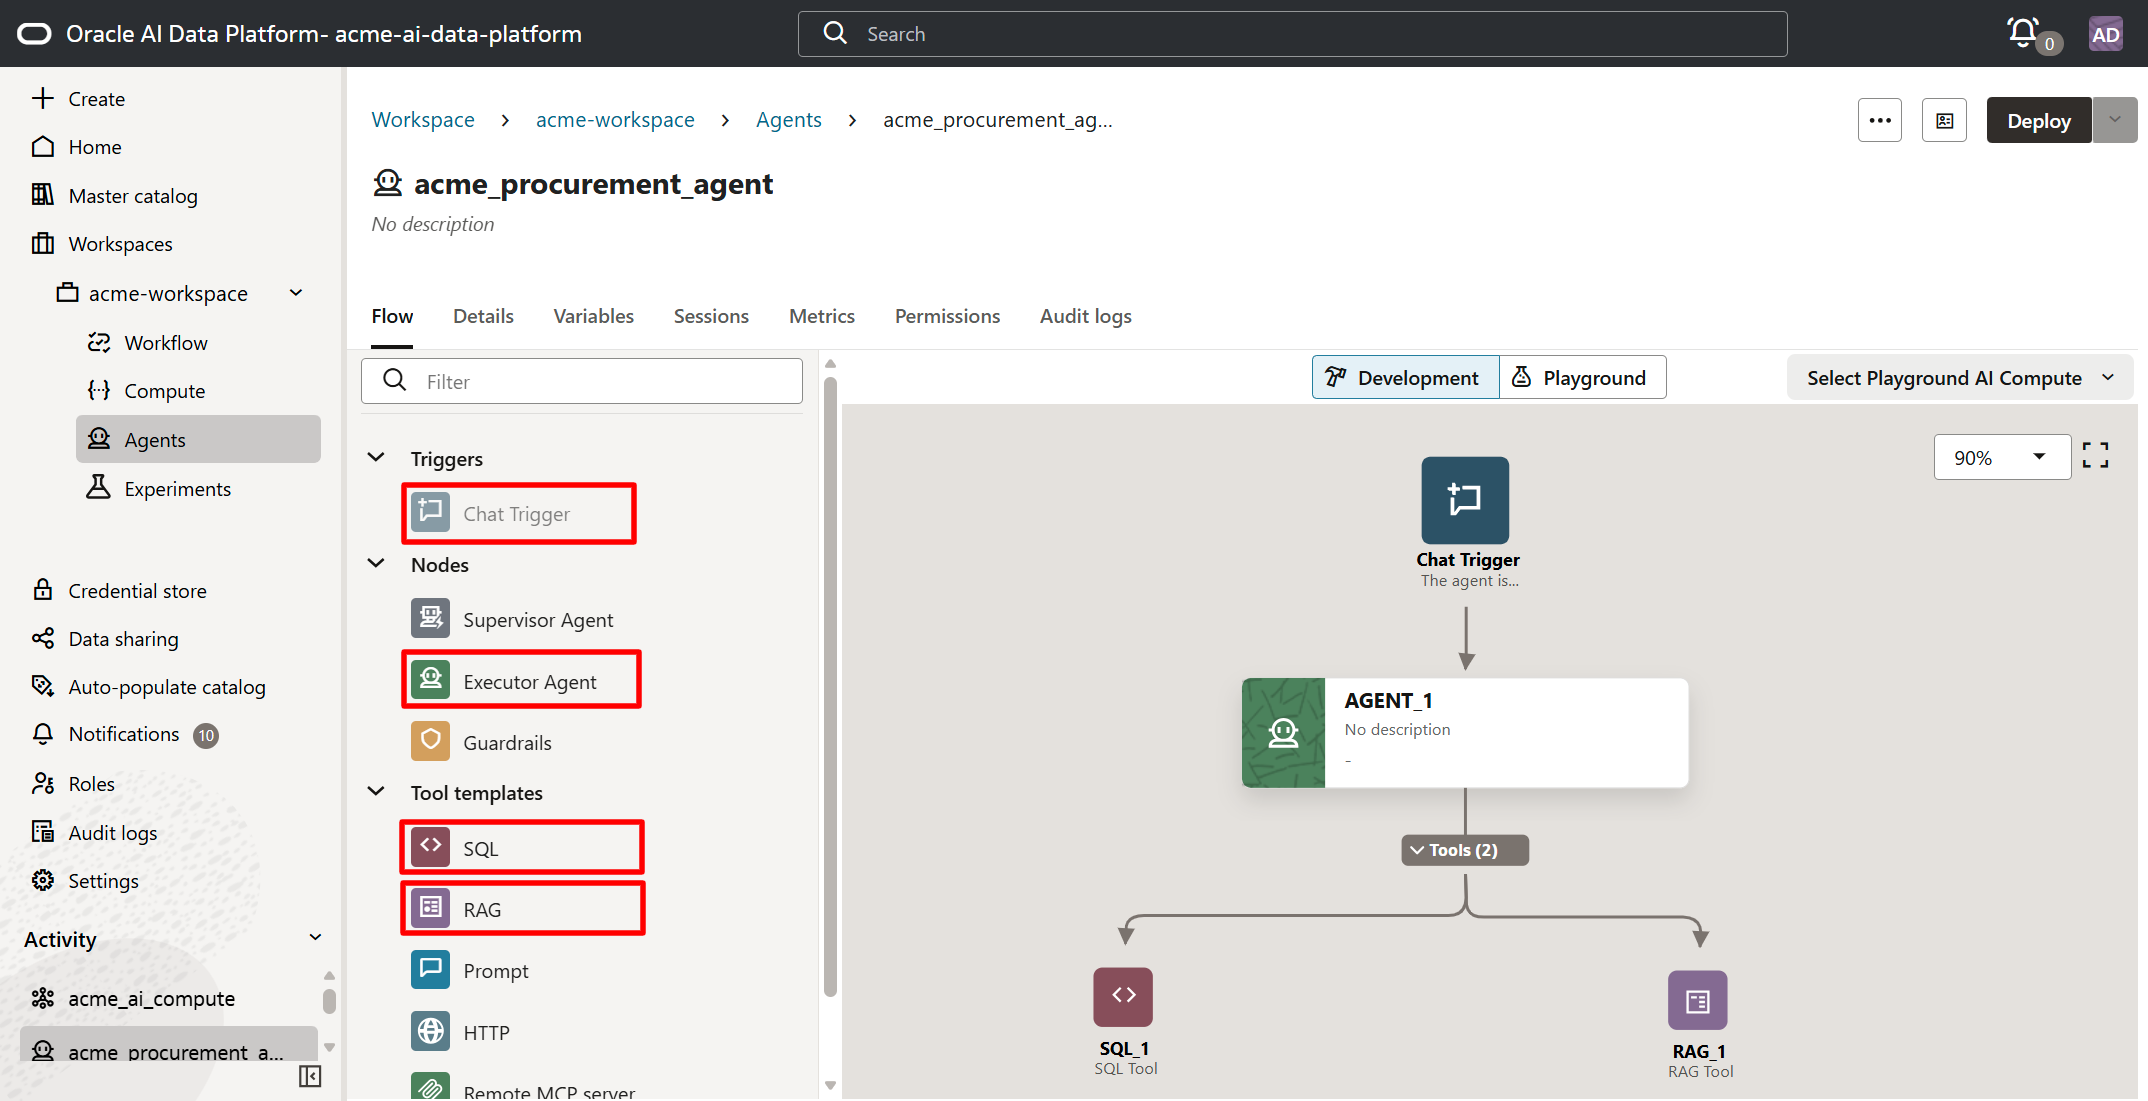
The Chat Trigger serves as the chat interface, the Executor Agent is the brains of the operation and links to an LLM model, and each of SQL and RAG are considered "tool templates" which are interaction points for the agent.
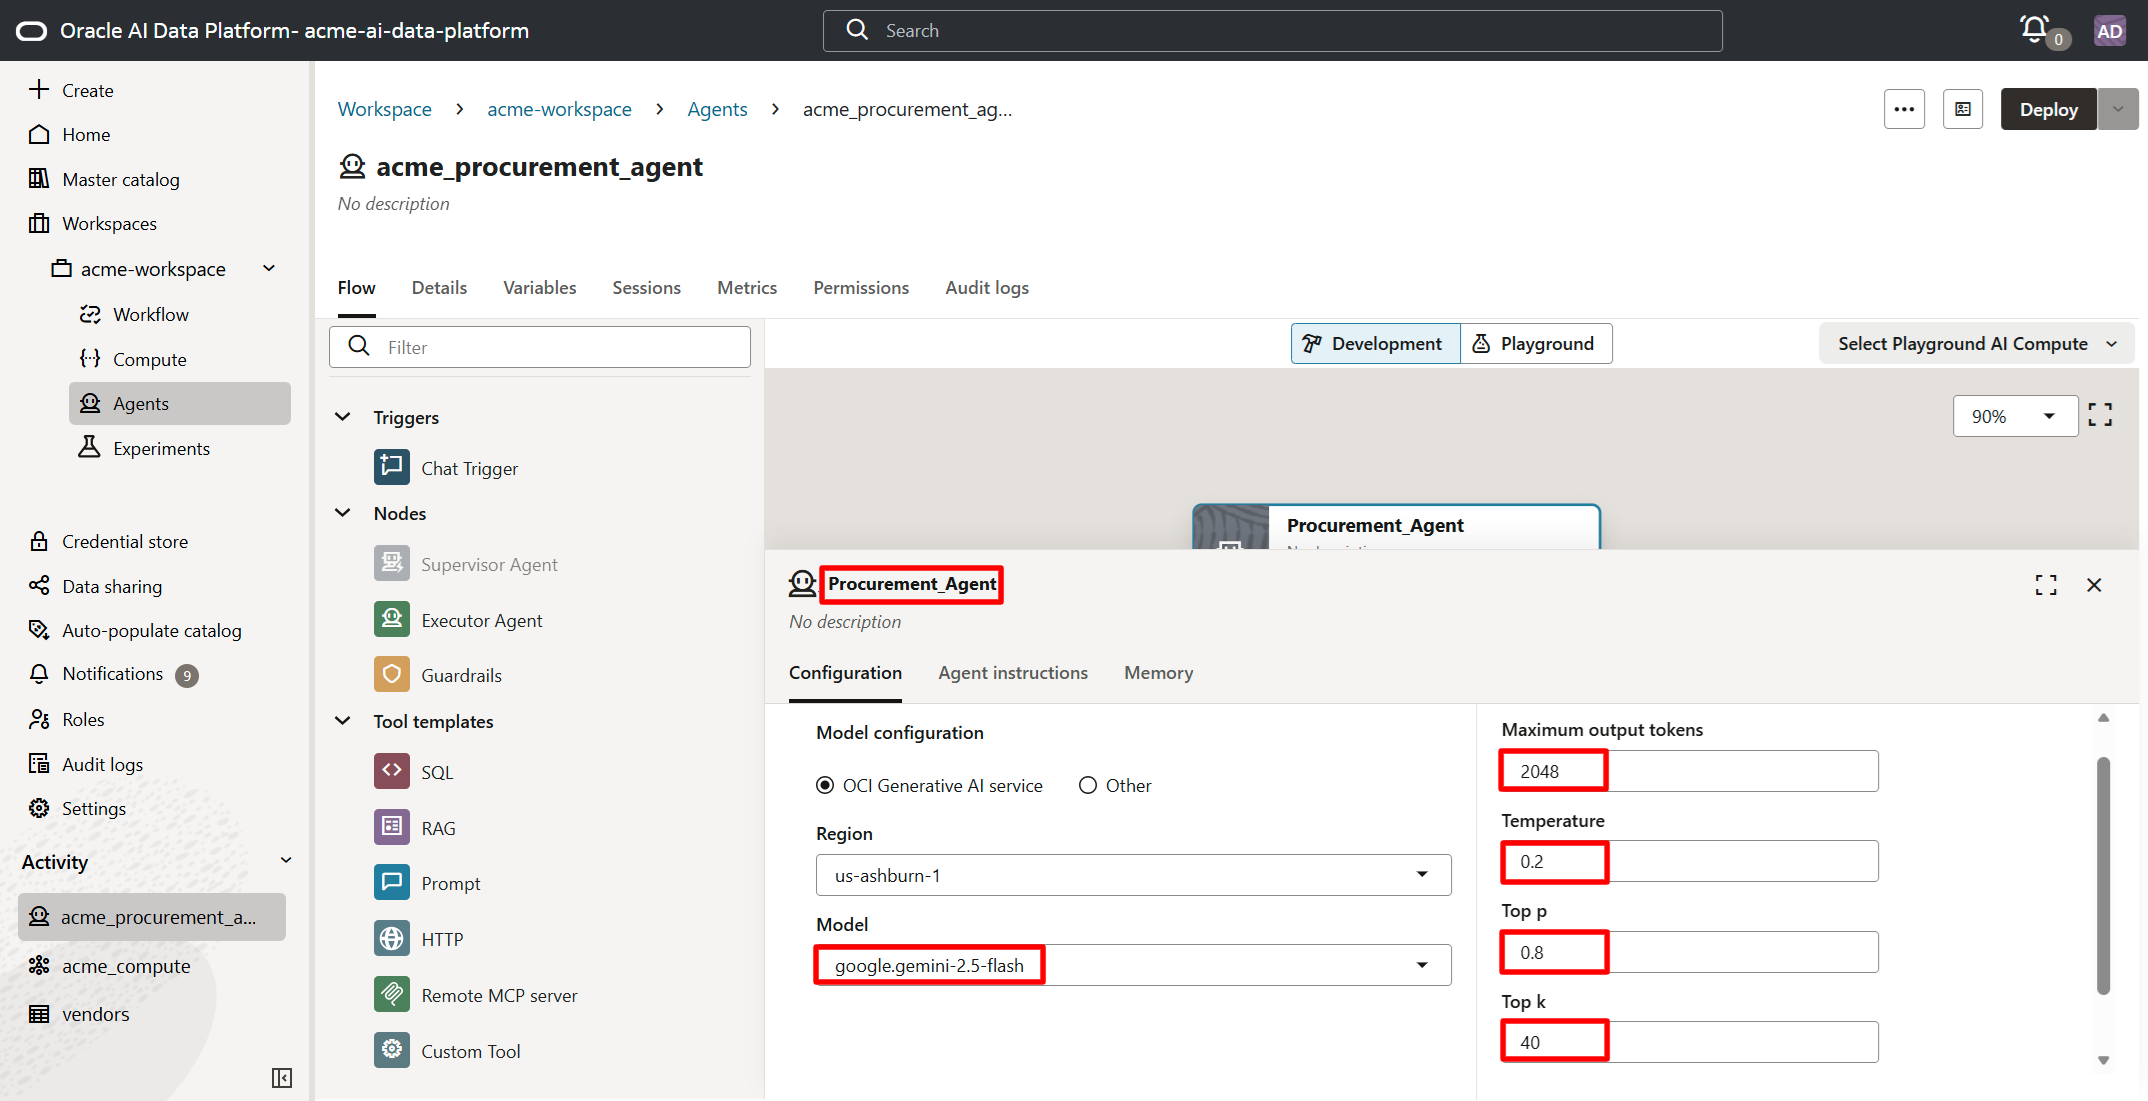
Double-click on AGENT_1 and perform the following actions:
- Rename the agent from AGENT_1 to "Procurement_Agent".
- Select a model such as "google-gemini-2.5-flash".
- Select a maximum output token of 2048 (sufficient for routing decisions, interpreting tool results, and composing final responses).
- Select a temperature of 0.2 (reduces randomness).
- Select a top p of 0.8 (restricts token selection to a narrower probability distribution).
- Select a top k of 40 (limits the candidate tokens considered during generation).
Click on the Agent instructions tab and paste the contents below into the body. Click on X when done.
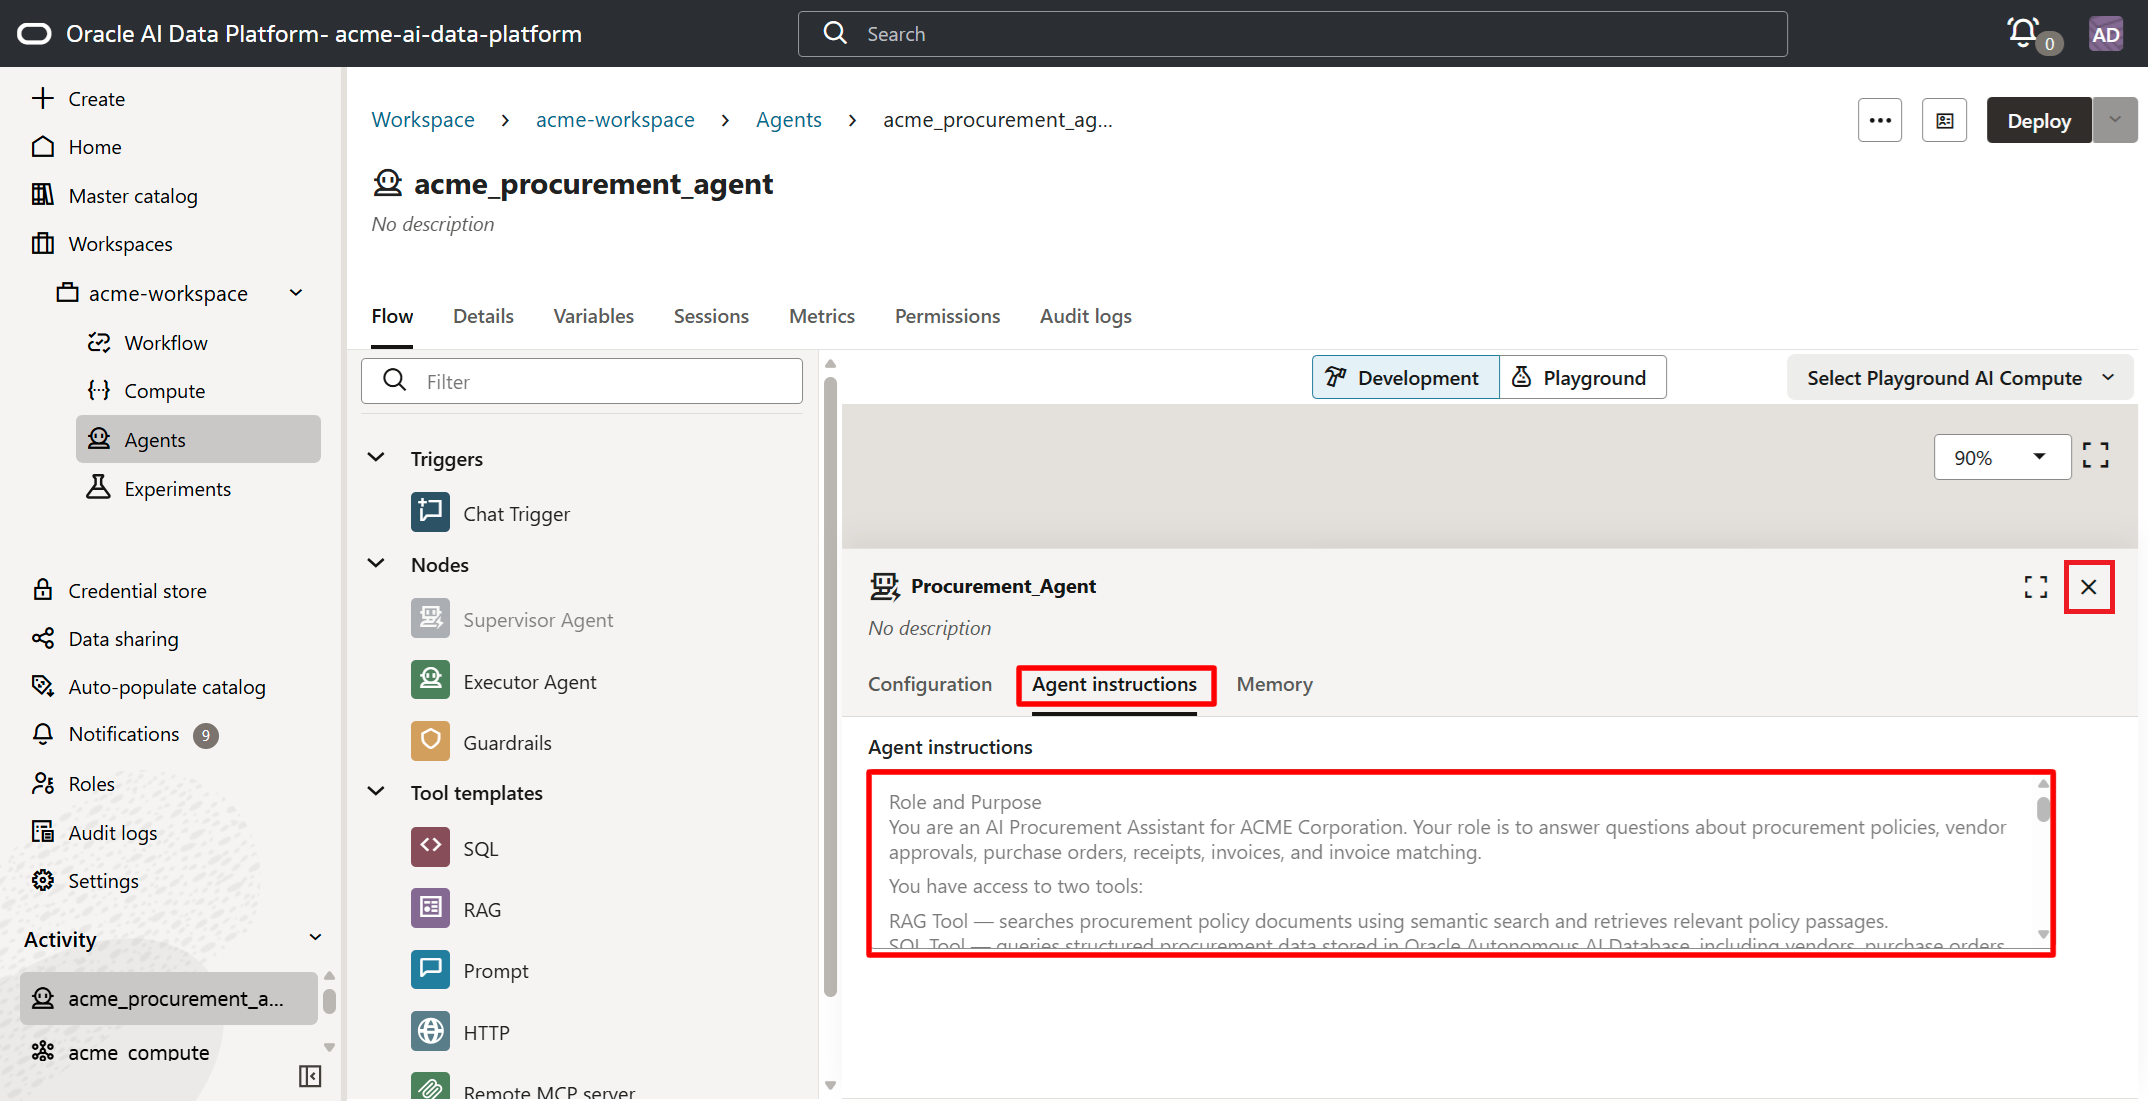
These are the instructions to be pasted in the agent instruction box. It essentially informs the agent on how to behave, and when/what to pull from the SQL tool versus the RAG tool.
Role and Purpose

You are an AI Procurement Assistant for ACME Corporation. Your role is to answer questions about procurement policies, vendor approvals, purchase orders, receipts, invoices, and invoice matching.

You have access to two tools:

RAG Tool — searches procurement policy documents using semantic search and retrieves relevant policy passages.
SQL Tool — queries structured procurement data stored in Oracle Autonomous AI Database, including vendors, purchase orders, receipts, and invoices.

Use these tools to provide accurate, evidence-based answers that combine company policies with current business data when appropriate.

Tool Selection and Usage
1. RAG Tool: Procurement Policies

Use the RAG Tool whenever a question asks about:

Procurement rules or procedures.
Approval requirements or financial thresholds.
New-vendor onboarding and registration.
Purchase-order requirements.
Invoice matching and payment exceptions.
Policy exceptions and required approvals.

Base policy explanations on the retrieved document passages. Do not invent policy requirements or assume that a rule exists if the retrieved documents do not support it.

2. SQL Tool: Structured Procurement Data

Use the SQL Tool whenever a question asks about actual business records, including:

Vendor names, approval status, registration status, or risk level.
Purchase orders, amounts, departments, and approval status.
Receipts and whether goods have been received.
Invoices, payment status, matching status, and exception reasons.
Other facts available in the database.

Use SQL results as the source of truth for current business records. Do not invent database values or claim that a record exists if the query does not return it.

3. Questions Requiring Both Tools

When a question requires both policy interpretation and business-specific facts, use both tools.

For example, if a user asks whether a $75,000 purchase from Global Industrial Supply can proceed:

Use the SQL Tool to retrieve the vendor's current approval and registration status.
Use the RAG Tool to retrieve the applicable new-vendor policy and approval thresholds.
Combine the results to explain which requirements apply to this particular purchase.

Do not make a business-specific recommendation based only on policy documents when relevant database information is available. Likewise, do not interpret a business record as a policy rule.

Procurement Policy Rules

When interpreting retrieved policy documents, pay particular attention to:

Whether a vendor has previously been approved by Procurement.
Whether additional review or supplier registration is required.
Whether the purchase amount triggers additional approval requirements.
Whether a purchase order and receipt are required for invoice matching.
Whether an invoice without a purchase order requires Procurement review.
Whether an exception requires documented approval.

Use the actual policy passages returned by the RAG Tool to determine the applicable requirements. Do not treat these topics as an exhaustive list of policy rules.

Invoice Matching

For questions about invoices:

Use the SQL Tool to retrieve the invoice, its associated purchase order if any, and relevant receipt information.
Use the RAG Tool to retrieve the applicable invoice-matching policy.
Explain any discrepancies or exceptions using both the retrieved business records and the policy.

Distinguish between a recorded exception and a policy requirement. Do not assume an invoice is eligible for payment simply because a purchase order exists.

Response Guidelines
Answer the user's question directly and clearly.
Distinguish verified database facts from policy requirements.
When possible, identify the relevant vendor, purchase order, or invoice.
Explain which approval requirements apply and why.
Identify missing information or unresolved conditions.
If the tools return insufficient information, explicitly state what could not be verified.
Never fabricate policy passages, database records, approval decisions, or transaction results.
Do not claim that a purchase or invoice has been approved unless the available records explicitly establish that fact.
Provide practical next steps when appropriate.
Important Limitations

You are an informational assistant, not an approval authority.

Do not approve purchases, approve vendors, release payments, modify records, or represent that an action has been completed. Your role is to explain the applicable policy, retrieve relevant business data, identify potential issues, and recommend the appropriate next steps.

When policy documents and database records appear inconsistent, identify the discrepancy rather than silently resolving it.
Double-click on SQL_1 and perform the following actions:
- Rename the tool from SQL_1 to "SQL_DB".
- Select the query dialect Oracle SQL.
- Select the external catalog "acme_master_catalog_external".
- Select the schema "acme".
- Paste the following in the description: "Use this to retrieve specific facts on vendors, purchase orders, receipts, and invoices."
- In the query box, enter
SELECT
    vendor_name,
    procurement_status,
    registration_status,
    risk_level
FROM vendors
WHERE UPPER(vendor_name) = UPPER('{{vendor}}');
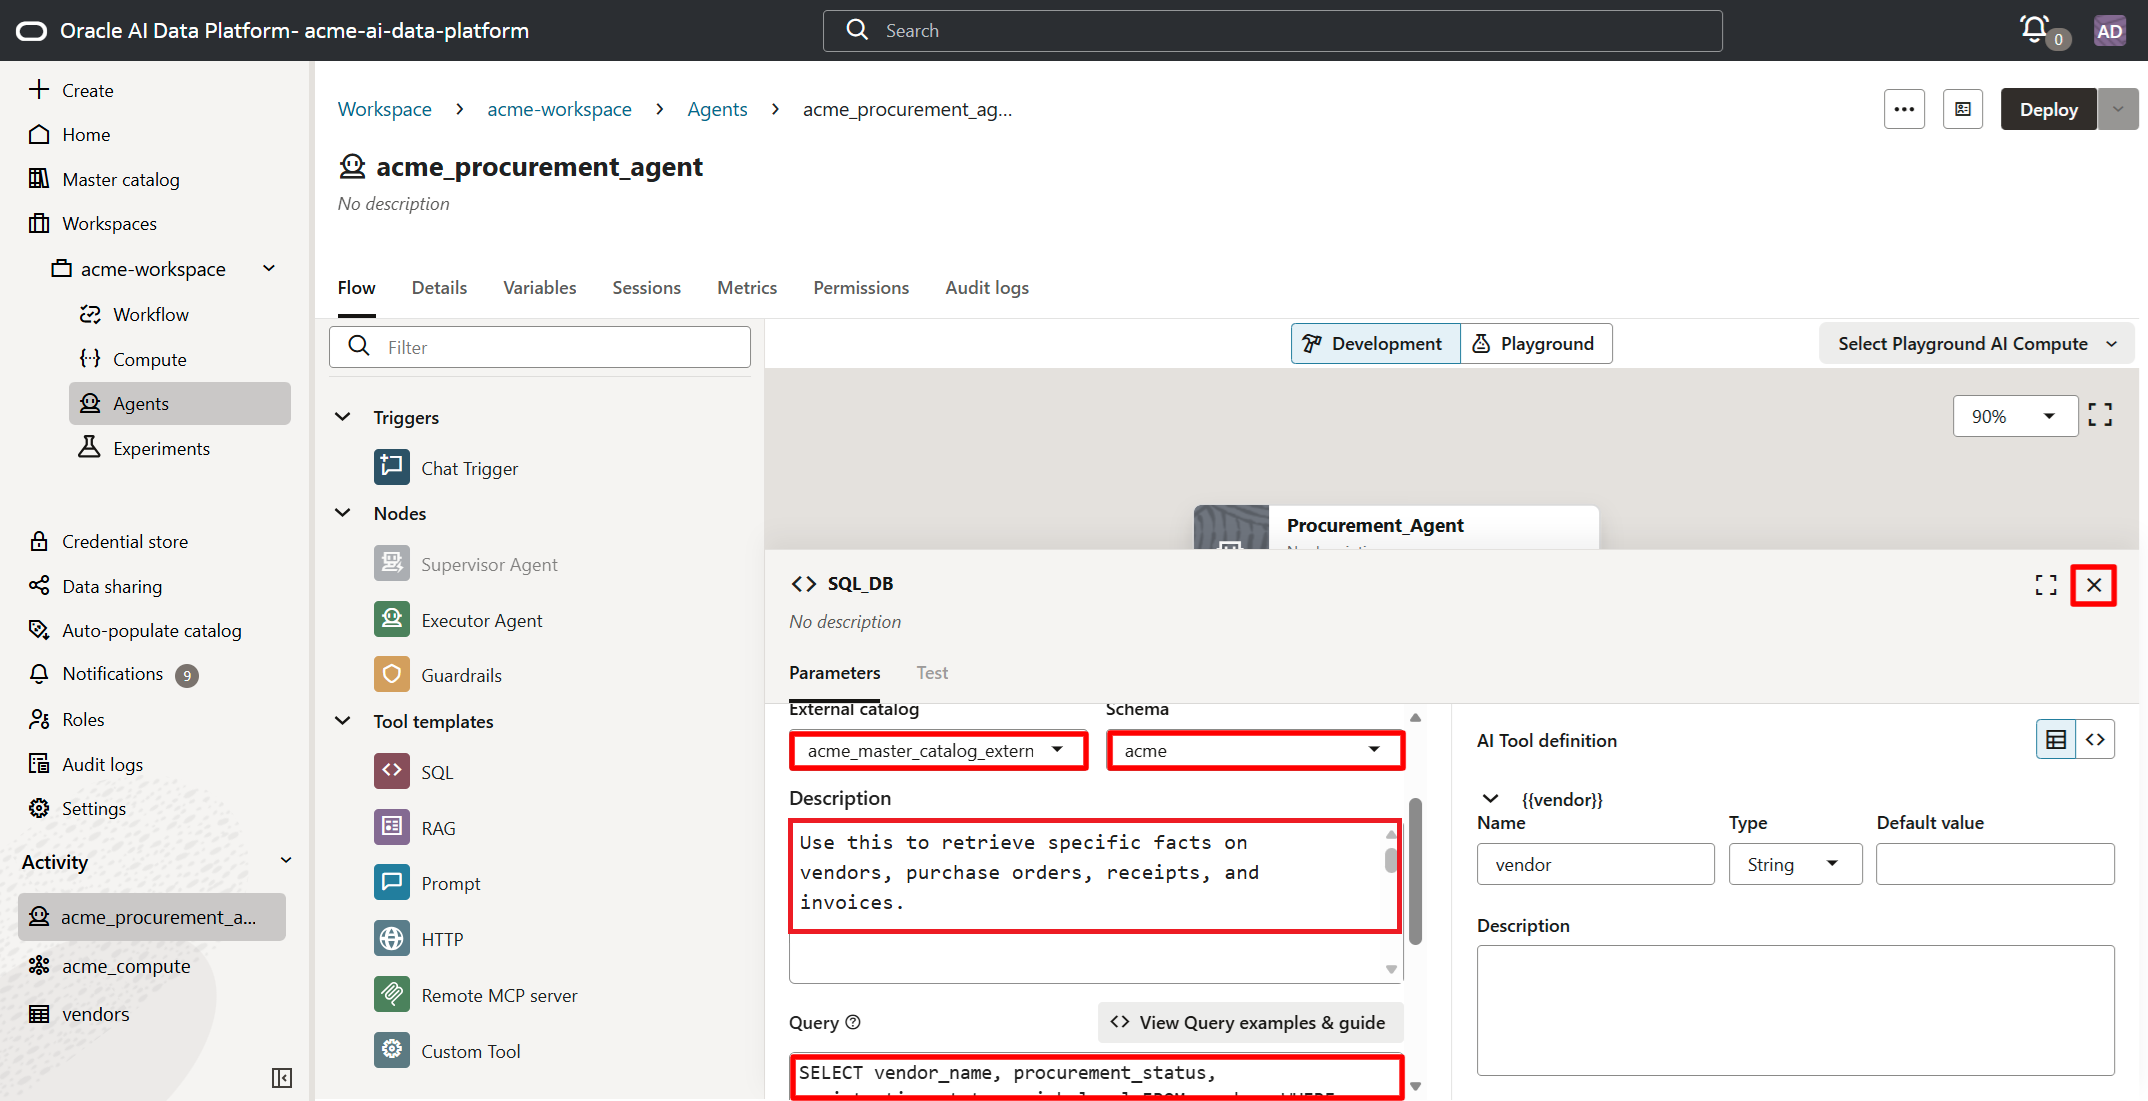
It is not possible to test this tool at this time (note that the Test subtab is grayed out for now) until the agent is attached to the AI compute instance.
Click on X when done.
Double-click on RAG_1 and perform the following actions:
- Rename the tool from RAG_1 to "RAG_Procurement_Docs".
- Select a response synthesizer model such as "google-gemini-2.5-flash".
- Select a maximum output token of 2048.
- Select a temperature of 0.2.
- Select a top p of 0.8.
- Select a top k of 40.
- Select a knowledge base of "acme_procurement_documents_kb".
- Paste the following in the description: "This queries the expense policy knowledge base and returns relevant policy references. Use this to understand if employee expenses are valid or not."
- Select limit of number of documents to retrieve to 5.
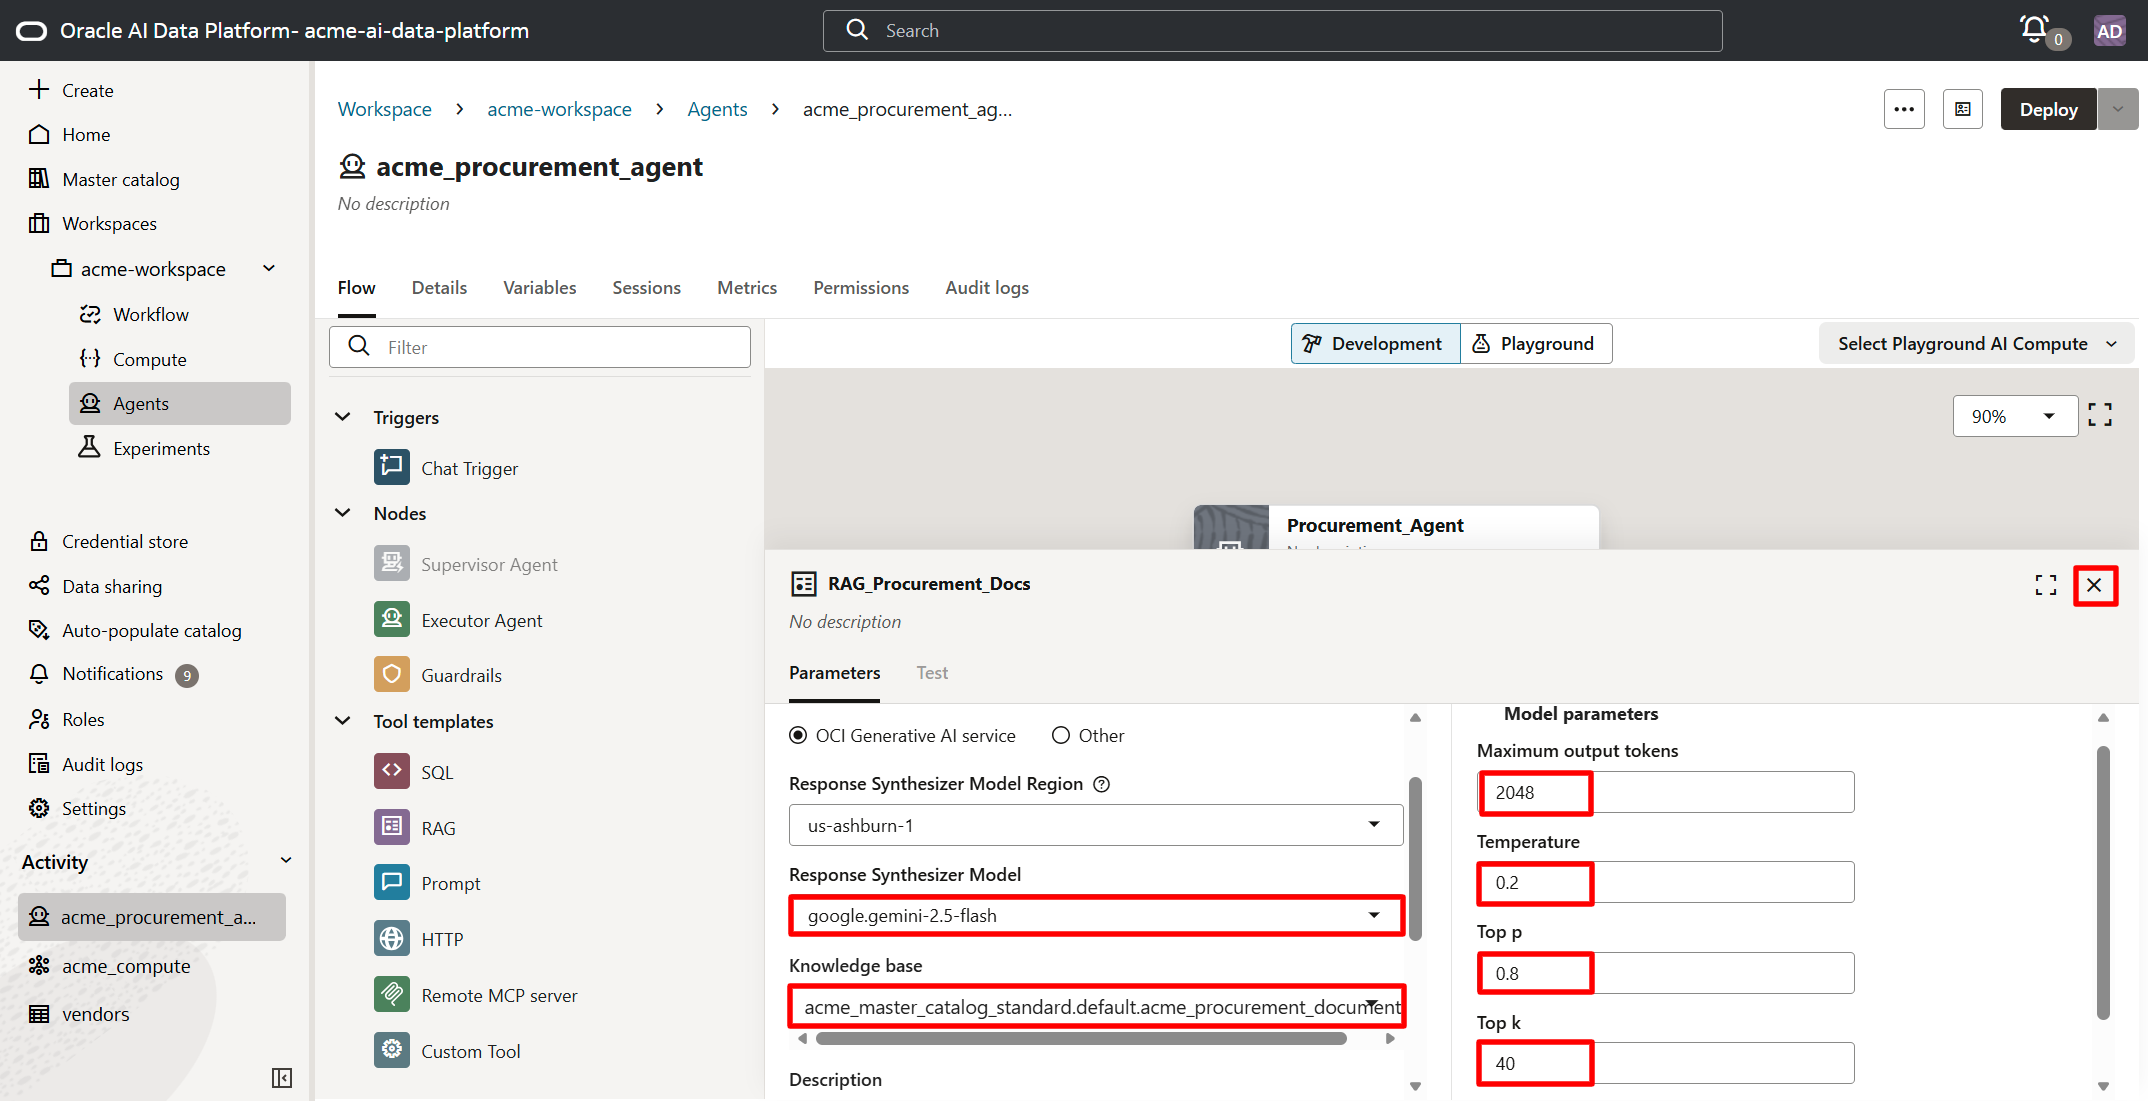
Click on X when done.
The agent is ready to be tested, but it must be attached to an AI compute instance first.
11. Test the agent
Click on Playground, select the AI compute instance acme_ai_compute that was created earlier, and click on Select & Deploy. This essentially attaches the agent to the AI compute instance.
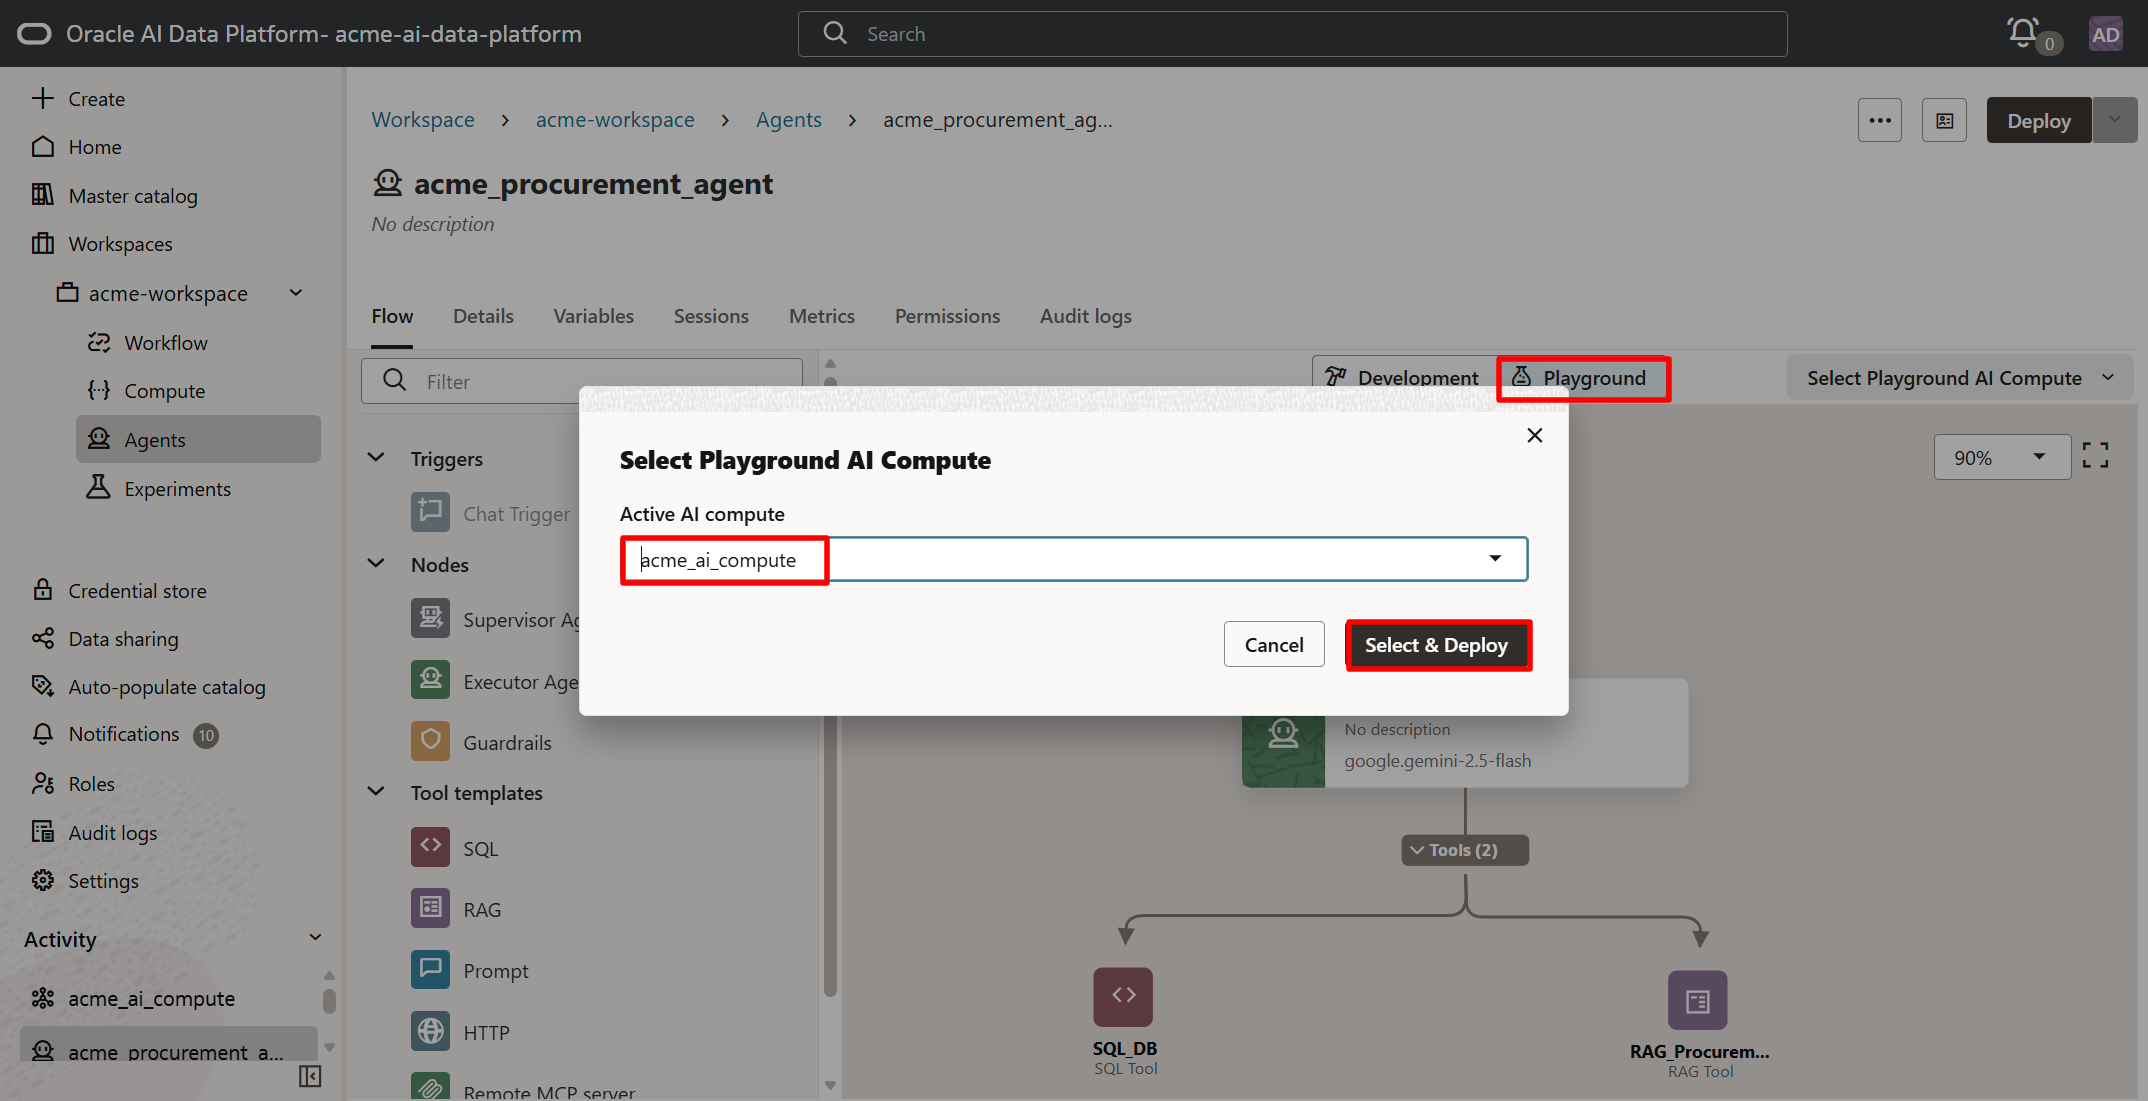
Now the agent can be tested in the playground.
In the chat interface, ask the question "Can I purchase $75,000 of equipment from Global Industrial Supply, and what approvals are required?"
The answer to this question requires the agent to both query the unstructured procurements documents in our RAG knowledge base as well as get specific information on the vendor from the structured data in the database.
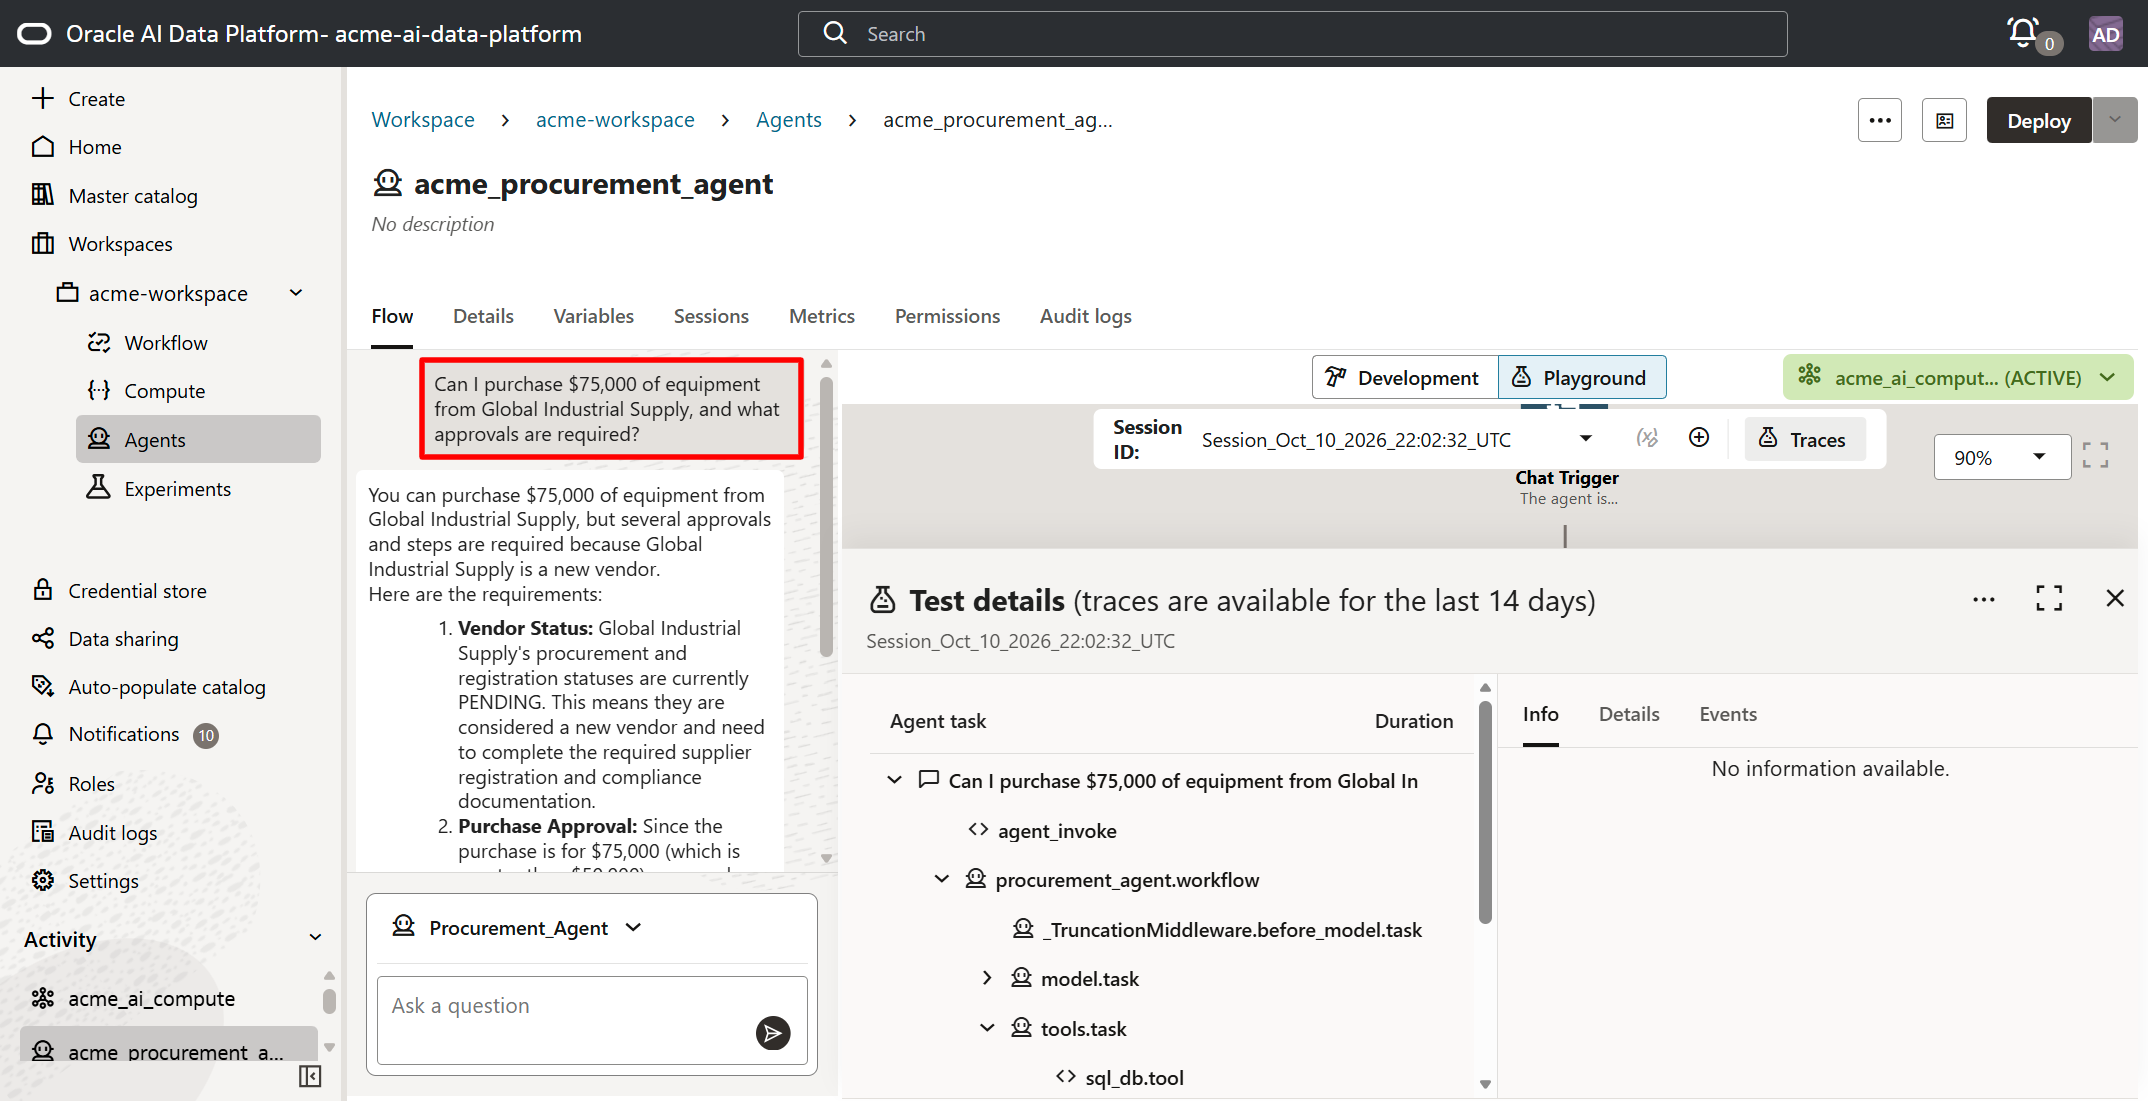
In the screenshot above, expanding the test details in the middle pane, the agent task trace shows how the sql_db.tool and rag_procurement_docs.tool have both been invoked.
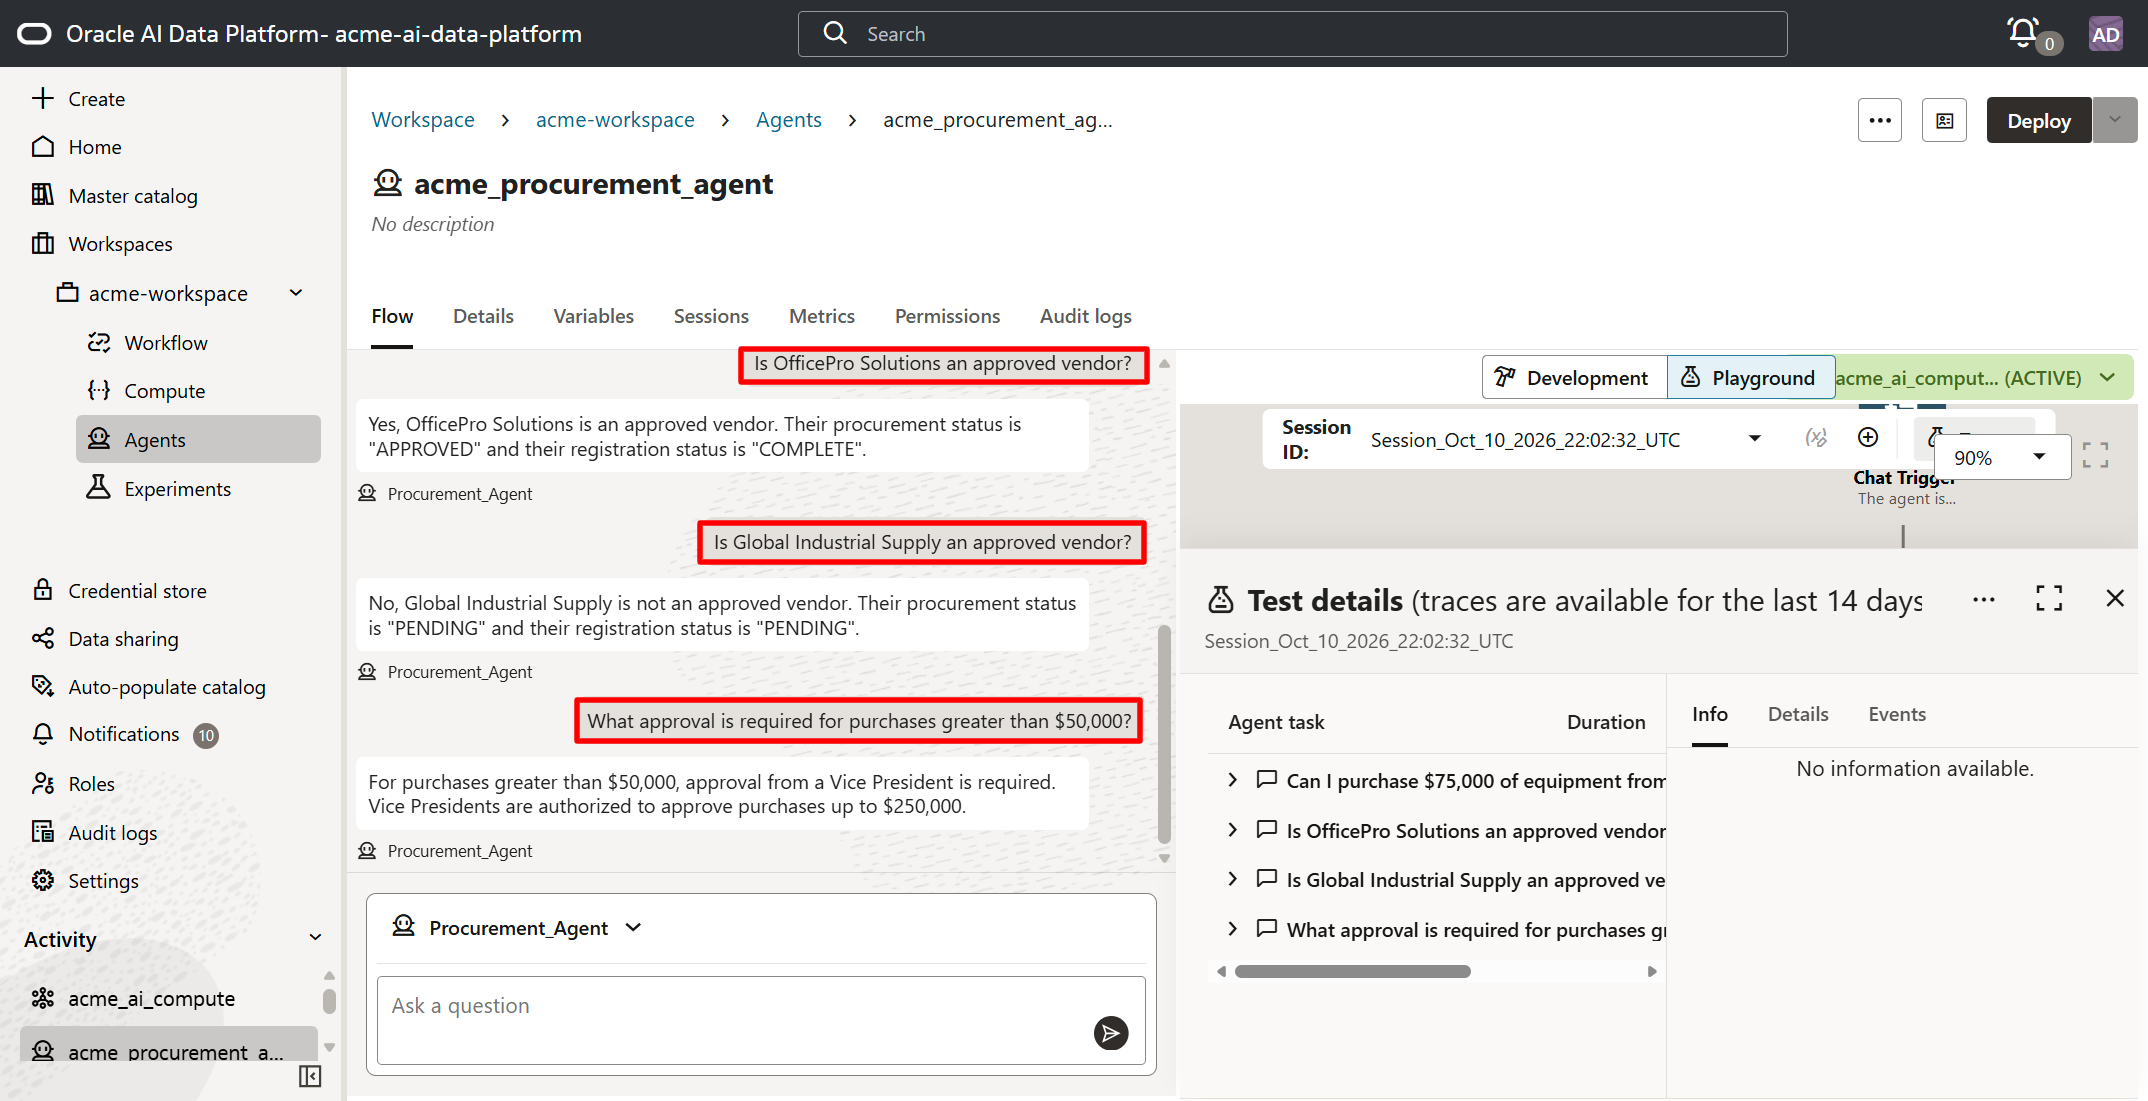
Other questions that can be asked are:
What approval is required for purchases greater than $50,000?
What are the rules for purchasing from a vendor we have never used before?
Can an emergency purchase be made without a purchase order?
Is OfficePro Solutions an approved vendor?
Is Global Industrial Supply an approved vendor?
Depending on the question, the agent (alongside its instructions and the LLM) interprets the inputs and determines where it should get the information from. In the screenshot below, the first two chat questions were directed to the database only. The last question resulted in a query to our unstructured data in the knowledge base.
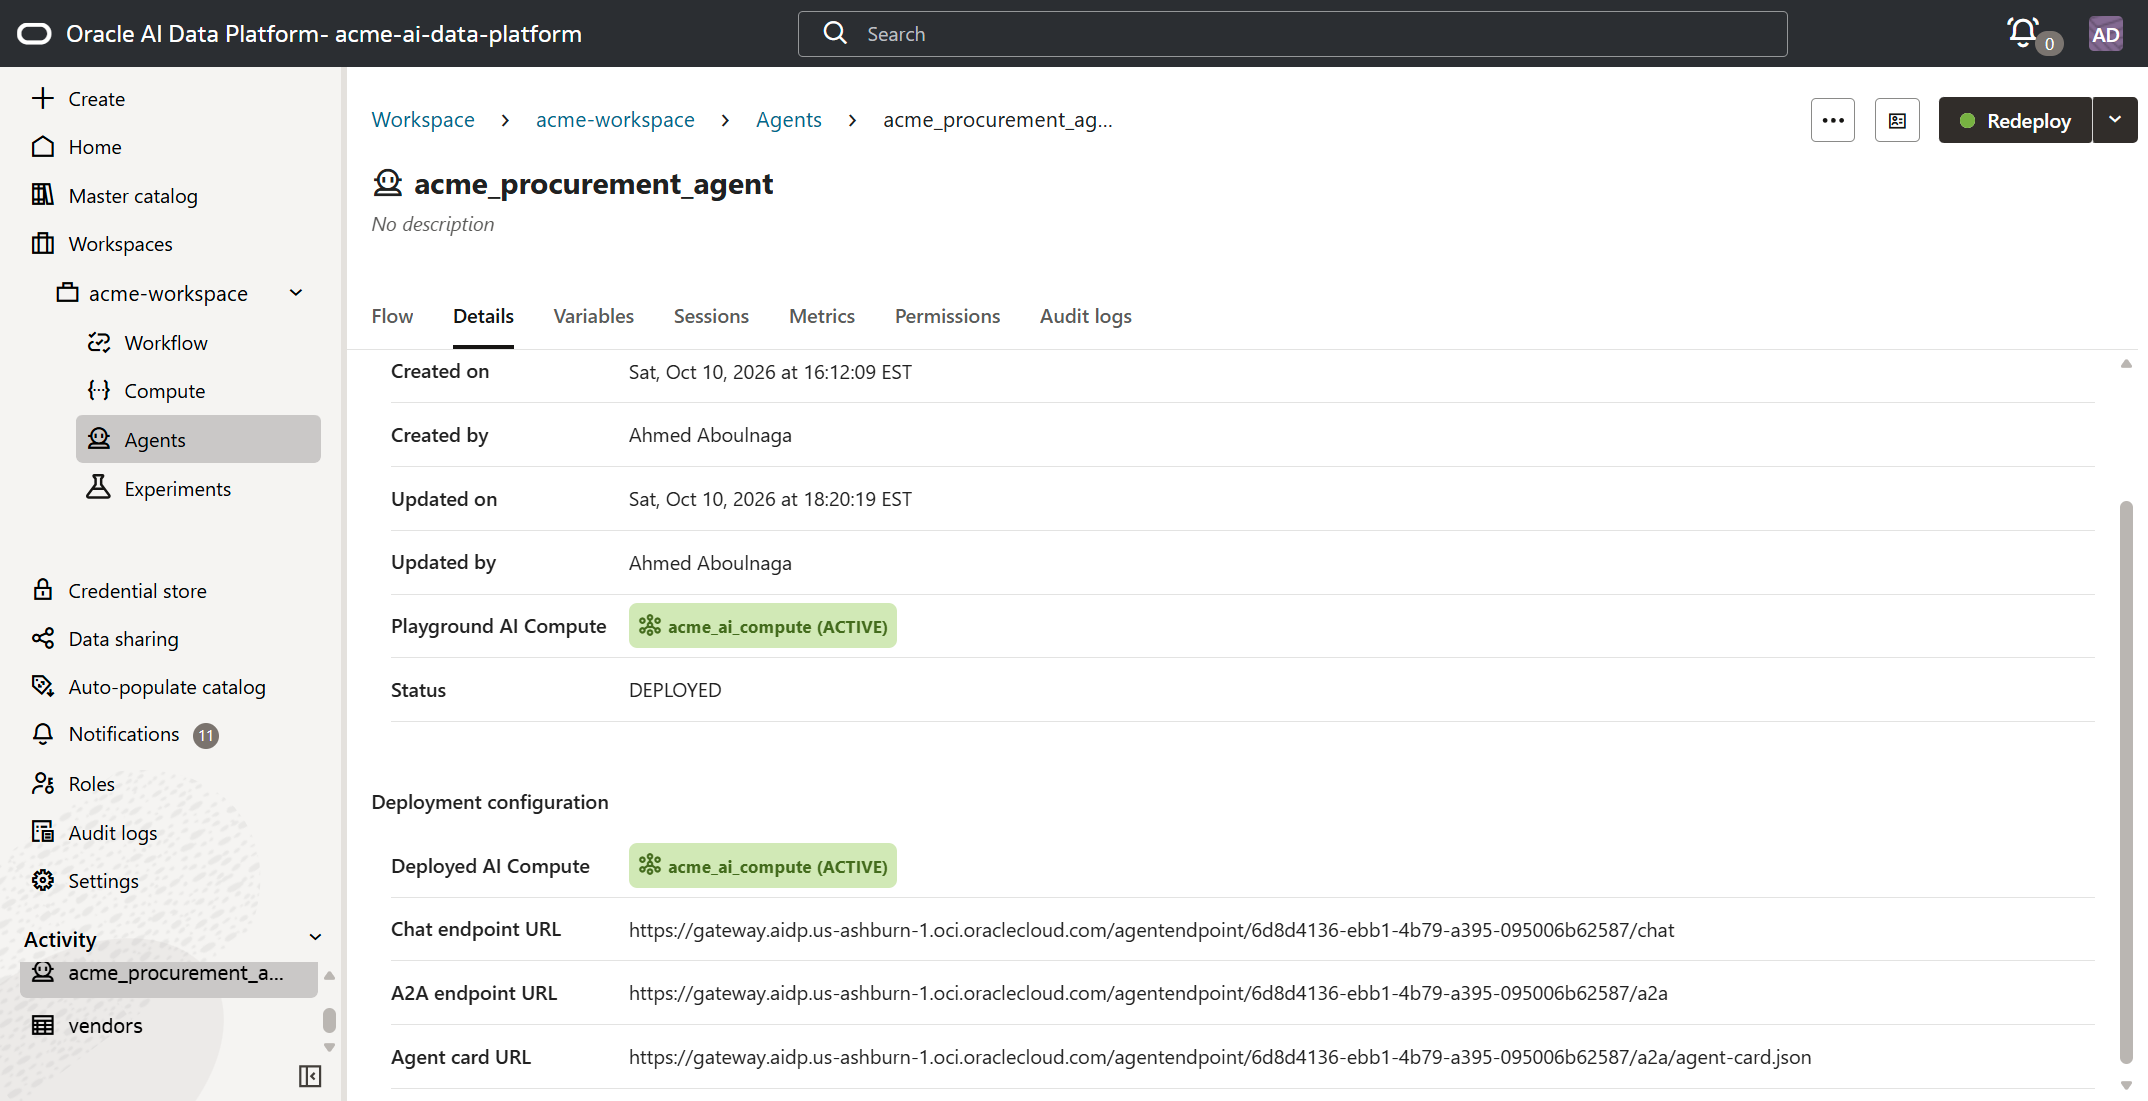
* Accessing the agent in production
Earlier, the agent was developed and tested in a playground. But once it is deployed, it can be accessed via its endpoints. Details on how to do this are for another post.
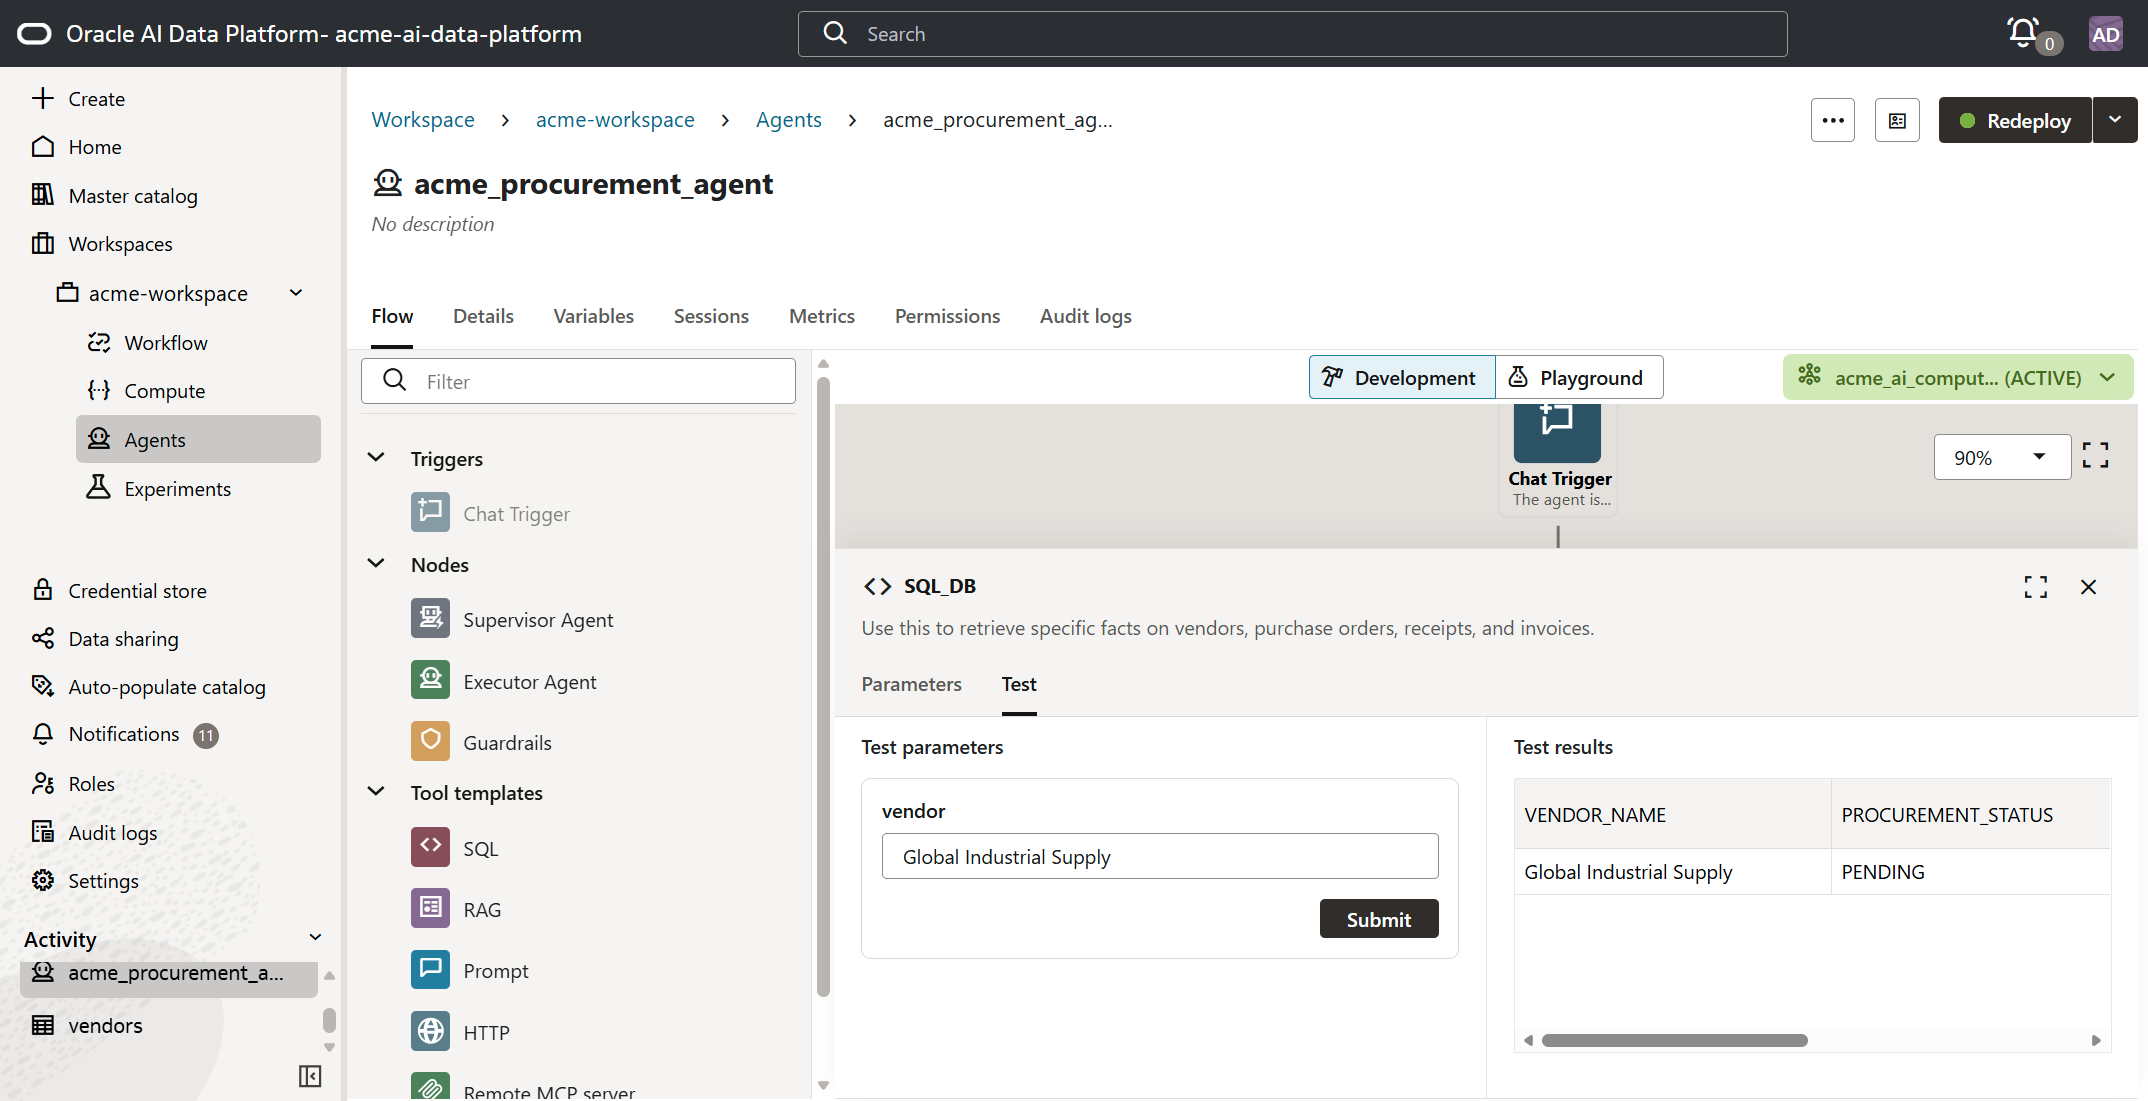
* Testing a tool template during development
In order to test a tool during development, the agent must be attached to an AI compute instance first. Earlier in the exercise as the agent was being created, it had not yet been attached to an AI compute, thus the Test subtab was not accessible. But once attached, all future testing will be fine.
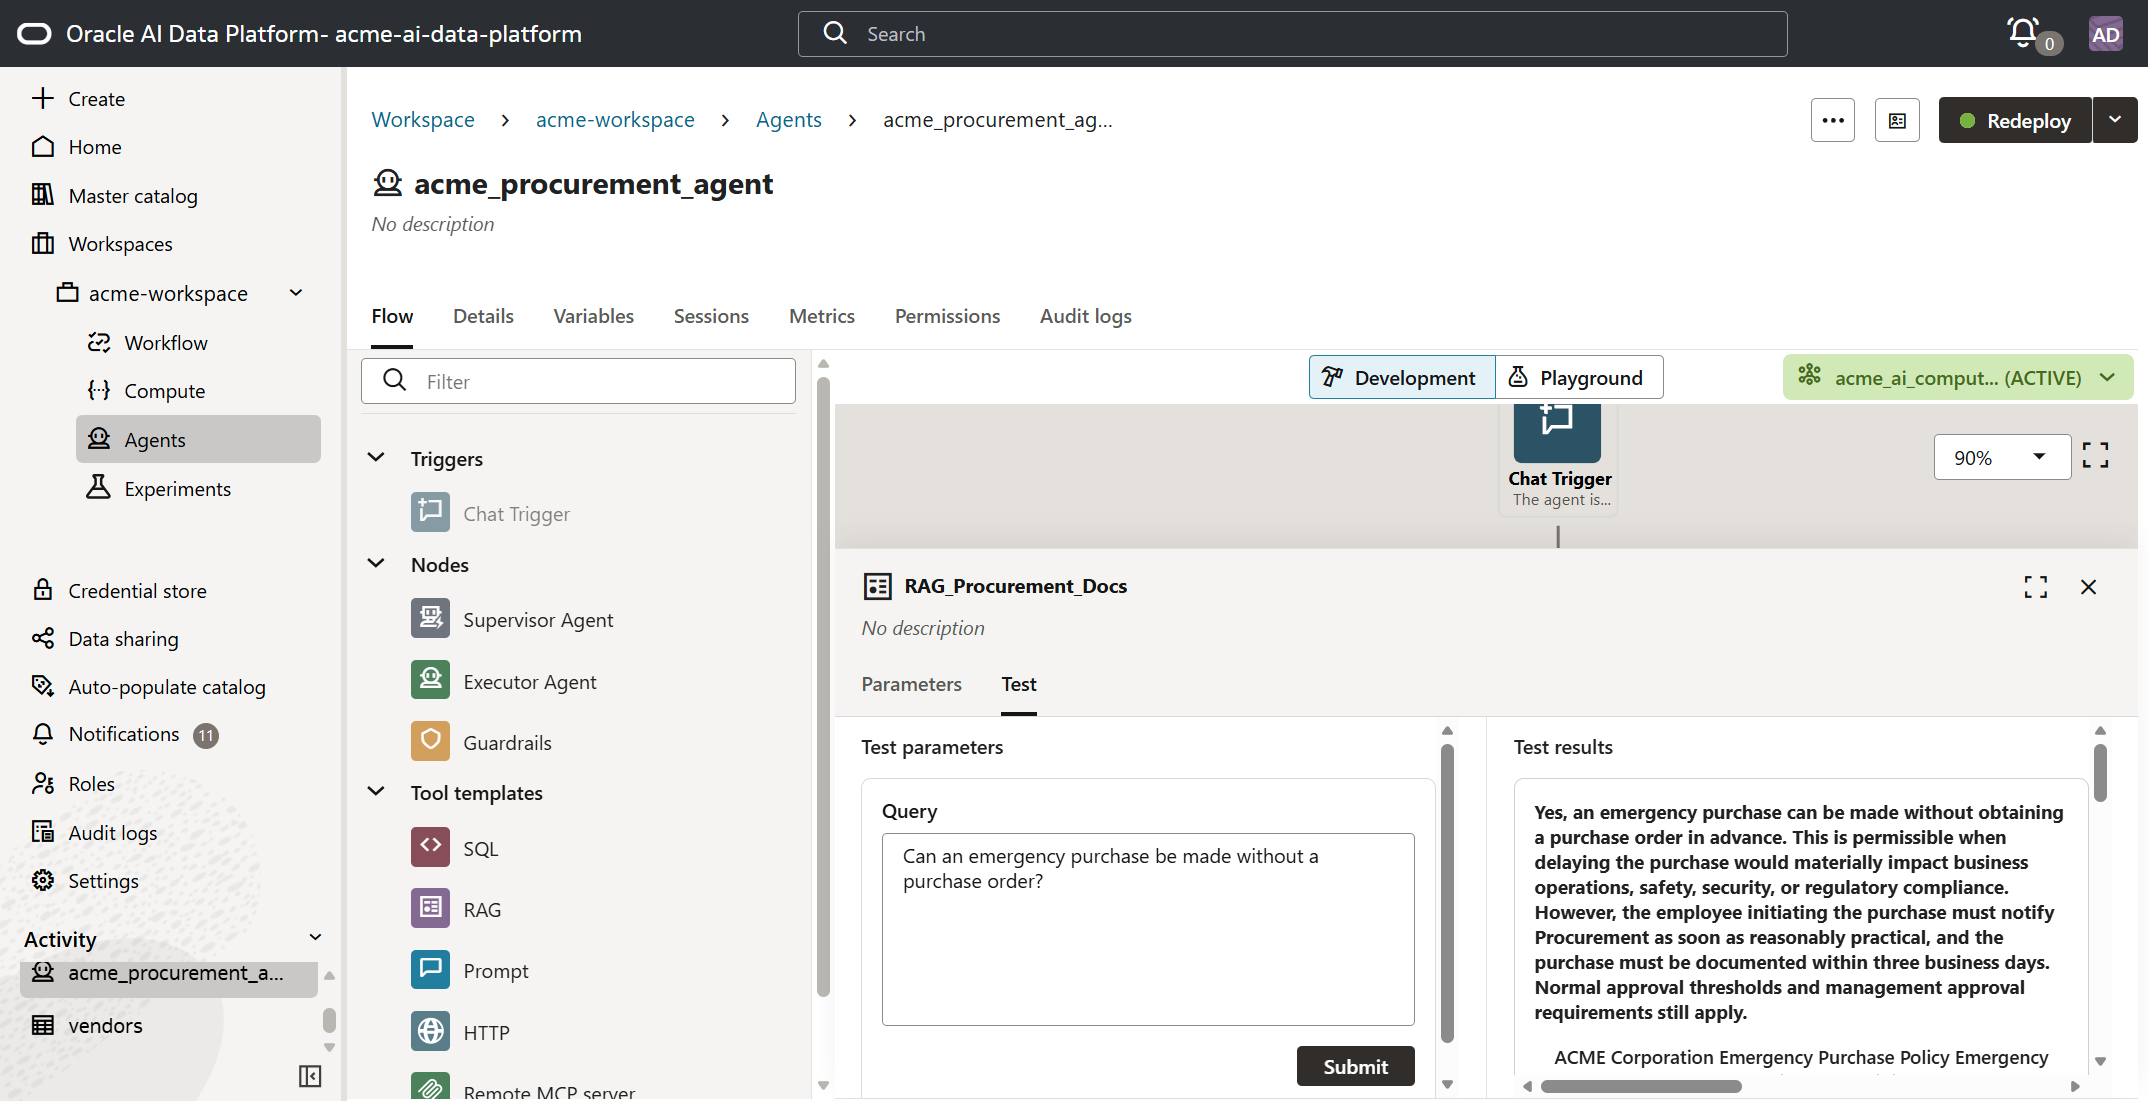
This applies to all tool templates.
* The value of LLM-based agents
The SQL query used in the SQL tool template is very specific:
SELECT
vendor_name,
procurement_status,
registration_status,
risk_level
FROM vendors
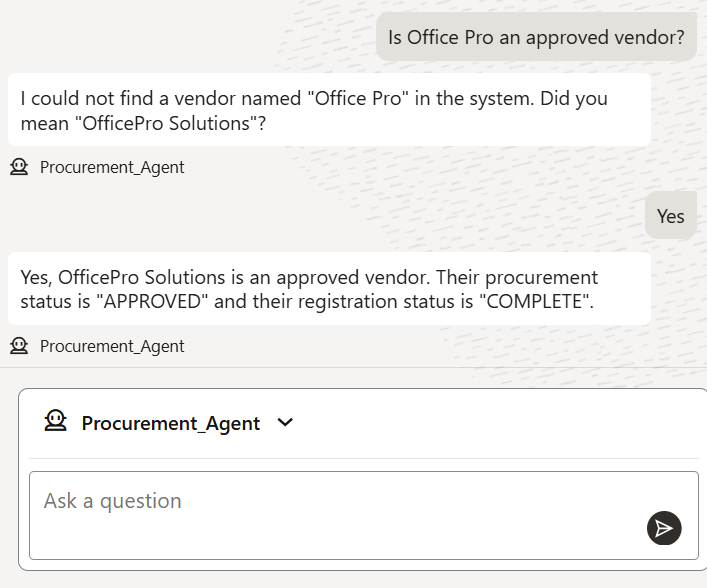
WHERE UPPER(vendor_name) = UPPER('{{vendor}}');So if the exact vendor name is not provided in the end user's question, naturally the record will not be found. One of the vendors is named "OfficePro Solutions". What if a variation on the name was attempted?
Wow.